Showing posts with label Simon Says Stamp and Show. Show all posts

Sunday, January 19, 2014

Smile Layout

Hello Everybody!

I created this layout using the sketch at Sketchabilities: Sketch 107.  I used spray inks (Mr. Huey and October Afternoon) and some modeling paste with a Tim Holtz stencil.  I also used one of my new stamps from the Bitty Grunge stamp (my sister gave me for Christmas).  There's washi tape and some Ideology on there as well.

My son who is older now than in this picture insisted on putting this bingo piece on there.  There isn't a significant reason for the number.  He just picked it and wanted to glue it down.  So I said ok-but I told him where to glue it down.  LOL ;)  The blue star is Tim Holtz and I used alcohol ink to paint it blue.


Thank you for stopping by!  Until next time my friends...Smile!


Friday, January 17, 2014

Vintage Anniversary Card

Hello Everybody!

I am so glad I finished this card and it turned out like how it was in my head! :)  I love it when a plan comes together! ;)

I recently bought some stamps and this couple was one of the stamps.  They are all previously used but totally brand new to me and I am so excited to start using them.

So all of a sudden I starting visualizing this card with the sketch from House of Cards and the stamp.  I used my Cricut and the Craft Room (love the craft room!) to get a scalloped circle cut out.  It's tricky when you are going for the negative.  But third time was a charm :)

I used Vintage Photo Distress Ink on my embossing folder and then embossed the tan cardstock that the oval had been cut out of.  I did practice this first before I did it.

I love how it turned out.  Then I adhered the ribbon and the pearls.  The purple flower was apart of a bigger flower so I detached it.  That is not usually in my nature.  If something comes together I use it like you are supposed to.  But the flower that this was attached to was so awesome and 3-D-ish I thought it would take away from my couple.  So I took this flower off and I am so glad I did!  I put an adhesive pearl in the middle of it.  Then I pop dotted this whole panel.  It creates a sort of window or frame for the couple.

I wanted to use this as a Valentine's Day card but my hubby said maybe an Anniversary card.  He's so smart-that's the perfect idea for this card!


Here are the challenges that I am submitting this to:

House of Cards: Cute and Vintage style using this sketch.  (I chose vintage.)

Simon Says Stamp--Anything Goes--Monday Challenge

Simon Says Stamp Wednesday Challenge-Emboss It!  The front panel is embossed with a Sizzix folder.


Thank you for stopping by!  Until next time my friends...good night! :)


Saturday, November 23, 2013

Mysterious Card...

Hello Everybody!

At Simon Says Stamp Monday Challenge they are having a fun challenge called "It's a Mystery."  It's where you might use something or do something in a "mysterious" fashion.  Check out the DT projects too, they are fabulous!

So here is my card:


For the background  I used Tim Holtz's Distress paints=scattered straw, persimmon, walnut stain and a bit of peeled paint.  Then I used his distress ink walnut to distress the edges.  I didn't use any water for the background.  But the mystery is in the flower...I didn't emboss white cardstock for the flower.

The mystery is in the flowers.  I used the T.H. tattered floral die and cut the shapes out of Mon Ami Crepe paper.  Then I painted it with some of the diistress paint and again no water.  I used bronze for the flower int he very back.  Mystery solved!


For the sentiment I used a Tim Holtz mover and shaker shape and scattered straw distress ink.  Tim's little letters and some brown ink to outline the shape.

Thanks for stopping by!  Until next time my friends....what's your mystery?

Saturday, November 2, 2013

A Little Brew for You

Hello Everybody!

Beside my Tim tag that I just posted-it has been forever since I have posted projects.  On Tuesday I was hammering out Halloween cards that I think made it to most destinations on Halloween.  Hopefully!

I try to make cards for about 17 people-friends and family that we can't spend that much time with because of geography.  So as the deadline nears I go from making each card different to making many of the same cards.  Here is one of those examples:


The stamps (witches and sentiment) are from Great Impressions.  I used Tim Holtz's Distress paints for the backgrounds.  If you look closely you can see each one is different.  I used crushed olive, seedless perserves, ripe persimmon, and scattered straw for each one.  I LOVE this color combo.  I can't explain it but all of these colors are just gorgeous together!  I bought these paints at Simon Says Stamp.  

I used the same paints on the sentiments too.  I just painted them without water whereas the backgrounds I used water.  The Distress Paints react with water-so cool!  I used black soot around the edges of the painted backgrounds.  Then I used black embossing powder for the image.

These were lots of fun to make-and quick too!

I am entering this in the Anything Goes! challenge at Simon Says Stamp and Show.  Thanks for stopping by!  Until next time my friends...don't drink too much brew.

Tim's October Tag

Hello Everybody!

Well I have finally finished my October Tim tag.  It took me long enough!


He extended the deadline-something I am very happy about!  So I used the color combo he used-Distress Paints in Scattered Straw, Crushed Olive, Seedless Preserves, and Ripe Persimmon.  I love love love these colors!!  They are so pretty together!  And seedless preserves is a pretty purple-different from dusty concorde.  Crazy huh?

I had to use different die cut because I don't have that cool frame (or owl or moon).  The frame is totally on my Christmas list though!  

I did use the Distress glitter in seedless preserves, spiced marmalade, and black soot.  I distressed the spiced marmalade spider after putting the glitter on.  The other two are too dark (I thought) for adding distressing color.  I added some mirror stars and my sentiment.  The ribbon is Tim Holtz ribbon stained with spiced marmalade, tea dye, and walnut stain.  This was the last of my crinkle ribbon, hence why it's so short! 

So I am entering this tag into the following challenges:


Thank you for stopping by!  Until next time my friends...you can never distress too much! ;)

Friday, September 13, 2013

The Beat Goes On...

Hello Everybody!

Hope everyone out there is having a good week.  It is Friday the 13th-Boo!  ;)  Usually my bad luck doesn't discriminate on what day it is-LOL :)

So I have been in a little funk lately.  Don't you hate that?  Everything just seems sorta meh.  But I am hoping to get out of this little funk after I made this tag.

DragonsDream-Tag it On has a challenge going on right now using blue, music, and tissue paper/tape.  Also, at Simon Says Stamp and Show-this week's challenge is to emboss.  Lastly, at Frilly and Funkie the challenge is Anything Goes!

The first thing I did was brayer distress stain and some distress paint onto my tag.  I haven't done that before and thought now would be the perfect time!  And then I roughed up the edges.  I used a little black soot distress ink around the edges.  And then it sat on my desk for like a week.

I kept checking to see when the challenge ended because it felt like forever before I could commit something to this little blue canvas.

So after looking at the Simon Says embossing examples and a couple of fabulous tutorials--things started to come together!  Also, there is a song by Eminem that he sings called "Lose Yourself."  Everytime I thought about this tag, the one line And the Beat Goes on... kept singing in my head.


I used a stamp from one of Tim Holtz's collections and embossed it with silver embossing powder.  And then the word awesome is from Little Yellow Bicycle (a few years ago) and I embossed it with platinum embossing powder from Ranger.  I tore and distressed some musical paper from 7 Gypsies.  And the ribbon is tissue tape from Tim that I distressed with peacock feathers and faded blue jeans distress inks.  And last but not least the umbrella man die cut :)

Here's a closeup.


Thank you for stopping by!  Until next time my friends...remember the beat ;)

Thursday, July 4, 2013

Aquarium Fun-A Scrapbook Page

Hello Everybody!

Over at Simon Says Stamp and Show they are having an Anything Goes. So I am trying to work on scrapbook pages, and I thought I would make one with a little mixed medium on it.

I used 3 different hues of blue gelatos and mixed them with light modeling paste-which is one of my favorite things right now.  If you want to get something like this and your not sure which one (because it can be overwhelming to go to that part of the craft store-for me anyways!) get this stuff first.  Martha Stewart has some stuff-just wait on that.  Fiber paste is fun but if you have to get just one thing to start with-my suggestion is this stuff.  You can mix it with gelatos to make different colors and when it dries-well it's cool and raised.

So the bubbles on the left are made with the paste and gelatos.  The circle on the right are made with a stencil from The Crafters Workshop and Salty Ocean Distress Paint.  The bottom of the page is sprayed with blue Dylusions ink.

I used some cool ocean die cuts from K&Company.  I am like addicted to buying their die cuts. I love them!

I had to hang my page up with clothes pins to get a better picture of it.  Because of the spray mist at the bottom it wouldn't stand up-LOL.  So please look past them at the top.  :)


Here is (hopefully) a closer look at the paste (which I used a dylusion stencil for these).  Also, a closer look at the journaling which is a circle from Bella Blvd.  It sorta looks like a bubble too.  The remember and camera on the kraft panel are stamps from Simple Stories. 


I hope you like my bubbles.  This was a fun page to make.  Until next time my friends...don't burst my bubble! ;)

Friday, May 3, 2013

Off to London!

Hello Everybody!

It would be so awesome if that were true!  But right now I am only taking crafty trips to London using my Paris to London stamp set from Tim Holtz.  :)

The challenge this week at Simon Says Stamp and Show is Passport to Fun.  Cross check complete!


The base is a 6X6 piece of chipboard.  I put gesso on a page from an old text book.  The I put some of Tim Holtz's distress paint on my craft mat and sloshed it around.  Not too much-I didn't want to make brown.  The I stamped some of the images from the Paris to London set using the paints and some with just regular ink.  There are these little stamps and I stamped them on white paper and painted them with different colors of distressed paints.  They are in the left top corner.  I cut out the word London and used paint around the edges.  I used tea distress embossing powder for the gentleman in the middle.  I inked him up in various ways because I thought he was too dark.  I still think he might need something (maybe a different picture LOL) but I put the pop dots on him and let him be.

He could be like walking away from all of the lights of the city and that casts a shadow on him.  Hmmm...that's a good story.  ;)  The twine is from Maya Arts and it's black and white-or was until I used some distressed stain to color it.  :)

Thank you for stopping by!  Until next time my friends...let's head up to London! :)


Friday, April 19, 2013

You're 4!

Hello Everybody!

I got my gelli plate out tonight and had a wonderful time making backgrounds!  For this card I used a blue paint and a texture thing from Martha Stewart.  We were at Home Depot last night in the paint section and Martha Stewart had a paint combing set for $6!  There were 3 different sized combs and one of the combs had two sides so that's like 4!  I used the biggest one on this monoprint.

Then for the square I used bubble wrap and edged scissors to cut out the square.  I put Tim Holtz Silver distress paint around the edges.  The circle is from a different monoprint.  The tissue tapes and letters are also Tim Holtz.


I am entering the following challenges:  Unscripted Sketches #206 4th Blogiversary


And Simon Says Stamp and Show: Make your own background.  They always give away a $50 voucher to Simon Says Stamp- so awesome! :)

Thank you for stopping by!  I am giving this card to a little guy that turns 4 tomorrow!  He likes art so I hope he likes this card!

Until next time my friends-Let's have some cake and ice cream! There are celebrations everywhere! :)

Sunday, April 14, 2013

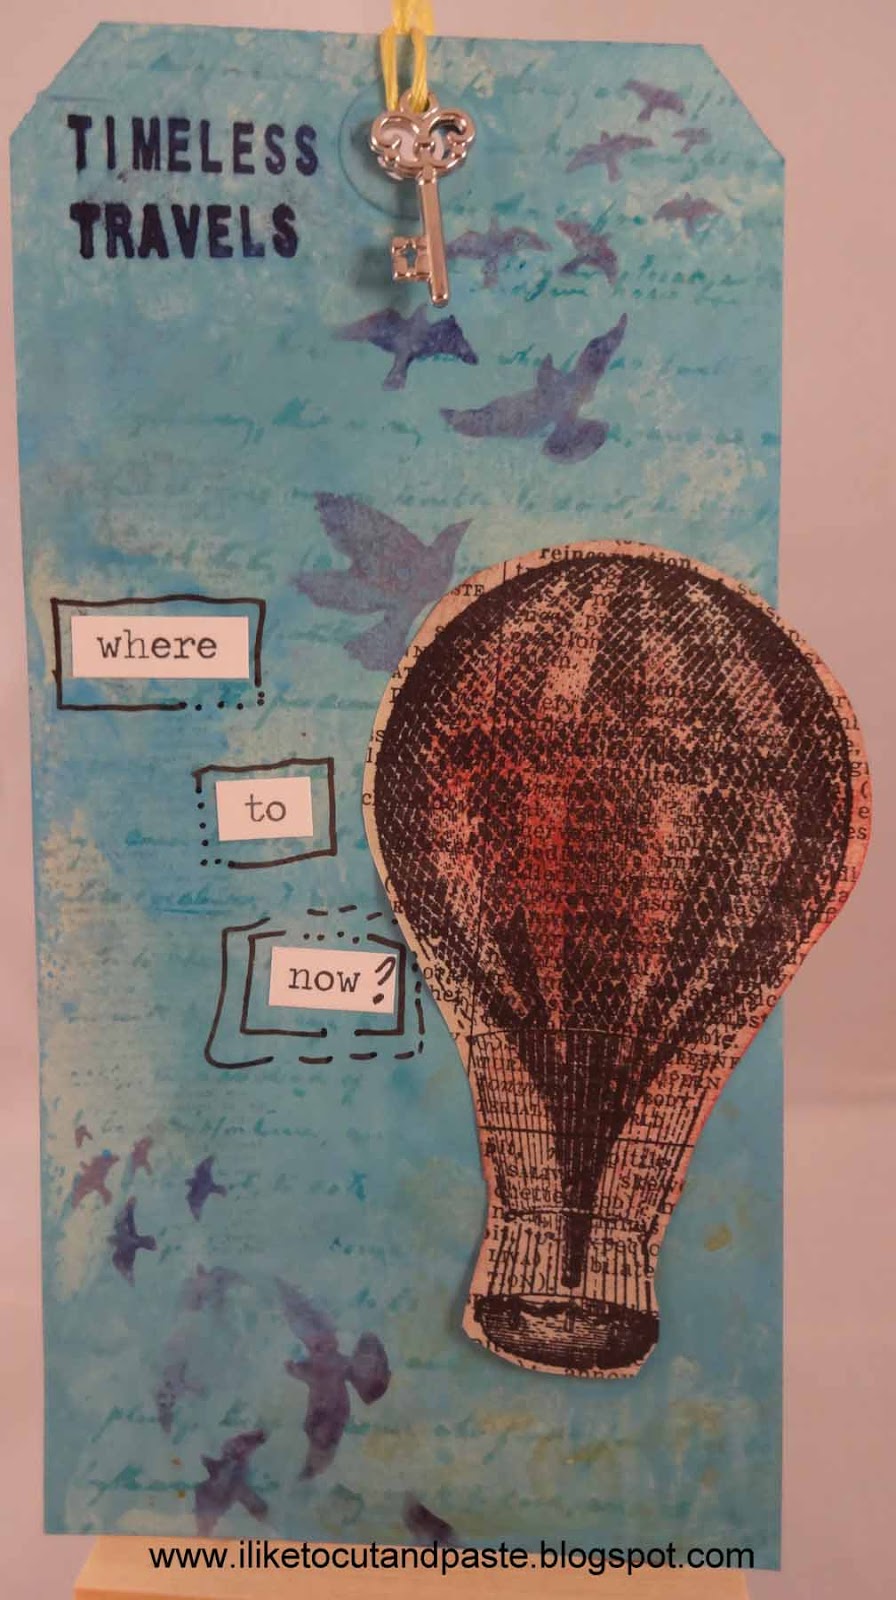
Where to Now?

Hello Everybody!

I finally got some of Tim Holtz's Distress Paints, and they are super fun to play with!  I made this tag for the Challenge at Simon Says Stamp and Show: Fly.


I used distress paints salty ocean and broken china for the background.  I stamped a script stamp using broken china distress ink and the birds (Tim H's) with dusty concord.  The hot air balloon is from Hampton Arts and the Timeless Travels is from Just Rite stamps (I think).  Those are Tim H's chit chat stickers too.  And a key.  :)

Thanks for stopping by!  Until next time my friends...Up up and Away! :)

Friday, April 5, 2013

Coffee and Beignets

Hello Everybody!

I finished this layout today for the weekly challenge at Let's Scrap.  About 3 years ago we took a trip to New Orleans.  It was lots of fun and one of the places we stopped at was Cafe du Monde.

I used a few different papers and some walnut distress ink.  I used printed tissue paper, Tim Holtz paper, DCWV, and Basic Grey.  Also, I used a Unity Stamp (on pg 2) and some Tim Holtz tissue tape and tag.

Because I used Tim Holtz Distress Ink and some of his paper I am also going to submit this to Simon Says Stamp and Show.  This week Anything Goes! And there is still time to play!


Thank you for stopping by!  Until next time my friends....mmmm beignets! :)

Saturday, March 9, 2013

ATC's with Numbers

Hello Everybody!

Over the next week or so, I am going to share with you guys the ATC's I have been working on.  Whew-am I worn out too!

These two here are for the challenge at Simon Says Stamps and Show: By theNumbers.  Simon Says Stamp is giving away a $50 gift card so fingers crossed! ;)

The numbers are on the right side of the first card and bottom of the the second card.  Each card has two layers of pattern tissue (like from a McCall's Pattern).

The first card I used a Tim Holtz die cut for the spool and dress form.  The dress form is made out of a material swatch from K & C Company.  I added a button and the sentiment is from a stamp set that I received from Cardmaking and Papercraft Magazine.  I love it when they send free stamps! :)


On the second card the sewing machine and dress form are from the same stamps as the sentiment.  I tried using a stamp from Tim H. Stampers Anonymous-one of the sewing stamps.  But it got blurry so I just "hung up some laundry."  LOL! :)  It's not totally hidden but it isn't showcased either.  Then I added some lace at the bottom.

Thanks for stopping by!  Until next time my friends...Happy Springing Forward! :)

Friday, January 25, 2013

What am I Known For?

Hello Everybody!

Over at Simon Says Stamp and Show the challenge is "What are you known for?"  This is a really great question, right?  So there are 2 sides of this-my side, like what I think I am (or should be known for LOL) and then there is the perception of everybody else.  So I conducted a study :)  I asked my friends on Facebook what they thought I was known for.  I got some great answers back like: always smiling, honest, fun to be with, hilarious, my laugh (which I tried to change one time but was unsuccessful), and positive.  Yeah!  I was super impressed.  No one tried to be funny or smart alecky either!

So using my friends words I made this mixed media "canvas."


So the inspiration for doing this embroidery hoop canvas came from YouTube.  I was searching for a different technique and ran across this video.  She uses canvas, and I didn't have canvas but I had muslin.  So that is, what I used for the base and I covered it in gesso.  Side note-put a plastic bag or something under your material.  Thankfully I was using my craft mat but if I wasn't-yikes!

I am also linking up to the Lessology Challenge-You are My Sweetheart-using Hearts and my upcycled item is my embroidery hoop.

Here is a picture of the main materials I used to create the background.


Close to My Heart makes a base paint that is pearl.  They make it so that you can add their re-inkers to it and create matching paint colors to their stamp pads.  So I used a yellow with it and painted the embroidery hoop.  The color on the hoop is this shimmery yellow goldish color.  I had a little extra so I put in on the gesso.


Then I used some Faber-Castell Gelatos-green.  I added water to it and used it like paint.  Then I took regular white acrylic paint and added Lawn Distress Re-Inker (like a drop or 2 it's very concentrated) and a couple of drops of yellow CTMH re-inker.  It came out fabulous!  I used bubble wrap and made spots and used foam letters (old and never been used before!) to spell out some of the words.  I used a rub-on for "sweet" from Prima.

I used a page from the dictionary for positive.  With my green and yellow paint I added the gel medium.  This allowed the paint to become translucent.  How cool is that!  So you can read the words because of the gel medium-awesome!!

This is fabric that I ironed Pellon to (a fabric stiffener) and then colored with worn lipstick Distress Stain.  I painted the chipboard pieces pink and then painted Rock Candy Crackle over them.


Here's a close up of the top.  These are chipboard hearts that I covered with musical scrapbook paper and distressed with barn red.  The scissors are on there because my friend Mynnette said I must have them-and she is right!  I used pop dots on the big heart so the scissors would hang properly.

The center of the happy flowers are those little letter beads that kids would make bracelets with.  I got those at a garage sale-score! ;)


This is a recent picture of me-I got a hair cut-Yay! :) I love this light bulb (TH).  I dyed it with yellow alcohol ink and added yellow stickles.  I added the crown because my friend Melissa said I was the Queen of Scrapbooking-LOL :)  I don't know if I am-I don't have my own paper line yet but I am definitely a Princess!  LOL ;)  That's a Tim Holtz crown that I used alcohol inks-white picket fence and red to make pink.  That beautiful flower is a Prima flower.


I hope you like my mixed media canvas and learning a little bit more about me!  :)  Until next time my friends...have a great weekend!

Sunday, November 18, 2012

Wishful

Hello Everybody!

Today I am sharing a Christmas card I made for the following challenges.  Each challenge inspired an element on this card.

Simon Says Stamp and Show: Stamping Without Ink-I used silver embossing powder on the snowflake stamp


Unscripted Sketches: Sketch 185


CAS-ual Fridays-Winter project featuring blue-CFC79


Here's my card.  I just bought some Martha Stewart snowflake stamps.  This is one of them (yay! I am already using them!)  I embossed it with silver embossing powder.  The white square behind it is where I took the Versamark pad and made the square and then used white embossing powder behind it.  Wishful is from the Tim Holtz word stickers.


Here's a closeup.

Thank you for stopping by!  Until next time my friends...It's beginning to look a lot like Christmas! :)

Saturday, November 10, 2012

Merci!

Hello Everybody!

I am so excited to show you my card!  I made the background for it and I used mica for the first time!  Ok so let's take care of business first and then I can show you my card! :)

I am submitting this card to the following challenges:

Simon Says Stamp and Show: Inspiration Francaise-Eiffel Tower stamp from Hero Arts

Our Creative Corner: Make Your Own Background-inks and stamps

Moxie Fab World: Alphabet Stickers Challenge-Greeting on the card

So here's my card.  I bought a new little easel to hold my cards.  Yay! :)  I guess I will figure out if I will crop it out but for now there it is.  I also bought in that same little shopping trip some mica bits.  They are from Stampendous and have 5 different colors.  I have seen mica forever-but now I have some.  So I applied glue to the edges of the black cardstock to get it to stick.  I did this after I gold embossed the Eiffel Tower.  Then I sprayed gold Pearls Mist onto it.


Here is my background.  I love this background-so it must be one of the prettiest ones I have made.  LOL!  I used spiced marmalade and bronze distress stain and mustard seed and rusty hinge distress ink.  I applied them to my mat and spritzed a little water.  The result is just awesome!  Then I stamped the script on top.  But that wasn't enough.  So after this picture I went back and added swirls and polka dots using stamps by Stephanie Barnard (I got them a loooong time ago at CKU).


Here's a close up of my card.  The title is made from Making Memories sticker letters.


Thank you for stopping by!  Until next time my friends...Bonsoir!

Friday, November 2, 2012

Mirror Mirror-Who is the Steampunkish of All?

Hello Everybody!

I know I am not the most Steampunkish of all but it doesn't make me love it any less!  Gears, clocks, keys, oh my!  This is one of my first all out projects using a Steampunk theme.  So let me show you, and I will tell you more about it as you scroll down! :)

I am entering this piece into the following challenges:

LESSology: Challenge: #19 Mirror, Mirror on the Wall--upcycled mirror

Simon Says Stamp and Show: Just Add Pearl--Perfect Pearl Mist and Pearls on the Butterfiles

So here is my mirror.  Eek!  I am so happy at how it turned out.  The mirror itself is 14 inches long plus the frame around it.  I upcycled the mirror.  I bought it at Goodwill for $4-Score!! :)  There is a mix of pictures taken from inside and outside.  Experiments with lighting-what can I say?  :)


Here's another picture of the mirror. :)


Here are the gears that go up both sides of the mirror.  They are from Tim Holtz die cut.  I painted them with gold dabber and then rubbed black stamp ink on them.  Some have a little bronze distress stain.


Here is the right side.  That pocket watch is Jolee's.  Rubons are from 7 Gypsies and well as the hooks you will see.  There's a lot of Tim Holtz Ideaology on here also. :)


I put a few butterflies to bring in a feminine element.  For the butterflies I used music paper cardstock, Martha Stewart punch, Want2Scrap pearls, distress inks, Perfect Pearls mixed with water.


The hooks are from 7 Gypsies, the gear is from Bead Landing (the ones my husband bought me in my last post), and Tim Holtz philosophy :)


Here are more of those cool gears mixed in with Ideaology and a butterfly.


Here is the top of the mirror.  The 3 men are one of Tim Holtz's stamp.  I used black embossing powder than spray them with blue Dylusions spray.  Then I sprayed Perfect Pearls Mist gold on them for some shimmer.  They were very blue-so I added some bronze distress stain and some Perfect Pearls powder and water (gold and silver).  Then I inked the edges so they would stand out.  I used 3 pop dot squares stacked on top of each other (2 times) to adhere them to the mirror.  

I air balloon is from Hampton Art.  I stamped it on dictionary paper then mounted it on black cardstock.  I sprayed silver Perfect Pearls Mist on it.  The gears in the corner are rub-ons from 7 Gypsies.


Here is the bottom of the frame.  The little light bulbs are actually burned out light bulbs from the microwave. The first time my husband changed the bulb, I said can I have that?  It's really cute!  It looks like he had to change it again, because when I found them there were 2! :)  So they are recycled!


Here is the original mirror-taped off-ready for a new look.


Here are my original supplies.


Here is the mirror painted white.  I did a second layer but you could still see the old color come through.  At first I wanted the mirror to be shabby chic and girly.  But I couldn't get an even white all the way around and I am a bit impatient.  I saw a Steampunk blog hop and I had my gears so I changed the theme of my mirror.  Then I painted it with the Gold Dabber by Ranger/Tim Holtz.  I took the top off and painted it with a paintbrush.  

So here is another picture of my mirror (and me!).  Thank you for stopping by!  Until next time my friends...like what you see! :)


Wednesday, October 3, 2012

Christmas Frame

Hello Everybody!

I have to say first that out of all of the cards I make-I do not make Christmas, generally.  I used to not make them at all.  And then last year with all of the challenges and spirit in the air-how could I not?

Well this year I am going to make a few Christmas cards to donate.  So the first place I look is 52 {Christmas} Card Throwdown.  And this week's challenge is anything but cards and tags.  I laughed out loud!  But this was kismet (my new favorite word).  I happened to watch an episode on Scrapbook Soup and the lady on there had heat embossed on wood.  WHAT?  And why didn't I think of that!

So here I bring you my project for the following challenges:

52 {Christmas} Card Throwdown: Anything but a card, ATC, or tag goes

Simon Says Stamp and Show: Leaf-spiration

Here's my finished frame.  This is not a metal frame.  It is a wooden frame from IKEA.  I used silver WOW embossing powder on it.  And I used regular Versmark directly to the frame and then added the embossing powder and heated it.


Here my wooden frame.


Here's a closeup.  You can even see my left over embossing powder in the coffee filter :)


Here is on edge.  This was a little more challenging.  What I realized is that I liked that not quite covered look.  I did go back and put a little white paint over the wood and whiped it off of the "cooked" embossing powder.  Next time I will paint the frame first.  :)


These are floral Christmas leaves.  I used Crystal Stickles to outline the leaves.  The rhinestones are from MAMBI.


I put a piece of velvet ribbon on the bottom of the frame, and the Christmas tree is from Jolee's.


Now I'm ready to find a picture for my frame!  Until next time my friends...have a great rest of your week! :)