Showing posts with label Wall Hanging. Show all posts

Sunday, March 6, 2022

Limited Edition Mixed Media

 Hello Friends!

I am so excited to share with you this 6X6 Canvas Magnet that is all sorts of grungy fun!


I love love love mixed media and knew I had to participate in this challenge. Also, I watch Ana from Finnabair do a live stream on her new products and I was totally inspired to make something. She had these canvases that had some clay pieces and they were showcasing her new waxes-but they easy looking to make. So I knew I wanted to make something like that and this evolved from it.

This is what I started with: the 3-d gear folder from Tim Holtz/Sizzix, Ranger foil sheets, and the canvas magnet itself. The canvas magnet is a thin canvas that has a magnetic backing. Look at how shiny that embossed foil is!


Then I painted it black and once dry I scuffed it up with steel wool.


This is a foundry number from Tim Holtz and I edged the outside of it with black paint and wound up wire through the holes. When it gets glued down I actually glue it on top of 2 pieces of craft foam to give it dimension.  Underneath this is a Tim quote chip that I also edge with black paint. It it thick on it's own so I glue it straight to the canvas.


I used metal gears for depth. But I wasn't feeling the copper color so I painted them black.


The main centerpiece with the gears and the gentleman are clay pieces. I used finnabair and stamperia molds. On the  main gear I added some paper stones and microc beads.


Here is the canvas-now it's time for Finnabair waxes! 


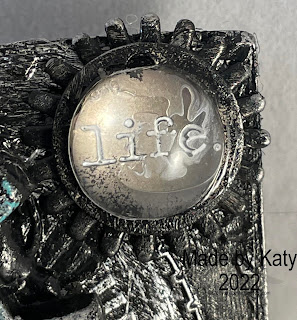
This is so cool to me-lol. It's a gear painted black with a word coin from Tim Holtz (I used distress picket fence to make life pop.) Then I put a Finnabair Melange on top and it made the word life bigger. The glossy accents seemed to have dried weird but that's ok. 

Here are all of the colors of waxes that I used on gears. Old silver is just a favorite-what can I say?  :)


Here's a side view of my project.


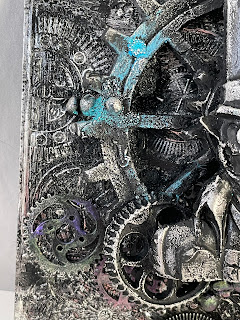
Here's a close up of the gears and area "painted" with the Finnabiar wax.


Looks like there's a little patina on the big gear :)

And here is a picture of the finished canvas. It was awesome to make a steam punk project again-it's been a little while ;)

                                               
Thank you for stoppin by! :)


Friday, February 18, 2022

Metal Heart Wall Decoration

 Hello Friends!

I am super excited to show you a metal heart that I decorated. At my work there were two metal hearts that were donated and my friend at work said we should have each make one and have a contest. Now my friend has mad skillz and paints like for real paints lol. I just do what I do. So I said ok. And then there was a little stress because I wanted to make an awesome. So here's mine:


I have some pictures of the process. Before I get into that I want to take care of business. I am entering this heart into the Funkie Junkie Boutique Blog: Valentines.

So the heart started like this-plain and shiny.


So the question with a metal heart--do I let the metal shine through? Do I cover it with paper? It didn't seem right to cover it all up. Also, I wasn't sure how things would stick to the metal so I covered it in clear gesso.


The gesso dulled the metal, but the metal was still there.


I used a finnabair stencil and some matte paste.  I love this script.


Then I used a Simon Says Stamp heart stencil with crackle paste.  Oh the crackles!


I have 4 different color pink paints. I was going for an antique look with pink and beiges. But sometimes the piece talks to you and the idea changes. So I used this pink paint sparingly and added water.


Here it is finished. It's also tough not knowing how I was going to cover the center. But I loved how the stenciled parts and paint turned out.


The window is a Etcetra window which means it's laser cut out of a thick material. I painted crackle paint over it. I cut a piece of watercolor paper to size and sprayed it with a distress oxide and one of the Christmas mica sprays.  The shimmer is so pretty!


Here's the middle. I used foam and hot glue to adhere the window. I knew I was going to tuck things under the window so I needed some depth.  Some of the flowers are from Hobby Lobby and some are those little flowers used in weddings. I believe the silhouette of the lady and the frame are Kaisercraft and I painted them with a pink sparks paint form finnabair and a black sparks on the frame. Then I used some finnabair wax to tone it down.

I cut some flowers and greens from Tim Holtz Sizzix Garden Greens and Funky Floral #1. The silver glitter leaves are cut from a table runner I bought at the Dollar (25) Tree in the party section. I had the ideology arrow and word coin. For the coin I used the picket fence crayon to make the word love pop. I used a wire to add the coin to the arrow. I glued flowers and added some micro beads on the bottom. 

There is some lace under the window and then the flowers and greens. The flowers look like little circle but I think they are supposed to be Lantana or something. LOL. And then the rest of the leaves layer up from there.


Here's another picture of the heart. I also added a clay bird sprayed with the mica spray winterberry-but very light. 


So that's my heart-but I know if I was reading this post I would wonder what did the other heart look like?

Here is the my friend's heart:


So she put a song Jack sings-like the sheet music in the background and burned the edges to reveal the metal heart. She painted Jack and Sally (I told you she had mad skillz). And she made the jar of Deadly Night Shade out of clay. So beautiful! 

Thank you for stopping by! 

Thursday, June 27, 2019

Fairy House

Hello Everybody!

I am super excited to share with you my most recent project!  Like seriously excited! First, I have to tell you that this is the first time I have ever made a Fairy House (or any place for a mystical creature to live.) Second there are a lot of pictures.  So I am going to take care of business first-and then please feel free to proceed on if your time allows :)

So here is my before and after photos:


I would like to submit this Fairy House to the following Challenges:

Frilly and Funkie: Home Sweet Home


Mixed Media Warriors: #40  Old to New


I have to first tell you also where my inspiration came from.  I was scrolling Instagram like I do and came across this house that Adrijana at Paper Beauty AK posted.  And I like fell in love with it.  Crazy-I know but it totally inspired me to make my house.  So Thank you Adrijana!  

I have had this house for about 2 years.  I bought it at Goodwill in August 2017.  My husband and I used to go to thrift stores a LOT and I would collect wood things with the hopes of transforming them into other things.  I buy faster than I create LOL.  And it's been awhile since I made anything this big (usually I make cards and scrapbook pages).  


It's funny because when I have shown a couple of people the before picture they say "oh that's cute."  And it makes me feel bad because all I saw was a project.  LOL  It's about an inch or so thick.  Before I decorated it-the house could stand on it's own.


I cleaned the dust off with a wet rag.  And started to gesso it.  Then I realized I didn't want the shutters-so I took those off.  The little nails were left behind so I left them there.  


I added Power Tex 3-D balls (some might call them art rocks) and painted the house white (Martha Stewart Paint).


On the right you an see the supplies and the finished paint.


Inspired by the other house-I wanted to use a nest too.  This is a Melissa Frances nest and those are Dollar Tree golden eggs.  You can find these kind of nests at Hobby Lobby also (like in the moss or fairy house section I cannot remember which).  I hot glued the eggs inside but not the nest just yet.


I painted the roof gray.

The roof makes me want to have a PayDay candy bar.  This is little gravel that came with a beta fish set.  I did not use the gravel for the fish because I refuse to clean dirty fish gravel.  So these are clean straight out of the bag and I used hot glue to apply them.  I only burned myself like 3 times.  ;)


I used my silhouette machine to make windows and a door.  The cut files came from the Silhouette Design Store.  I took clear extra laminating and applied yellow tim holtz alcohol ink.  Then I cut them to fit the window and glued them on with glossy accents.


I painted the underside of the roof a beige color.  It was gray before and didn't look right.  Then I added spring green paint mixed with white and dabbed it off with a paper towel.  This was cool because it created a lighter more organic feel.  The inspiration house is what gave me that idea.  That's one of the things I loved about it.


I wanted dimension and I figured an awning above the door would be a perfect way to accomplish that.  I took some light cardboard and cut it into pieces and curved them.  I covered them with these fake leaves I found in my stash.  I used hot glue to adhere and then I added more leaves to the front of the awnings.  

The door-I painted with tim holtz distress mustard seed.  Adhered material to the window using mod podge fabric glue.  That stuff is awesome for adhering fabric (me just sayin').  Bliss sign that came in a scrapbook kit and an orange brad for the door knob.


So here is what it looks like now.  Time for some greenery!  I added paper grass to the front and it's a Lawn Fawn die.  Then in my stash (gifted to me) are the green "bushes." I added moss (so fun!  and totally inspired) and then I found some little critters to put in places.  Also, I glue on the nest.


Ta-Da!  I painted a wood veneer butterfly pick raspberry (TH Distress Paint).  I bought moss from the Dollar Tree and Hobby Lobby.  There are many different types of moss.  :)

Outside Picture


Side View

Other Side 


Inside Picture


And these are closeups of the little critters I found-that I didn't remember having.  LOL


And here it is again.  All finished.


If you made it this far--thank you and big hugs!  Until next time my friends...stay creative! :)

Monday, March 27, 2017

Dreams Plaque

Hello Everybody!

I am so excited about this project.  It's started out as a wooden plaque-you know the ones that the big box craft store sells for a couple of dollars.  And they are filled with potential-and yet I am always afraid to commit to an idea.

Well I'm sure you have seen the beautiful canvases and projects done by Finnabair.  (If you haven't google it-they are beautiful!)  So I thought what if I could do those type of projects with stuff I already have.  So I started-but I couldn't paint everything in gesso.  And I think I'm some sort of weird purist-like I bought something in red so it's meant to be red not some other color.  I know--it's weird.

So here is my Finnabair inspired-but completely different plaque:


I couldn't paint those red flowers or bingo chips.  And once this lady (from Tim Holtz) was sort of placed on this plaque-I knew this is where she belonged.  

First I'm going to take care of some business-then I will show you the steps on how this wall hanging came together.

I would like to submit this plaque into the following challenges;


For the plaque I started with the wooden surface.  Then I picked out the stencil I wanted to use which is Tim Holtz's.  I used light modeling paste.


It came out really nice!


I added more paste to the sides to make it blend in better.


I painted it with spun sugar.  But it started to look way too pink.  


So I added walnut stain and scattered straw to tone down the pink.


Once it was colored enough to go with the picture, I picked out things to glue onto the plaque.  Most of this fun things are Tim Holtz's.  The little wooden frame is not.  I painted it with the walnut brown paint.  The clock is from Michaels.  The flowers are some I had in my stash along with the pearls.  I was happy to use some of the bingo chips-I have lots of those. :)


My husband bought me these cool metal gears for Christmas, and I'm excited to use them on this project.  


Here's the plaque again,  Thank you for stopping by!


Until next time my friends...stay creative! :)