Showing posts with label waxes. Show all posts

Wednesday, August 3, 2022

Happy Birthday Cow Card

 Hello Friends!

I made a birthday card for my friend who loves cows. 


I used silver cardstock for the base. On watercolor paper I sprayed the following Tim Holtz sprays: stain wilted violet, chipped sapphire, blueprint sketch, mica snowflurries, and Dylusions crushed grape mica spray.  Then I embossed it with a star embossing folder from cuttlebug (called star blanket).  I applied Finnabair old silver was with my finger on the stars to help them pop.

The cow is from Silhouette and I cut it out on my cameo.  So is the hat. I used stickles and a pom pom to make the hat a little jazzy.

The grass is a Lawn Fawn grass die. I used the following sprays for the grass from Tim: shabby shutters oxide, mowed lawn stain, rustic wilderness stain, and mica tree lot.


Here is a side view to hopefully pick up some of the shine of the mica and wax. This card was super fun to make :)

I am linking this to the Simon Says Monday Challenge: Happy Birthday.  Simon Says Stamp Challenge is 12 years old--Happy Birthday! :)

Thank you for stopping by! :)


Wednesday, June 22, 2022

Use Your Wings Card

 Hello Everybody!

Happy Summer so far! I created this card for a graduation-I am a little late-but better late than never!  So this is for my cousin :) Yay! And it's not a traditional cap and gown but I think that's ok.


I used:

Tim Holtz Silver Cardstock (background)
Sticky Sheet
Finnabair Fine Metallic Flakes-Dublin
Air Dry Clay and Mould from Finnabair for the butterfly
Tim Holtz Quote Chip
Tim Holtz Sterling Foundry Wax
Finnabair Peacock Wax
Brads

So I was watching a Sizzix video and Pete talked about using metallic flakes with an adhesive sheet-and that is what I did for the pretty green/blue/silver panel. He embosses his but I couldn't. At least not this time around-I just thought it was gorgeous. I also sealed it with modge podge so it doesn't rub off too bad if someone touches it.

The clay butterfly-I just directed applied the foundry wax-little by little and as I rewatched Tim's video so I did it correctly).  When the butterfly was all silver I then added the peacock wax over the highlights.

I used my crop-a-dile to make holes in the quote chip and I put some brads to make it look more finished since I didn't ink it or anything.

I used glossy accents to glue the butterfly and chip quote.

I am linking this to The Funkie Junkie Boutique Challenge Blog: Stuck in the Middle.  The butterfly and sentiment are in the middle :)

Thank you for stopping by!


Sunday, March 6, 2022

Limited Edition Mixed Media

 Hello Friends!

I am so excited to share with you this 6X6 Canvas Magnet that is all sorts of grungy fun!


I love love love mixed media and knew I had to participate in this challenge. Also, I watch Ana from Finnabair do a live stream on her new products and I was totally inspired to make something. She had these canvases that had some clay pieces and they were showcasing her new waxes-but they easy looking to make. So I knew I wanted to make something like that and this evolved from it.

This is what I started with: the 3-d gear folder from Tim Holtz/Sizzix, Ranger foil sheets, and the canvas magnet itself. The canvas magnet is a thin canvas that has a magnetic backing. Look at how shiny that embossed foil is!


Then I painted it black and once dry I scuffed it up with steel wool.


This is a foundry number from Tim Holtz and I edged the outside of it with black paint and wound up wire through the holes. When it gets glued down I actually glue it on top of 2 pieces of craft foam to give it dimension.  Underneath this is a Tim quote chip that I also edge with black paint. It it thick on it's own so I glue it straight to the canvas.


I used metal gears for depth. But I wasn't feeling the copper color so I painted them black.


The main centerpiece with the gears and the gentleman are clay pieces. I used finnabair and stamperia molds. On the  main gear I added some paper stones and microc beads.


Here is the canvas-now it's time for Finnabair waxes! 


This is so cool to me-lol. It's a gear painted black with a word coin from Tim Holtz (I used distress picket fence to make life pop.) Then I put a Finnabair Melange on top and it made the word life bigger. The glossy accents seemed to have dried weird but that's ok. 


Here are all of the colors of waxes that I used on gears. Old silver is just a favorite-what can I say?  :)


Here's a side view of my project.


Here's a close up of the gears and area "painted" with the Finnabiar wax.


Looks like there's a little patina on the big gear :)


And here is a picture of the finished canvas. It was awesome to make a steam punk project again-it's been a little while ;)

                                               
Thank you for stoppin by! :)


Monday, July 19, 2021

A Birthday Vignette Box

 Hello Friends!

It was my husband's birthday and I wanted to make him something special. Combine that with my love of making vignette boxes-and a special gift was made :)

This is the second biggest vignette box in the set of 4 when you buy them. I also added the wood frame that are sold separately. So here is the box.


Then here is the box with tiny lights! I love tiny lights. Tim suggested a Fiskars hand drill to help put the lights through-and my husband bought me one.  It is very handy and not intimidating.  I don't usually use drills and stuff so for me this hand held drill is really nice.


Then here is the vignette box with tiny lights in a dark room. LOL. Those lights are just magical!


Starting here I love this because this is a little fish tank made with:
Red Foil paper and the smaller fish from Under the Sea die
Dimensional dome and the circle to cut it from Tiny Snowglobes dies
Baubles painted with Aqua and Sail Boat Blue Ranger Alcohol Inks
Googly Eye

The baubles look like real bubbles with the tiny lights on. And there is no filter! :) 


This Tim Holtz decorative dome has little bead dice from my stash. I glued them together using collage medium. Some how some magic happened here too and the dice look like they defy gravity. lol


These chess pieces are plastic and I used pitch black and gold alloy to dress it up a bit. This is the king piece :)


This is a Tim Holtz base that I bought for this project. I thought it would be fun to take the Vignette Box a step further. The package comes with two different sizes-this is the larger size. I used gold gilded alloy in the recesses and black on the embossed. 


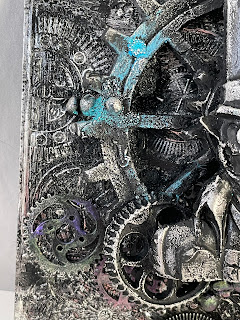
Here is one side of the vignette box. First I painted the whole box and frame with black gesso. Then I painted collage medium over it. Then I tried to use some grit and crackle paste but I'm not good at that yet. I don't know how to get it mixed because I tried mixing it with paint. So I painted over it with brown and black paint. Then I got out my Finnabair Rust paint effects and created the rust. I left the crackle. The I went over the black it Finnabair vintage gold wax. That's what makes the frame dots on the front gold also.


Here is the other side of the box.


Top of the box. That little record player is from Hobby Lobby a long while ago. I love minatures but I don't need another hobby. So when they are on sale and I think I can use them-I will buy them. But I really have to think if I can use it and not buy it just because it's cute LOL. (The struggle is real.)


The sweet lightbulb is from Prima many years ago.

Metal gears in my stash (could be Tim's).


The pen nub and pen chipboard are both Tim's. The background paper is 7 Gypsies. I used a bit of walnut ink distress oxide here and there. Also-I used some washi tape with gears to hide the hot glue on the tiny lights wires. 


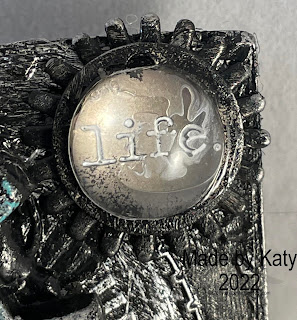
The laugh was a token I bought at a thrift store with my husband. There was a small handful of them. I finally used one! :)  Yay! And an awesome paper doll.


Thank you for stopping by today!


Monday, May 3, 2021

Summer Time Mixed Media Canvas

 Hello Everybody!

I love summertime! So to kick it off a little early I made this 4 x 4 (inches) canvas.


The trees are paper clay and a Finnabair mold. I painted them with golden paints and used a finnabair vintage gold was to highlight. 

On the canvas is finnabair patina paste/paint. I glue shells and a sand dollar and painted them with different finnabair sparks paint. It is so pretty! It's translucent so you don't loose the shell like with an opaque paint. I filled in the spaces with silver micro beads. On the island I used a sand and glue product from a company called muddpuddles. And some word stickers from Tim Holtz-upon a shore. 


I am entering this into the following challenge:

Crafter's Castle: May 2021 Anything Goes

Thank you for stopping by! :)

Sunday, May 2, 2021

Anniversary Card

 Hello Everybody!

Today I am sharing a card I made for my husband for our 13th wedding anniversary. 

I used Tim Holtz's embossing folder, and 4 leaf clover  embossed die, quote chip, and the hardware heads. I used a little black soot distress ink around the clover. And a little rustic wilderness around the quote chip before I put some gold wax from finnabair around it. I also used the gold wax on the four leaf clover. For the embossed cardstock I used brocade finnabair wax. The card stock was just plain brown before-and it's always cool to see it come to life. 

The lace in the middle is something I had floating around my desk from another project. For the 13th anniversary lace is part of the old tradition and textiles is part of the modern gift giving tradition. We aren't lacey people so this worked perfectly. :)


I am submitting this card to:


Thank you for stopping by! :)


Friday, February 12, 2021

Steampunk Valentine Frame

 Hello Friends!

Tonight I am sharing with you one of 6 frames I decorated. This is the 12th day of my 14 Days of Valentine's Craftiness. And there are still so many fun things left to share! But for now check out this cool frame!

I am submitting this frame into the following challenges: 

The Male Room: #147 Steampunk 

SanDee & Amelie's Steampunk Challenge: Steampunk Jan/Feb Challenge


Here's how I made it. These wood frames came from Hobby Lobby. And I will be honest-I looked all over Pinterest for inspiration and there was none. LOL. Maybe I looked it up wrong. So I started to gesso this frame and paint it pink.


Here it is gesso. Then I used some pink craft paint and what I saw was a bit of natural distress. If you look at the first picture again you can see white show through. That's the gesso. I could have painted over it-but I liked the distress of. And this was good because it was like the personality of the frame was starting.


I have pre-made clay pieces that I make when I'm watching tv. And it's great for times like this. I brought them out and sorted through them so see what would fit. So this cluster here is all prima moulds. I also painted them with black gesso and then used various finnabair waxes. This is definitely one of my favorite parts. I love the waxes!  I also took some of the matte wax and went along the edge of the frame. You can see it here behind the gears. Also, I hot glued this gears on.


This bottom cluster is also clay gears except the bottom is Prima and the top 2 are from Mod Podge. And the LOVE is a metal charm. 


This was made using a Tim Holtz stencil and vintage gold finnabair wax. I love this stencil. And you can see the pink paint and the white showing through and the texture it creates. and then the wax applied on top of that. So cool! :)


I didn't keep this frame-I mailed it to a family member. I put a picture of all of us together the last time we were together which has been a while. I made the pic black and white and it turned out really nice. :)

Thank you for stopping by!  Hugs!


Wednesday, January 27, 2021

Tag of Magic

 Hello Friends!

Do you ever have a word for the New Year? I will see people post a word to describe the overall goal for the year-maybe like Happiness or Determined. I usually do not have a word. And I have gotten away from resolutions because they just don't seem to work for me. However! This year is different as far as the word goes. Stay with me. :) 

Somewhere I was inspired by the word Magic. My last project was about a magical garden place in a book. And I wasn't finished with the word Magic. And (I do believe God puts this on my heart) I wanted Magic to be my word for 2021. And not the scary voo doo kind but more like The Disney Magic kind of magic. Making people happy-especially folks who weren't expecting anything. 

So how can one be a bit more "magical" especially during a pandemic? Here is my answer-to fill up my family and friends' mailboxes over the year more than last year. I am working on more cards. I am going to mail out more cards. And really try. So this tag is an inspiration for that. Should I forget what my mission is-this tag will remind me :)


The base is a tag from a company that used to do wood laser cuts.  The actual letters are from grungeboard from Tim Holtz (way old and retired. I'm working on my stash). The stencil is Tim Holtz's, and I used light modeling paste.


Here is a close up of the stenciling.


Here are closeups of the tag. I covered it in gesso. And then I used tumbled glass, dusty concorde, and shabby shutters distress oxide sprays along with mustard seed stain and Kevin Oliver's colorburst-yellow, green, and blue. Also lots of water.  There was a lot of ink that I absorbed on watercolor paper. So there are cool backgrounds in the making :)


That beautiful pink on the word magic is from Sweet Rose Finnabair metallic wax. And then I glued Recollections silver micro beads on.   I lined the stencil back up to match the stars and used Silver Finnabair wax to go over the top parts of the stars. The sentiment-which I love, "I dream of stars that glitter" is from Tim Holtz's clippings stickers.  I outlined the stickers with a grey fine tip marker so the words would pop. And that is one of his paper dolls.


This is one of my favorite paper dolls.  I think because she is smiling and dancing around. And that is sort of like me. LOL. I could have been this kid. I colored her with two prismacolor markers. At first I thought the outline pink was too dark and I sort of blended it and then I used a lighter pink marker and by some sort of miracle (or was it magic? ;) ) the dress looked good and blended nicely.


I hope you like this tag and much as I do. I am exciting for the next few projects too. Make sure you check back :) 

I am submitting this tag into the following challenges:


Path of Positivity Challenges: #87 Look for the Positives. (I am going to try to be the positive and put more happy magic and love out in the world.)

Have a magical day! :)

Friday, June 5, 2020

Lucky to Know You Canvas

Hello Everybody!

I made this little canvas which is about 4 X 4.  I used modeling paste and then a flurry of sparks paints and micro beads and some finnabair waxes.  First you have to see what it is made from!


The base is this ten flat foam piece which is actually for teachers to teach kids.  I found a few sets of this with other counting things at Goodwill.  WooHoo!


So I painted it with black gesso which it took well.  Then stenciled over it with modeling paste.  I originally wanted it to be red.


And gold LOL


But that wasn't working for me.  So I coated the whole thing with Finnabair gesso to start over.


Then without a real plan I glue on some sandy bits-sort of like mircobeads from Powertex.


I gessoed over that.


And then I started painting and stamping and whatever else and couldn't stop.  Until I did stop and didn't take pictures of that process.  LOL.  I added some silver Finnabair wax and then I painted over it with Golden paints.  That's what gives it a metallic look.  Then I added black over the beads and then used a green wax to highlight the sand beads.  I stamped the sentiment from Muse stamps.  I added the bird which also has a green wax from Finnabair.  The bird is made of clay and the mold is from mod podge.  Then I added some Tim H. paperdolls and the gem heart button, key and clock.


Close Up.


Close Up.


I am entering this canvas into the following challenges:


Thank you for stopping by!  Until next time my friends-I am lucky that you stopped by :)

**Edited-this earned a top 3 at the Crafter's Castle.  Thank you! :)