Showing posts with label Steampunk. Show all posts

Sunday, March 6, 2022

Limited Edition Mixed Media

 Hello Friends!

I am so excited to share with you this 6X6 Canvas Magnet that is all sorts of grungy fun!


I love love love mixed media and knew I had to participate in this challenge. Also, I watch Ana from Finnabair do a live stream on her new products and I was totally inspired to make something. She had these canvases that had some clay pieces and they were showcasing her new waxes-but they easy looking to make. So I knew I wanted to make something like that and this evolved from it.

This is what I started with: the 3-d gear folder from Tim Holtz/Sizzix, Ranger foil sheets, and the canvas magnet itself. The canvas magnet is a thin canvas that has a magnetic backing. Look at how shiny that embossed foil is!


Then I painted it black and once dry I scuffed it up with steel wool.


This is a foundry number from Tim Holtz and I edged the outside of it with black paint and wound up wire through the holes. When it gets glued down I actually glue it on top of 2 pieces of craft foam to give it dimension.  Underneath this is a Tim quote chip that I also edge with black paint. It it thick on it's own so I glue it straight to the canvas.


I used metal gears for depth. But I wasn't feeling the copper color so I painted them black.


The main centerpiece with the gears and the gentleman are clay pieces. I used finnabair and stamperia molds. On the  main gear I added some paper stones and microc beads.


Here is the canvas-now it's time for Finnabair waxes! 


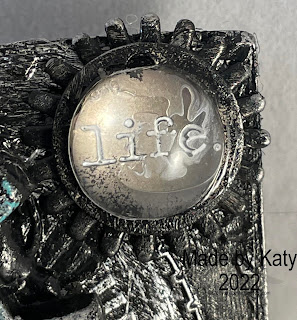
This is so cool to me-lol. It's a gear painted black with a word coin from Tim Holtz (I used distress picket fence to make life pop.) Then I put a Finnabair Melange on top and it made the word life bigger. The glossy accents seemed to have dried weird but that's ok. 

Here are all of the colors of waxes that I used on gears. Old silver is just a favorite-what can I say?  :)


Here's a side view of my project.


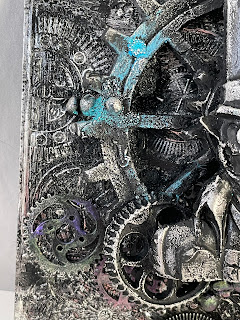
Here's a close up of the gears and area "painted" with the Finnabiar wax.


Looks like there's a little patina on the big gear :)

And here is a picture of the finished canvas. It was awesome to make a steam punk project again-it's been a little while ;)

                                               
Thank you for stoppin by! :)


Friday, February 12, 2021

Steampunk Valentine Frame

 Hello Friends!

Tonight I am sharing with you one of 6 frames I decorated. This is the 12th day of my 14 Days of Valentine's Craftiness. And there are still so many fun things left to share! But for now check out this cool frame!

I am submitting this frame into the following challenges: 

The Male Room: #147 Steampunk 

SanDee & Amelie's Steampunk Challenge: Steampunk Jan/Feb Challenge


Here's how I made it. These wood frames came from Hobby Lobby. And I will be honest-I looked all over Pinterest for inspiration and there was none. LOL. Maybe I looked it up wrong. So I started to gesso this frame and paint it pink.


Here it is gesso. Then I used some pink craft paint and what I saw was a bit of natural distress. If you look at the first picture again you can see white show through. That's the gesso. I could have painted over it-but I liked the distress of. And this was good because it was like the personality of the frame was starting.


I have pre-made clay pieces that I make when I'm watching tv. And it's great for times like this. I brought them out and sorted through them so see what would fit. So this cluster here is all prima moulds. I also painted them with black gesso and then used various finnabair waxes. This is definitely one of my favorite parts. I love the waxes!  I also took some of the matte wax and went along the edge of the frame. You can see it here behind the gears. Also, I hot glued this gears on.


This bottom cluster is also clay gears except the bottom is Prima and the top 2 are from Mod Podge. And the LOVE is a metal charm. 


This was made using a Tim Holtz stencil and vintage gold finnabair wax. I love this stencil. And you can see the pink paint and the white showing through and the texture it creates. and then the wax applied on top of that. So cool! :)


I didn't keep this frame-I mailed it to a family member. I put a picture of all of us together the last time we were together which has been a while. I made the pic black and white and it turned out really nice. :)

Thank you for stopping by!  Hugs!


Friday, February 28, 2020

An Odd Card

Hello Friends!

Over at the Funkie Junkie Boutique Blog, they are having a challenge requiring something odd.  I thought what could I make for this?  And I remembered that my son used to watch a show called The Odd Squad and they solved math problems in order to fix all sorts of odd happenings.  I also got out a stamp set that I bought a few years ago and hadn't used-because it was a little different than the rest of my stamps. 

Here is my card:


I made these cool circles with a stencil (probably Ranger but I don't know which artist) and blue velvet opal magic wax which is just awesome.  (this isn't the odd thing, keep going)


Here's my sorta odd stamp.  Now that I have created this card-I am excite to use this stamp again.  Her arm and legs are separate stamps and I think when you have more sets you can interchange them.  This is a Clearly Constructed Art Stamp by Catherine Moore.  One of the main reasons I hadn't used her is the space in her skirt.  Like what do I do with that?  LOL. I colored her with Prismacolor markers.


So I make these gears and upcoming clock out of paper clay and molds (from Mod Podge).  I had pieces of a gear that broke, and it was perfect!  I painted these with Prima Opal Magic pink blue paint. And glued them in the space.  Then I put another wax on the clock but I don't remember which one. This is under the clock.


So I moved her arm and her feet so you could see them in a different place because of the brads.  

What else is odd besides my teacup wearing character friend here?  The number circles are missing the number 4.  And there is a moon face on the left side of the card.  Why?  So odd.  And maybe she is a robot with all of those gears!  Also, odd.


I had a great time creating this card.  Maybe I should think more odd. :)

Here are the challenges I would like to submit this too:


Thank you for stopping by! :)  Until next time my friends...stay odd :)

Sunday, June 23, 2019

Father's Day Cards (3)

Hello Everybody!

I want to share with everyone the Father's Day cards I made.  I know I'm late.  Two were on time and the other will hopefully get in the mail tomorrow.  I know I'm lucky to make 3-one for my dad, my husband's dad, and my husband.

This first one was for my father-in-law.  He's not a cowboy but he likes Westerns.  :)  The background is paper from 7 Gypsies and I used this cowboy die cut from the Silhouette Design Store.


This card was for by husband.  I used 7 Gypsies paper and rub-ons.  The rest of it is Tim Holtz goodies.  The dude on the front is from the Stampers Anonymous "The Professor" set and I just love it.  My husband also likes fancy pens and noticed the ad for pens at the bottom.  Win! :)  


My dad loves computers but not gaming-and that can sometimes be hard for me to create around.  But he also likes a good nap (wink! ;) so somewhere in creative blogland I saw a hammock for fathers day and remembered I had this cute hedgehog in a hammock-yay!  I colored it with copics and added nuvo crystal drops-which I totally love.  The sentiment is stampin up and the leaf paper is vellum which I have had for a mighty long time-now I have a shorter piece of it.  LOL :)


Thank you for stopping by to check out my Dad cards.  Until next time my friends...stay crafty! :)

Thursday, September 28, 2017

Birdhouse Makeover

Hello Everybody!

I am so excited to share this project with y'all.  It's been awhile since I've made a project like this.  There's a lot of pictures so get ready!

I bought this birdhouse at the thrift store.


Here's the back.  I paid $2 for it.  Woot! Woot!  It's time for a makeover!


I'm not sure what direction I'm going to go in.  So I gesso it in case I decide to paint it.  And I took off those sad little butterflies that look like moths.  LOL ;)


So I decide not to paint it.  I am going to try to steampunk this birdhouse out!  I have foil tap paper.  But I'm curious to see if Aluminum Dryer Vent Tape will work because I don't have enough to cover my birdhouse and this is more readily available.


I use Ranger/Tim Holtz alcohol inks-grey and black on the aluminum tape.


Then I take the piece and run it through my embossing machine using a T.H. brick embossing folder.  So far so good.


I use this red pepper alcohol ink to make the bricks red.


That looks cool. :)  I peel off the adhesive back and mold it to the birdhouse.  It's already in strips because of how the tape comes-so the width is handy in this project.  I don't have to do a lot of trimming.


Here is the finished birdhouse.  Keep scrolling for side pictures and closeups. 


I used the same technique for the roof-but I used the "metal" embossing folder.  Still a Tim Holtz embossing folder.  I added these cool metal gears my husband got me one Christmas.  I think he bought them from Amazon.


Here is the back.  I couldn't figure out if I should do something on more on the back.  But it's the back-and except for y'all-who's going to see it? :)


This is the left side.  More cool gears.


This cool metal bow came from a Steampunk Show I went to.  I love it!  The house number is a Tim Holtz ideology thing.  Love! :)


The bird and metal flowers are Tim's.  There is a gear in the center of the left flower-it's from where my other gears came from.  And I used a Tim Holtz wire with a circle thing for the stem of the flower.  I had to use a white Faber-Castell marker to kind of highlight the metal pieces.  I used alcohol ink on them and everything was so dark.  The white sort of out lines the pieces and makes them pop.


Here's a closeup of the bricks.  I love how they came out, and they have a nice shine.


Thank you for stopping by.  :)

I am submitting this Steampunk Birdhouse into the following challenges:


Until next time my friends...keep that steam going! :)


Sunday, February 12, 2017

Steampunk Valentine

Hello Everybody!

I am so excited to show you the card I made using the Queen and Company Heart Throb kit with a Steampunk Flair!

First here is my card:

Here is another picture of it.


Here are the products that I used to create it:


Plus I used Q and C's heart die and a heart foam.

For the background I used the foil cardstock.  But it was too shiny-so I inked it up with black distress paint.

I also inked up the heart foam for the shaker part.  I used the black distress paint for that as well.


I realized I had to do the inside too! :)  


For the heart shaker I used the foil cardstock.  I embossed the inside with gears and used the preserves and black distress inks.  I used the black distress ink for the heart outline as well.


Then I filled it with all of those wonderful things-microbeads and diamonds and a few sequins.  But there are 3 silver little gears in there also.  They came from this earring that I bought at a Steampunk show back in January.


I'm saving the other 2 gears. :)

Here is another picture of the heart.  


For the sentiment I used black and white cardstock.  I cut it out on the Silhouette and then made the background from there also.  I used the Ken Olivers liquid metals silver to make the sentiment sparkly.

Thank you for stopping by today!

I would like to link this up to the following:


Thank you for stopping by!  Until next time my friends-may love fill your heart! :)