Showing posts with label Distress Stain. Show all posts

Wednesday, September 28, 2022

Friendship Altered Tin

 Hello Friends!

I am so excited to share with you my project for being the Guest Designer this week at The Funkie Junkie Challenge! This week it's about Friendship.  Be sure to check out the Design Team's project and maybe submit one of your own! :)

A first I didn't know what I was going to make. I am in Halloween mode-LOL. And I didn't know who I would make something for-my husband and sister get many things as it is. :)  And I love all of my friends-but it hit me-I would make something for my friend that lives down the street. She makes life easier and definitely more fun.

I started off with an altoids tin. And I altered it using mostly Tim Holtz products and a little Finnabair.  Funny side note--I don't eat altoids. A different friend of mine a long time ago gave me tins, and this is from her collection.


Here is the front:


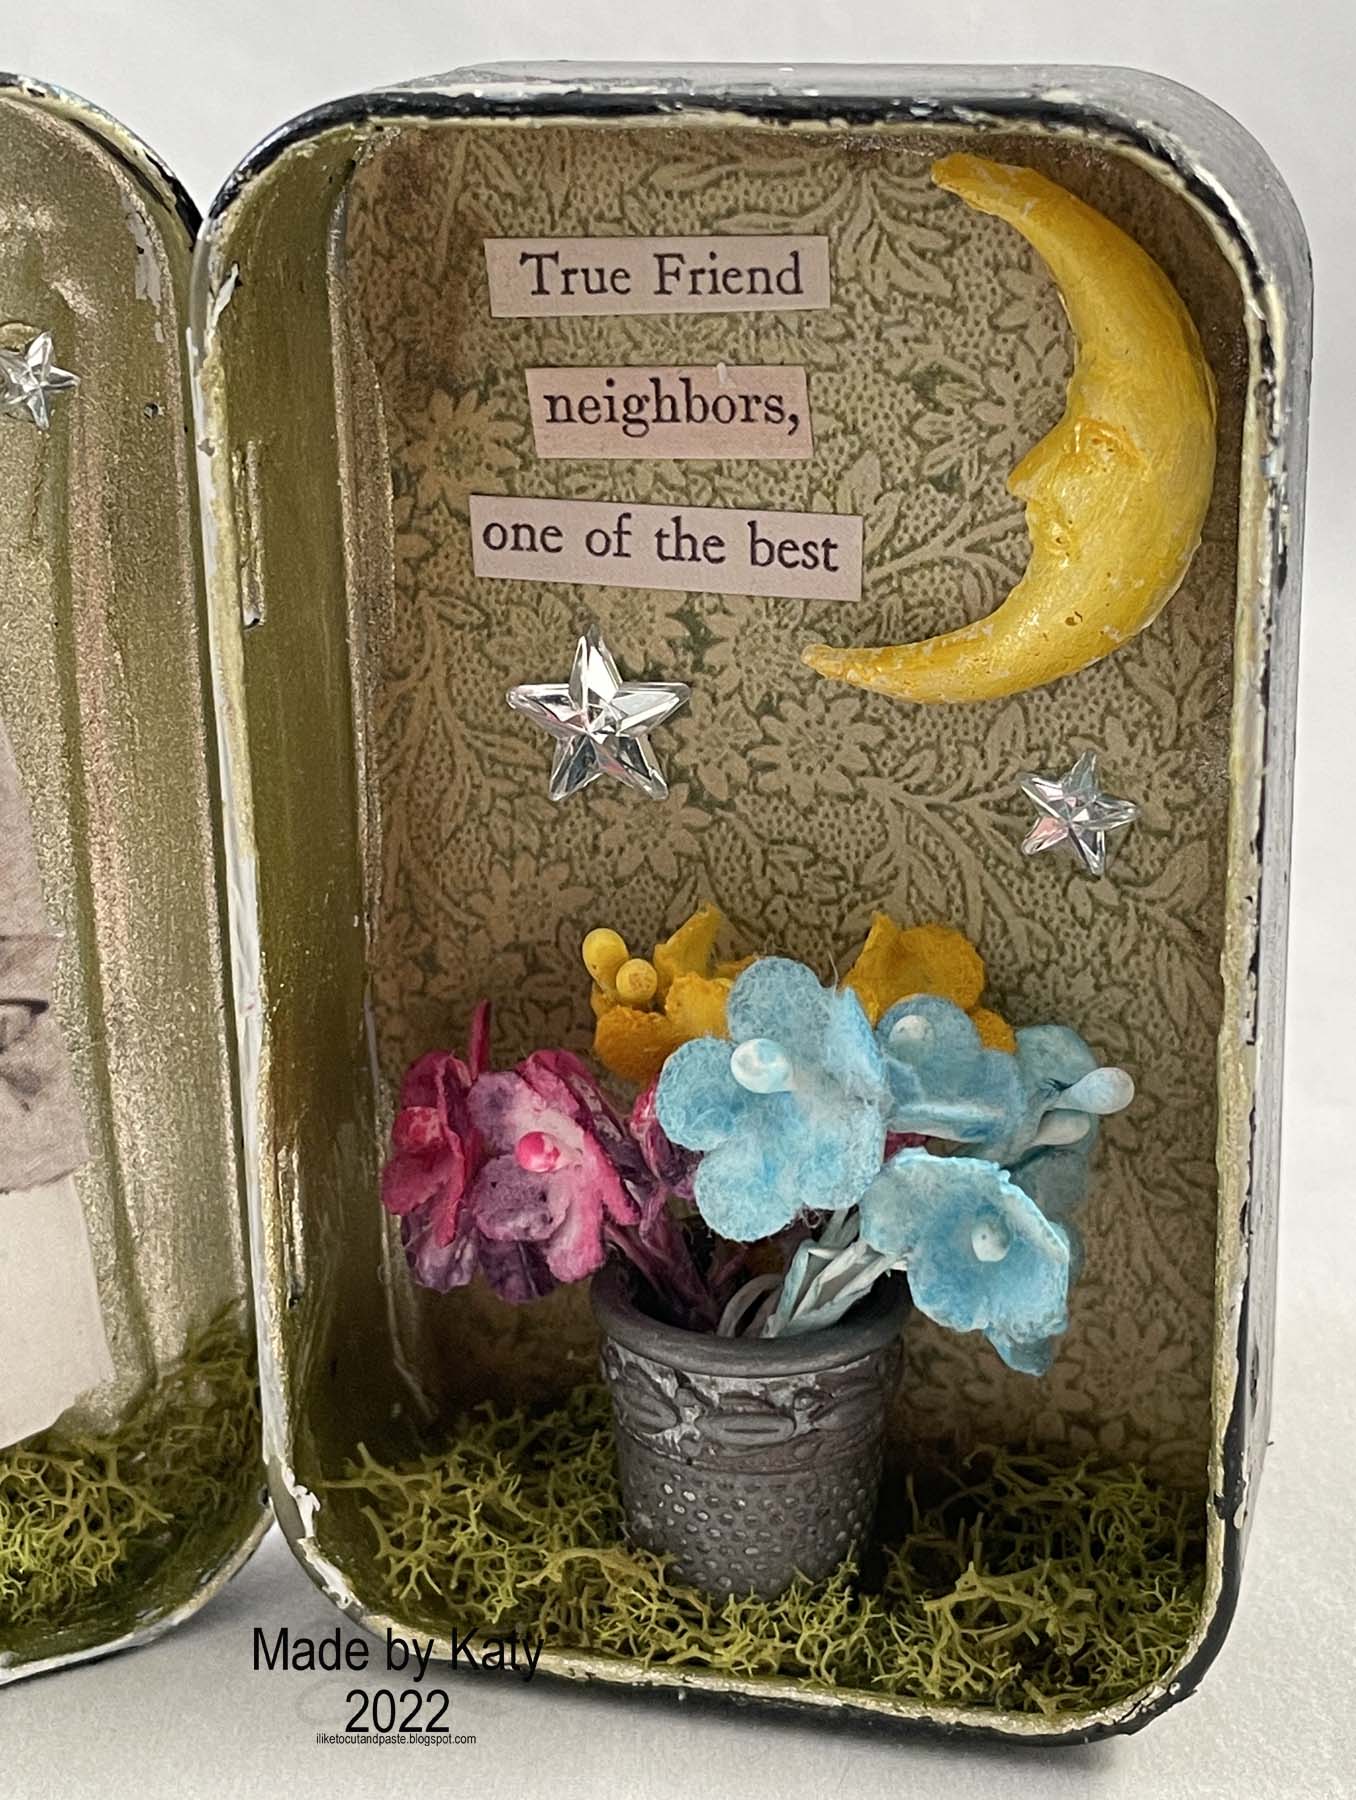
And when you open it...


So if you would like to see how I created this stay with me. If not-I understand that too :) 

I gessoed the tin with black gesso around the outside.  I put light modeling paste on the lid and let that dry. Then I used Tim's matte texture paste and a Tim stencil to create the stars. I used distress stains-mustard seed and carved pumpkin. I also took a little prize ribbon and used the spray tube to add drops of color. Then I spritzed with a little water and let that dry.


I sprayed some more stain on a piece of cardstock and added a little elixir mica spray. Then I used a garden green sizzix die to cut some leaves. I didn't use the leaves like how they are cut in the die. I cut the leaves in their little sections and created a bunch behind the flair piece.


To make the friend word card more fun I used this stars die cut which was the special die last year from Simon Says Stamp.  Then I used gathered twigs distress ink around the card.


For the inside I used liquitex gesso and a piece of paper from Tim's backdrop volume 1 papers.


I added walnut stain with a small brush to get into the corners.


Then I painted the inside left and the frame part of the right this beautiful finnabair sparks paint-unicorn hair. so magical :)


I just have to share that I love these thimbles as pots for the flowers. I used them before and glazed them with Tim's embossing glaze but the few colors of glaze didn't match what I was going for here. So I got out the Finnabair wax rusty brown and here's the difference. 


I sprayed my flowers-I think with tumbled glass and snowflurries mica for the blue, raspberry and hocus pocus mica for the pinkish, and flickering candle mica for the yellow. I did think that the flowers would stay nicely in this thimble pot. But they don't--LOL and I had to go back and glue them down with hot glue.


For the paper doll ladies I cut some craft foam and adhered it using glossy accents so they would have a little dimension.  And I added craft moss-I used the q-tip to put the glossy accents on the bottom of the tin. Also, I glued the thimble in first so I had small spaces on both sides to put the glue so the q-tip was awesome. And then I used craft tweezers to add in the moss. 


Here is the left inside. The stars are last years ideology christmas stars--I didn't know they had stars so small. It was a great surprise (and it was a brand new pack which means I guess I haven't needed any stars in like 11 months.)


The moon is made from paper clay I bought and a Finnabair mould. Those nice words are from the everyday clipping stickers and some more little stars.


My friends-here is the back. I took a piece of cardstock and added distress ink--crushed olive, scattered straw, oxide antique linen. Then I stamped the lines using a super old stampin up journaling stamp (2002 lol) and distress ink gathered twigs.  Later I will tell my friend how great she is :)


Thank you for making it to the end.  I appreciate your vising. :)


Friday, September 16, 2022

Birthday Card

 Hello Friends!

Over at Simon Says Stamp Monday Challenge the challenge is do use dies. Yes please! 

So I created this card out of Tim Holtz dies (like they are all his for real). And Tim's foil cardstock because it's my favorite. The background is a spray stains, oxides, and mica stains and then I embossed it with a folder from Sizzix. I put some finnabair wax amethyst magic on the raised parts.  I also added some sequins because flowers seemed to big but that corner needed a little something. :)


Thanks for stopping by! :)


Wednesday, August 17, 2022

2 Mixed Media Cards

 Hello Friends,

I made a couple of mixed media cards. I was inspired by the challenge at The Funky Junky Boutique: Chillin' in the Heat. So the challenge is to either to use hot colors like reds and oranges or cool colors like blues and greens. And because I am literal and cannot make a decision-I made a card for both cool and hot. :)  


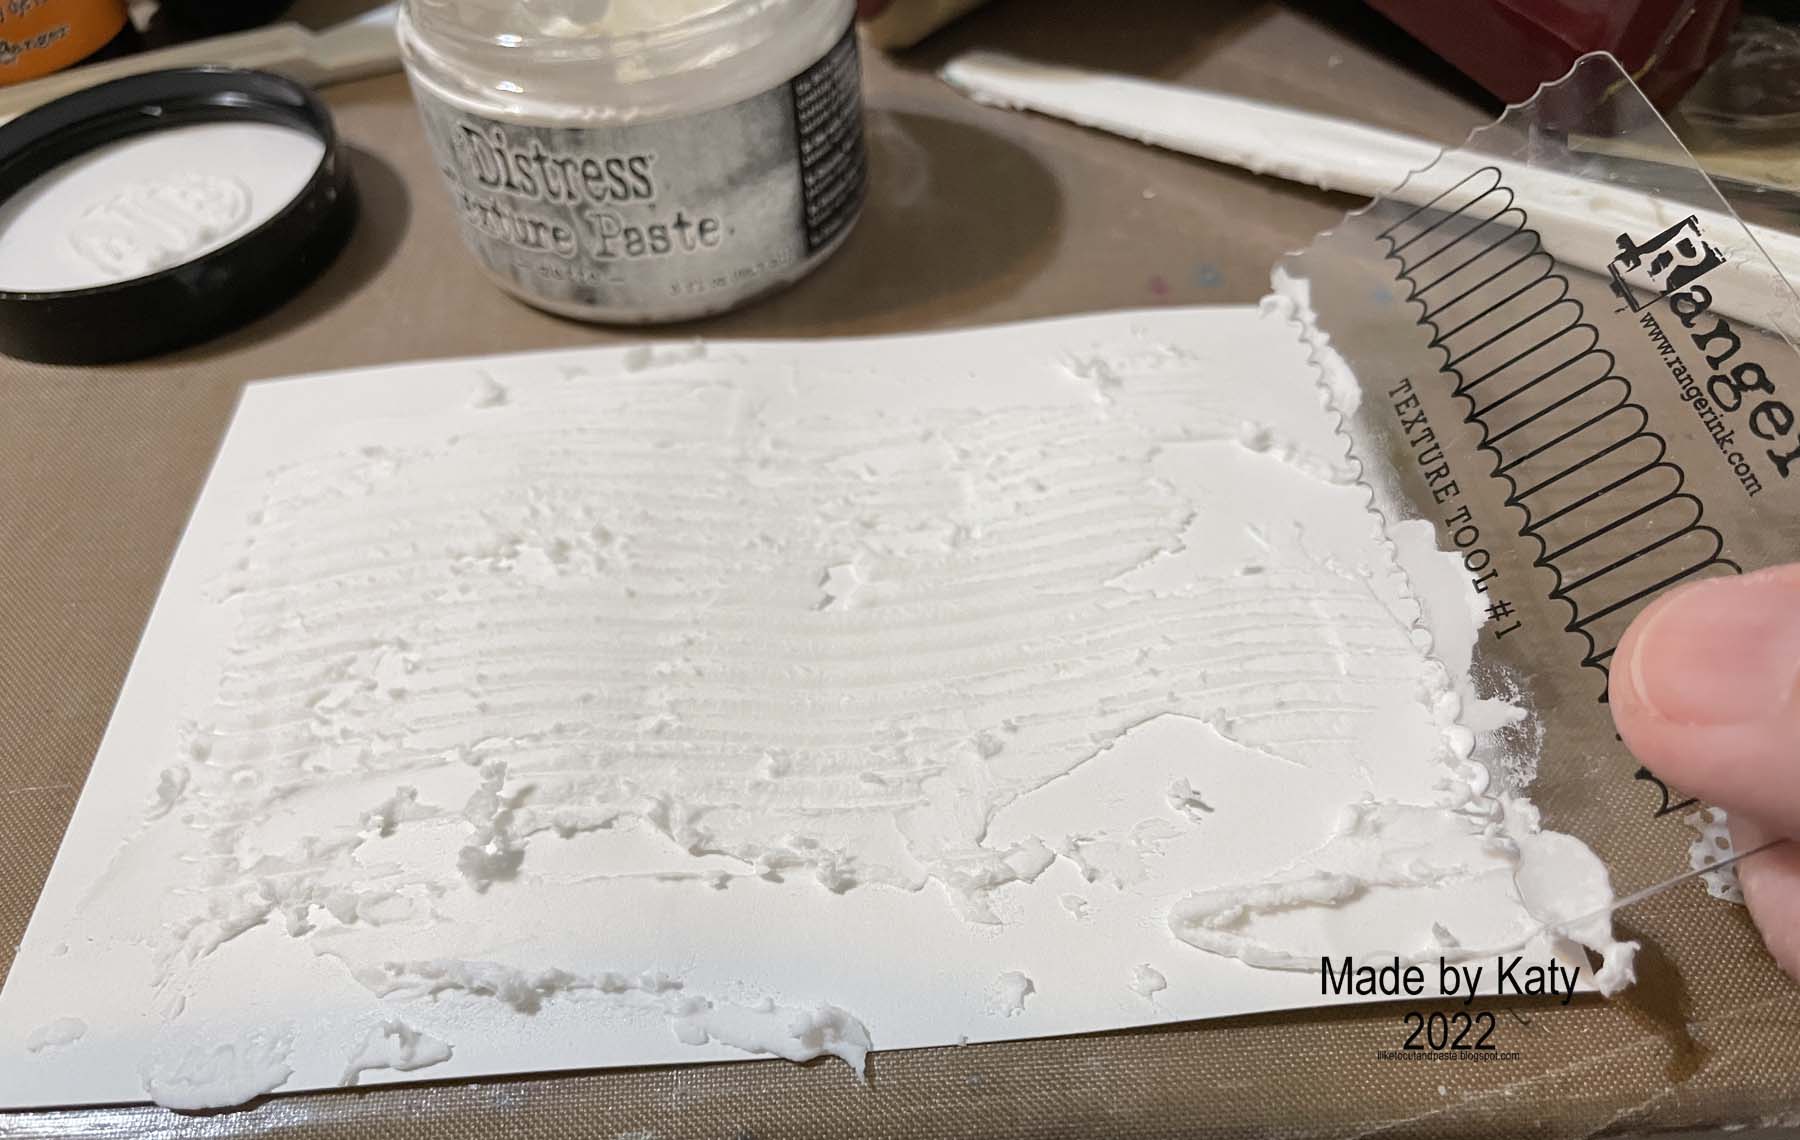
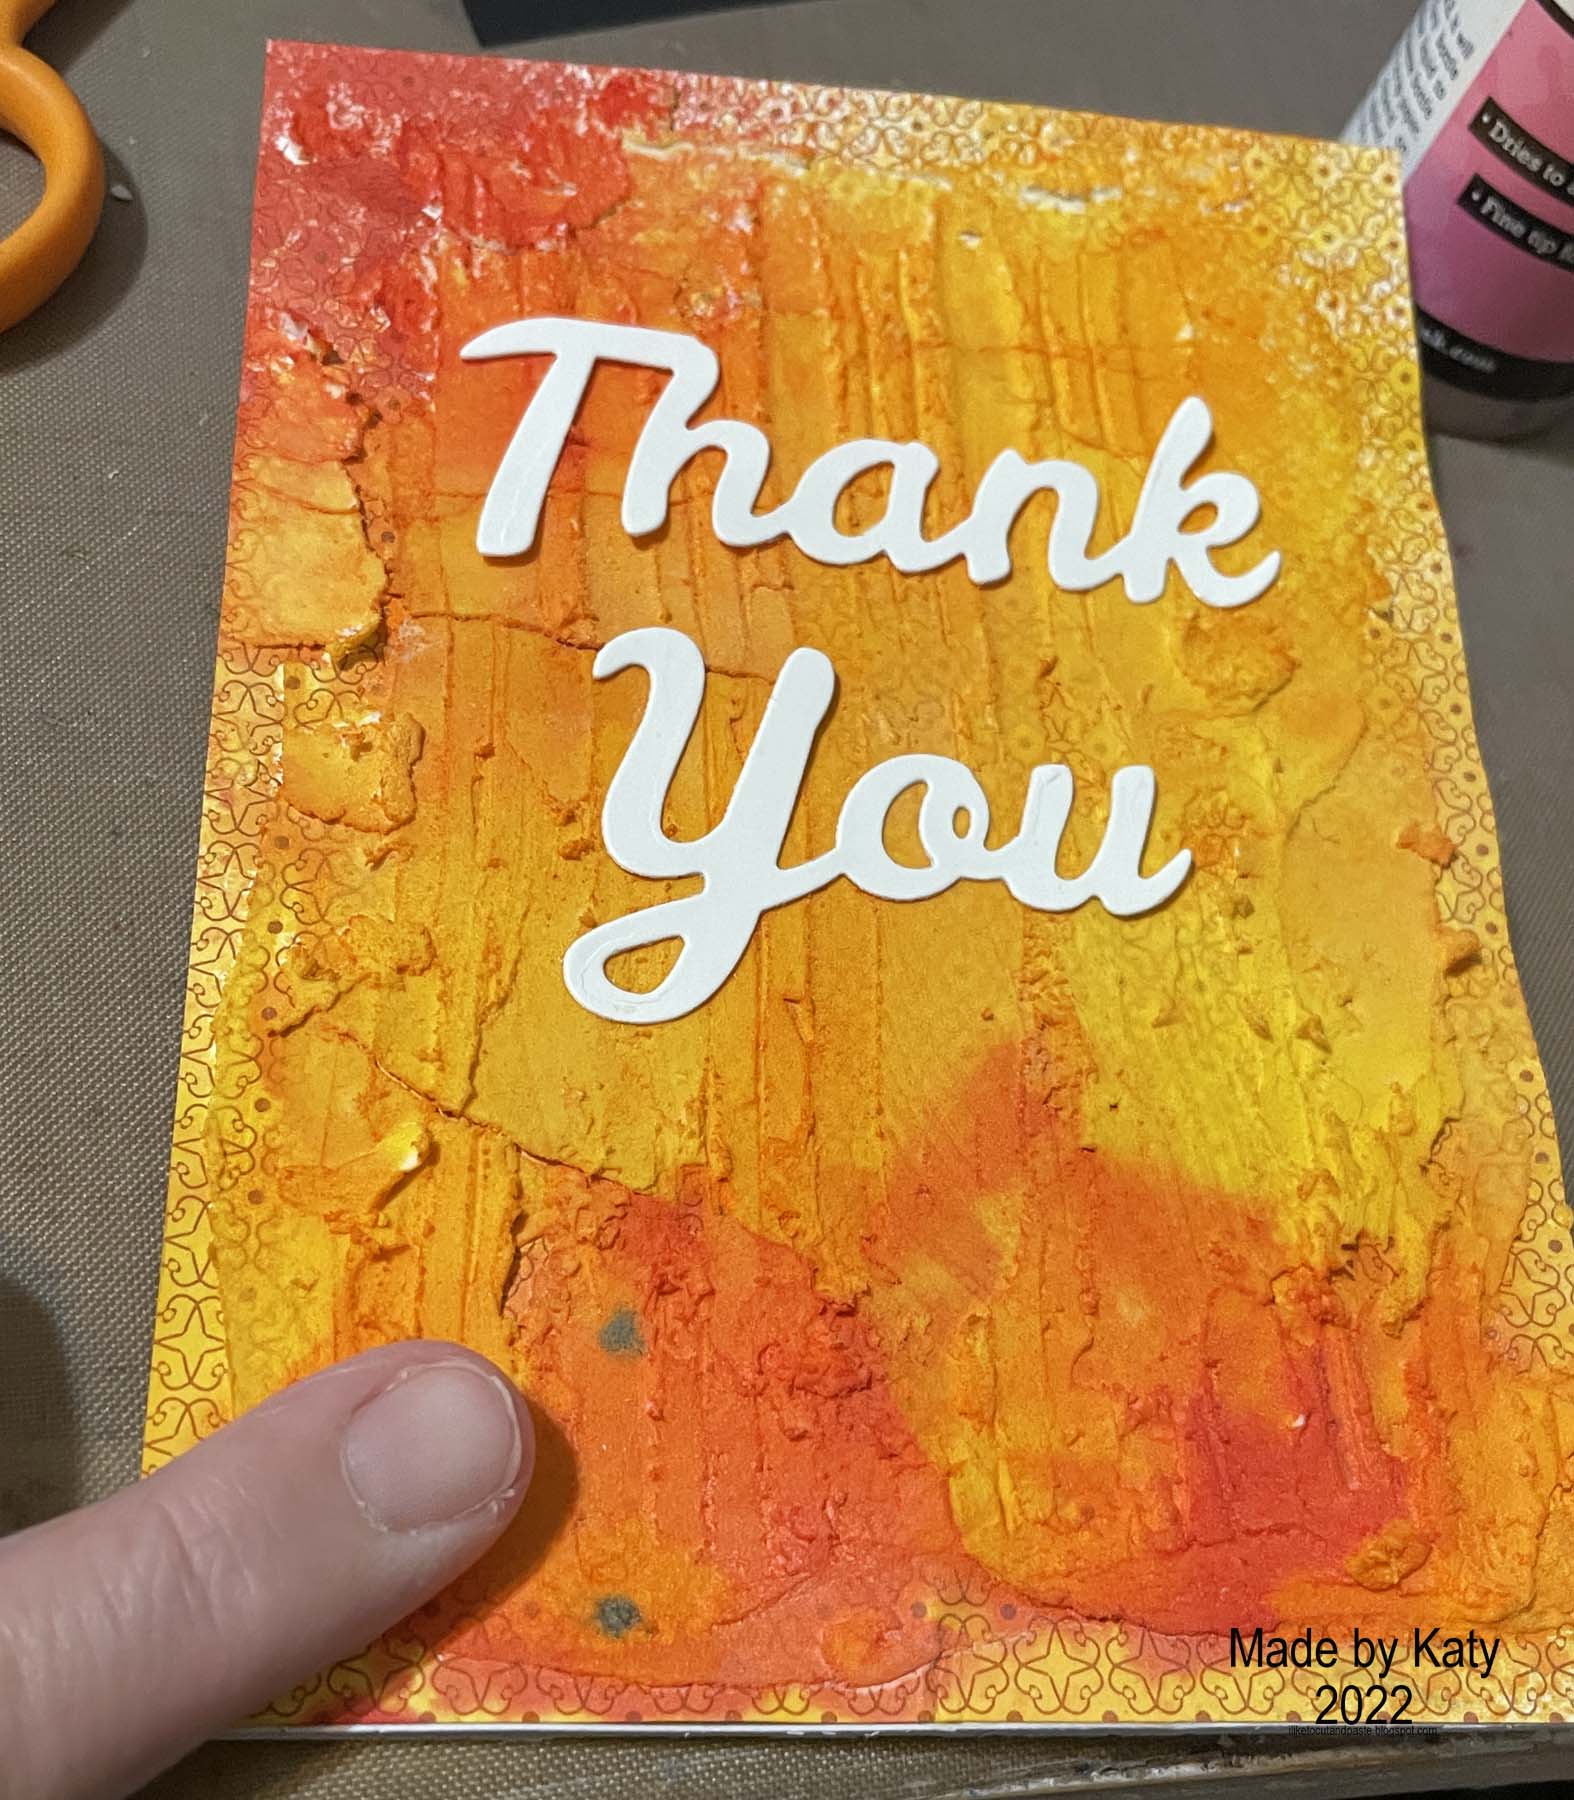
So for Christmas I received these Ranger tools that make textures in paste. For the hot card I spread Distress Texture Paste matte on to a piece of Stampin Up paper. You can see the design below.  And then I used this took to make those specific grooves.


This is the cool card.


Here are the sprays I used for the hot card.  I used a spell binders die for the sentiment and some little white gems.


Normally, I don't think I would put the gems like how I did. But here is why--LOL so I must have put the paste on too thick because the paper bent and you can see cracks in some places. I know it's not mixed media paper so maybe a duh moment-however I have a lot of pattern paper, and I can either donate it or use it. Right now I'm trying to use it, and I like how it looks on this card. 

So I sprayed the card and when dry the paper was bowed. So I put a box on it and these mysterious green dots appeared.  So I covered them but they were perfectly lined so I had to add a few more ;)


Here are the colors I used for the cool card. I used a Tim Holtz sizzix die cut and star.


Thank you for stopping by! :)


Wednesday, August 3, 2022

Happy Birthday Cow Card

 Hello Friends!

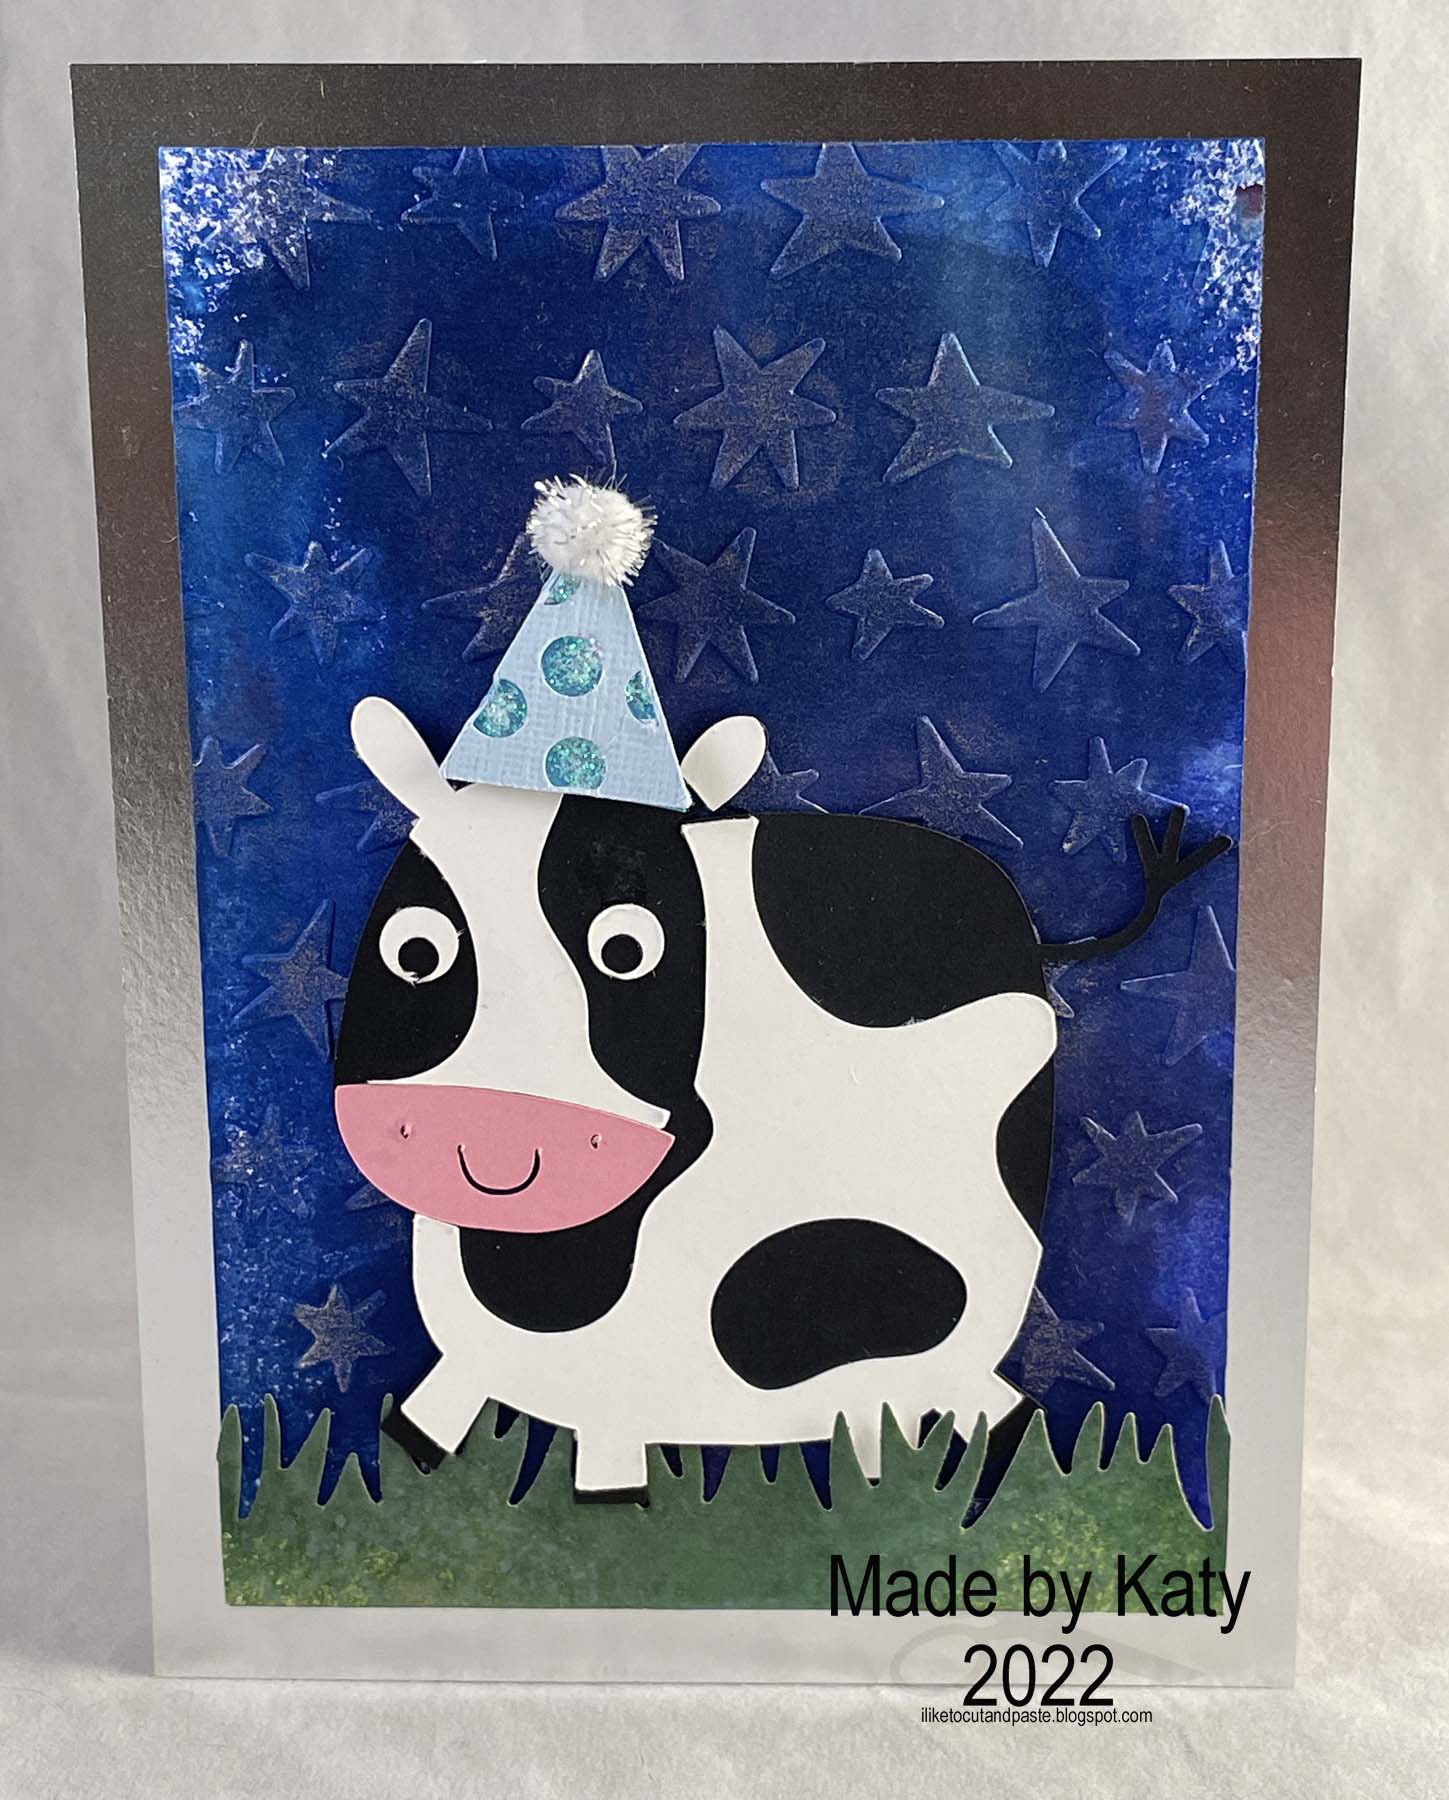
I made a birthday card for my friend who loves cows. 


I used silver cardstock for the base. On watercolor paper I sprayed the following Tim Holtz sprays: stain wilted violet, chipped sapphire, blueprint sketch, mica snowflurries, and Dylusions crushed grape mica spray.  Then I embossed it with a star embossing folder from cuttlebug (called star blanket).  I applied Finnabair old silver was with my finger on the stars to help them pop.

The cow is from Silhouette and I cut it out on my cameo.  So is the hat. I used stickles and a pom pom to make the hat a little jazzy.

The grass is a Lawn Fawn grass die. I used the following sprays for the grass from Tim: shabby shutters oxide, mowed lawn stain, rustic wilderness stain, and mica tree lot.


Here is a side view to hopefully pick up some of the shine of the mica and wax. This card was super fun to make :)

I am linking this to the Simon Says Monday Challenge: Happy Birthday.  Simon Says Stamp Challenge is 12 years old--Happy Birthday! :)

Thank you for stopping by! :)


Sunday, July 31, 2022

Summertime Layout

 Hello Friends!

Tonight I made a scrapbook layout which is the first one I have made in a while.  I have been wanting to do a rainbow with distress stains and this worked out perfect for me to try it.


I used a stencil from Dina Wakely and distress inks: candied apple, carved pumpkin, mustard seed, mowed lawn, blueprint sketch, shaded lilac, and wilted violet. The butterfly and summertime stickers and colorful paper behind the photo are from Echo Park. The flamingo is puffy and I think from Amy Tangerine. The pineapple is from the paper studio (hobby lobby).

I was inspired by Challenge YOUself #103 to scrap a picture of my family. :)


I was also inspired by the single page sketch at Stick It Down. The stencil part is the slant toward the bottom of the page. I used Tim's texture paste with the Dina stencil. And then I used the sprays.


Thank you for stopping by :)


Sunday, January 6, 2019

Happy New Year!

Hello Everybody!

Happy New Year!  I hope everyone has had a great couple of weeks!  I have had a great time with family and friends-and hope for more of that in 2019 :)

I got to be a little crafty-and I didn't realize how much I missed it!

There is a Facebook Group Challenge to do a Tim Holtz tissue wrap tag.  I had to dust off my supplies (yikes!) and then retrain myself on how to use the paints and stuff.  Very sad I know.  But there is a happy ending.  I made this cool tag and got a few more papers going because I poured out too much product.  A little goes a long way-LOL  It's all good though!


This is about 99% all Tim Holtz.  Here's what I used:
Ranger Tag
Distress Paints: Broken China, Chipped Sapphire, Salt Ocean, Picked Raspberry
Distress Oxide Ink: Picked Raspberry (on the 2019 cardstock under the glitter, around the edges
Melange Tissue Paper
Distress Spray Stain-Picket Fence
Lower Case Sizzix TH letter dies (663074)
Rubons-Life Quotes, Botanical, Words
Big Chat Stickers
Distress Glitter Spun Sugar
Glossy Accents
Mirrored Stars
Natural Trimmings Ribbon

The butterfly takes center stage on this cool background.  I didn't want to cover up that part of the tissue paper.  I added water to react with the paints also.  

Like I said-it has been too long since I made a tag so hopefully there will be more in the future.  :)  There are a few backgrounds in the making from this tag-so be sure to check back!

Until next time my friends...Get your wings and let's fly!

Friday, October 21, 2016

Halloween Vignette Box

Hello Everybody!

I follow Tim Holtz on a few different social platforms.  And I have been so inspired by the Halloween projects that he has been posting from different people using his awesome products.

So today I am showing you a little Halloween Vignette Box.  All of the products are Tim's except the black paint I used to paint the Vignette Box and the cheesecloth that is spiderwebs (totally got that from one of the photo's Tim posted.  Creative genius!)  Also, the frame that the picture is in is from Making Memories.  It was nice and square and purple until I cut it down to fit into the vignette box and dabbed black distress paint on it.  I had to draw a little jack o lantern face on the TH pumpkin.  :)


Here is the breakdown of this little box.  For the pumpkin I drew the jack o' lantern face on it with a precision pen (american crafts).  The back design is the back of a found relative card (a scrap because I used the face in a different project, but kept it because I might use the back side one day.  And I did!!)  I dabbed crushed olive distress paint on the card.

The girl's picture is from the photobooth pictures.  I bent it to give it crease and used distress walnut ink to darken it.  And then i put it in the frame.  Here is where the Making Memories frame came from-but I had already painted it when I took this picture.


For the doll-I put collage medium crazing on it.  Then mushroom alcohol ink.  I was hoping to create the little cracks but not really.  It's so small that if there were cracks you can barely see them.  But the brown color makes the doll look even creepier so that's a positive.  :) 


The doll on the right is the original.  The one on the left is the one I used the crazying medium.

mushroom alcohol ink


Then I used dusty concord distress stain on the white rose ribbon.  I didn't have black and now I'm glad because it gives it some color-a slight contrast.  Then I glued everything down including the web from cheesecloth.

Here is another look inside of the box.


Lastly, I glued on the alpha tiles after I dabbed black distress ink around each one.  This was a super fun project-and since I have 3 more vignette boxes-I will be back with more.  :)

I would like to submit this vingette box into the following challenges:

The Mixed Media Montly Challenge-The pumpkins in the truck inspired the pumpkin in the vignette box.


Sunny Day Crafting-#19 Anything Goes

Inspiration Destination- Anything Goes #108

Until next time my friends...stay spooky :)

Monday, September 21, 2015

Glitter Witches

Hello Friends!

How have you been?  It seems like way to much time in between my posts!  But Halloween is coming and so is Christmas so I am hoping to make more projects to share.  :)

This past Saturday I got the treat of going to Michaels.  "Don't go crazy" my sweet husband always says...but it's almost Halloween! ;)  LOL  So I am looking for some Halloween card making paper and all they have are 12X12 stacks (minus the last 8x8 Tim Holtz Halloween that I snatched up).  One of the stacks is like black and gold Halloween-like fancy Halloween.

Unfortunately, I'm not a fancy Halloween person.  I must have orange and black and pumpkins and witches.  I didn't get any paper (also I found a new stack of Halloween paper in a Christmas order I had placed and gotten.  So glad I didn't buy any paper!) But this thought of fancy Halloween haunted me.  Why can't I do a fancy Halloween card?  What constitutes fancy?

So I used Rangers Sticky Embossing Powder with Sparkle N Sprinkle's Golden Silver glitter and created this:


It's a fancy meets grunge--LOL.  I love the brightness of this glitter-all of my other glitter and embossing powder is dark gold.  It seems like bright happy gold is everywhere.  For the background I used a Tim Holtz stencil and Viva Inka Gold (which looks better on black than I would have ever imagined.)  The witches and sentiment are both from Great Impressions stamps.

For the lace I used antique linen and tarnished brass distress stains and some black distress ink. 


I am entering this Fancy grunge card into the following challenges:


Thank you for stopping by!  Until next time my friends...stay shiny :)


Saturday, August 30, 2014

Tim's August Tag

Hello Everybody!

I am so happy that I was able to make the Tim Holtz Tag this month.  I haven't played in awhile and I missed it.  Though I have made plenty of "sand" from his July tag.  ;)

On his blog he said it was kind of a follow your muse type of deal.  But I enjoy going through the steps that he does because I always learn something.  This month I learned I could stamp on the tissue tape and it would resist distress stain. :)


I was totally inspired by the new Dr. Who episode from last Saturday.  If you still have it on your DVR you may want to scroll on ahead.  ;)  There was this main droid guy in the episode and there were steampunk elements.  I loved it!  So the fella was looking for "paradise."  There is a P that I made from krackle paste (wendi vecchi's) and the eye chart stencil.  I included lots of gears and the hot air balloon.  It was a great episode!

Here is a closeup.  Searching for Paradise :)


I am submitting this tag into the following:

Tim Holtz August Tag

Simon Says Stamp Wednesday Challenge-Anything Goes

Thank you for stopping by!  Until next time my friends...it's time to fire up the Tardis ;)

Wednesday, July 9, 2014

Sky's the Limit!

Hello Everybody!

I have such a fun project to show ya'll today!  It's my turn over at the Unique Laser Designs Blog.  I have the full tutorial of how I made this wall hanging so check it out.  :)


Now let me be honest with you guys.  I had something else I was working on.  And then I sometimes get distracted by the Internet.  So I'm looking at the different challenges going on.  Later on on Monday it hits me what I should do.  So my original project I put aside-and started this one at once!

Here are the 2 challenges that inspired me:

Simon Says Stamp Monday Challenge: Start from Scratch --This wall hanging is built using Unique Laser Design Products

Inkspirational--Challenge 60  Photo--I love this painting.  I haven't seen it before but it stuck and wouldn't let go!  My inspiration was the hot air balloon.


The pieces you see here are what I used to make my all hanging.  They are all from Unique Design Laser Store.  I used ATC's, hot air balloon, clouds, and open window.


I used gloss gel medium to glue the ATCs to each.  I used this because it is seems strong and I can wipe the excess off so the panel is smooth.  (I use hot glue but I am terribly afraid of getting burned!)  LOL


I gessoed all of my pieces except the window.


This window is just so cool.  It looks 3-D but it is totally flat.  And it has lines engraved in it for added interest, and I don't like to cover that up.  So I used distress walnut stain on it.  And I did not like it at all.  So how to fix it?  I put some Time Holtz distress picket fence paint on my craft mat and blotted it on using my finger.  You can see the left side is just stain and the right is with some paint dabbed on.  It looked a little shabby shic so I went with it.  ;)


For the balloon I used Tim's Distress Paints: mustard seed and spiced marmalade.  The basket is with walnut stain and a little crushed olive on the zig zag.  I covered it with perfect pearls perfect gold and a little water.   


I used faded dots and bubble Tim Holtz stencils on the clouds.  I used Martha Stewart white texture on them.  I had to add water to it so the smaller cloud came out a little different then maybe it should have.  But I love it!


For the background I used Tim Holtz distress paints: chipped sapphire, salty ocean, and broken china.  Using a Ranger applicator I pounced the paint on from lightest to darkest and then filled it.

Then I used a text background stamp (LOVE)  that I bought at the Scrapbook Expo.  It's from Rubbernecker and it's the Best of Times (Charles Dickens) stamp.  


I used a Tim Holtz sunshine stamp and mustard seed at the top.  For the grass I used Tim's striped stencil with Emerald Twinkling H2Os and a little extra long the bottom.  For the stars I used Wendi Vecchi's translucent stars (so those will disappear) and Tim's star stencil.


There is an added detail to the grass.  I used these distress markers and this awesome stamp from Great Impressions Wild Flowers and stamped on the twinkling h2os.


I added my elements and some Tim Holtz Alpha Tiles at the bottom.


To make hangers on the back I used to soda tabs and hot glued them.  Then I double knotted my fancy yarn.  (Do you remember when they were called fibers? hehe)


Thank you for stopping by!  Until next time my friends...the Sky's the Limit! :)