Wednesday, November 30, 2011

Medallion Christmas Card

Hello Everybody!
Hope all is well on your last day of November!  Now I have to make a confession before I show you my card for a Moxie Fab challenge.  I do not make my own Christmas cards.  I make other holidays and send them to my friends and family...but I don't do Christmas cards.  We like to take a picture or two and have someone else print them all out so all we have to do is address the envelopes and poof....off they go!  Then I can enjoy the rest of Christmas and stress out about decorations and presents and not about making cards! 

However,  a friend of mine asked me to make a few Christmas cards for a little inspiration.  How sweet is that?  I can't say no!  So for the Moxie Fab World Challenge:  Championing Award Medallions Challenge ...I present this Christmas card :)  There's still a few more days so you can play along too! 


Scroll on down and I'll show you what I did!

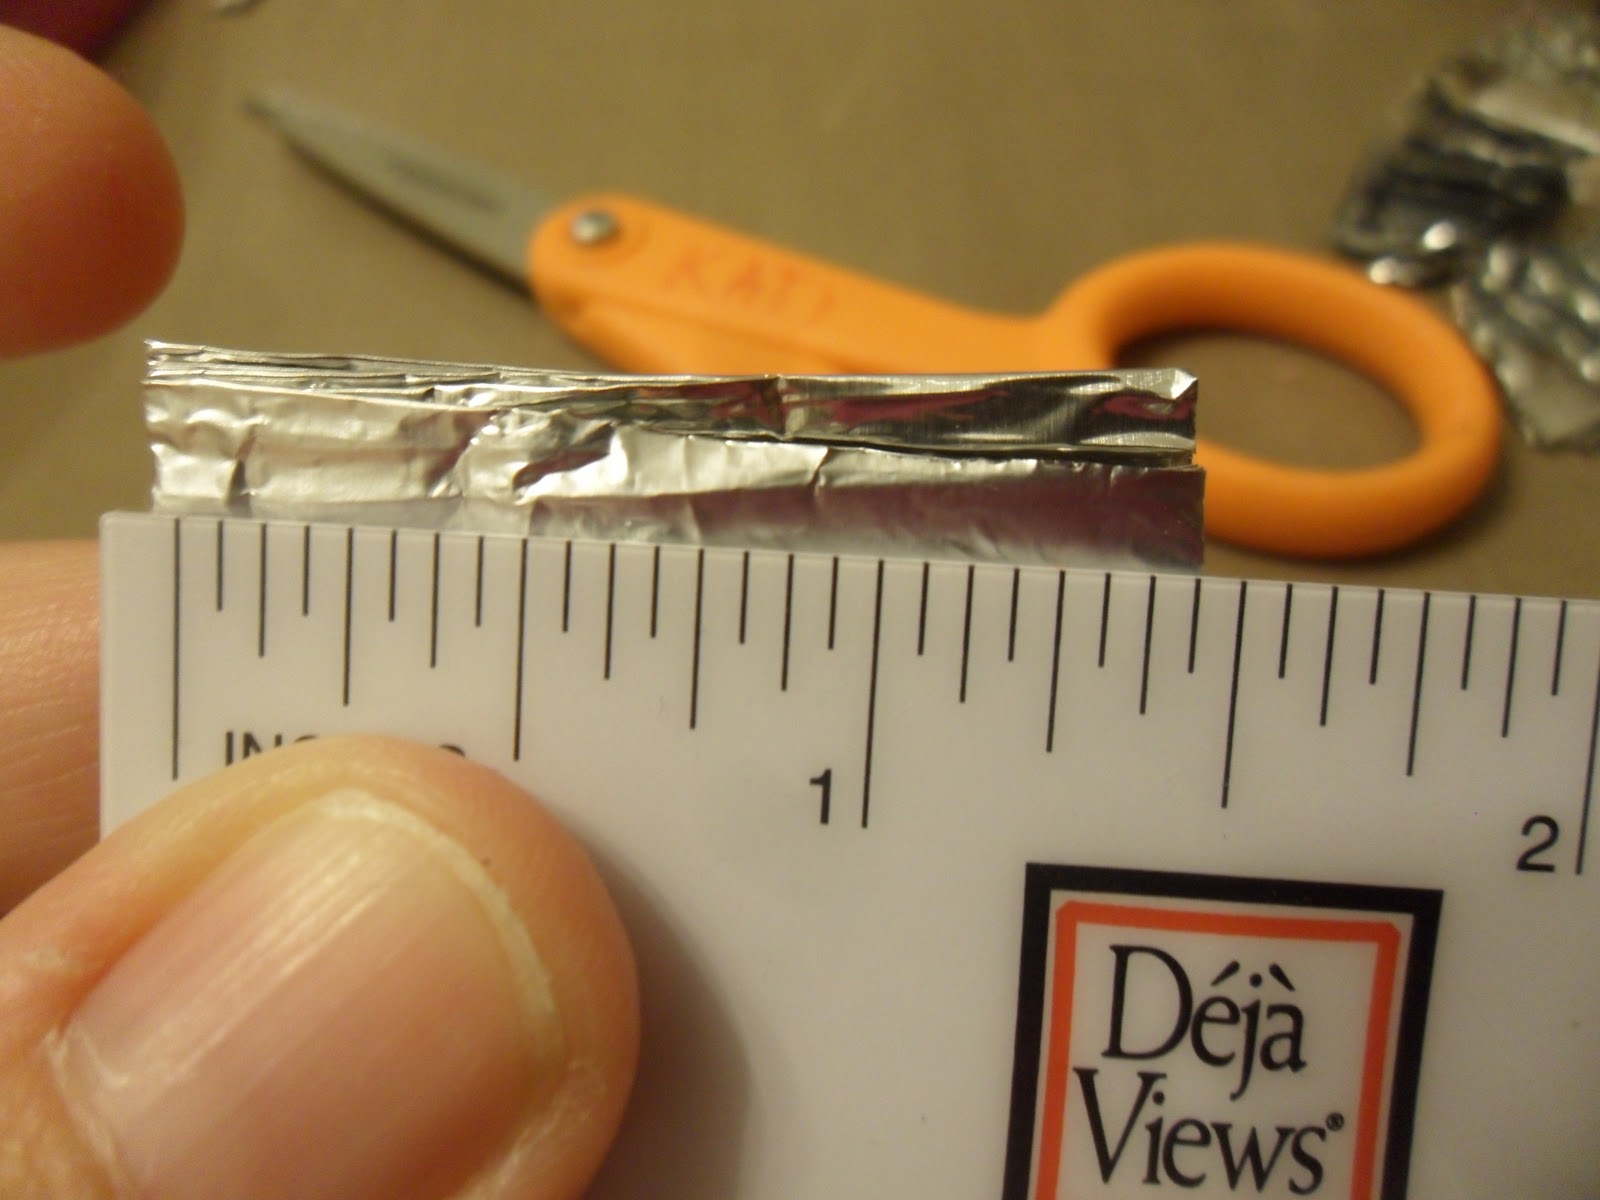
The first thing I made was the medallion, just to be sure I could make it.  I have had several unsuccessful tries in the past.  So I used regular household foil for my medallion.  I pulled off 24 inches and cut with scissors.  If you attempt this at home--please be careful.  Sometimes cut foil can be sharp!  (PS I'm not responsible for any foil mishaps, attempt at your own risk!)


I cut a 2.5 inch strip and save the rest for later.


I bend the foil back and forth (accordion style).  Because the foil is malleable, it doesn't spring like my paper medallions do.  Yay!


I fold it out and discover that it is quite large.  So I accordion fold the foil back and cut a little from each end (it's uneven so it cut off that part).  The new measurement is 1.5 inches.


Here is the medallion folded out.  I put some Glossy Accents on the end to close up the ends.


Here my medallion all finished!  One thing though--it is delicate.  The foil keeps its shape, but I think it would be tough to mail this little guy.


I put that aside.  I am going to put this medallion on black cardstock.  And I pulled out this cool reindeer ribbon that I bought a while back at Micheal's....and now I can use it!


My black cardstock was lacking.  To remedy this, I embossed it and put Perfect Pearls on it.  Perfect Pearls makes me so happy.  Total transformation....from black to silvery!!


Here is a close up of the powder in motion.  After I apply the Perfect Pearls, I use a spray adhesive so they won't rub off.


 When I do metallic things, I really get caught up in it.  When trying to find a center for my medallion, I looked at buttons, paper, all sorts of things.  But I ran across these Phrase Cafe stickers and saw the gold Joy--Bingo!  You can see I got these at Target on sale!  Woo Hoo!


I haven't put the black embossed paper on my card base yet.  This made it easy to wrap the ribbon.  I adhered it to the back with Zots (glue dots).  Then I put the medallion and the Joy sticker on.  The sticker I mounted on white cardstock first, cut it out, and then adhered it to the center of the medallion with redline tape.


Here is my finished card.  Until next time my friends....you're one in a medallion!  (LOLOLOL I know that was terrible!  I think my husband will love it though!)


Tuesday, November 29, 2011

Hey Money! CAS-ual Friday Card Challenge

Hello Everybody!

Whew!  The juices are flowing!  But I must go to bed soon--so here it goes! :)

I am entering the CAS-ual Friday Challenge: CFC29: 2 weeks of CAS Sketch fun!

Here is the challenge sketch:


And here is my entry.  I love it!!  Scroll on down so I can tell ya about it!


I used a larger base card than I normally do.  This one is 6.5 inches tall and 5 inches wide.  My pattern paper was big, so that is why I didn't use my normal 5.5 X 4 cards.

First I put black Bazzill cardstock on my card base.  Then I cut out the money paper to be smaller than the card.  The paper is from Creative Imaginations.  I think you can get it at Joann's.  


I put glue dots on the back of the pennies.  Those are real pennies.  I think I could've used dimes...but I'm feeling a little cheap with Christmas around the corner ;)

The letters are Making Memories.  I put them on backwards, meaning I started with the exclamation point then the "y" for Money.  This way I knew how many pennies to put on.


From one of my scraps I cut out the head of the fake money.  I add glue dots so he will be popped up!


Here's one picture with the pop dots...


And here's an angled shot...


And here is the card completed.  I hope you have enjoyed this card as much as I have!  Until next time my friends....Good Night! ;)

Thinking of You--Tuesday Trigger Challenge

Hello Everybody!

I told you I would be back!  And who knew just how quick?  ;)

This is my entry for the Moxie Fab Tuesday Trigger Challenge.  The inspiration for this challenge is this very cool rustic picture...


There is still plenty of time to play--so click HERE to check it out!  Here is my entry.  I was inspired by the colors.  Scroll down, and I'll show you what I did :)


First I cut my red cardstock to fit my card.  I think this may be DCWV cardstock from a little time ago...


My base is 4 X 5.5, so I cut a piece of 7 Gypsies paper to be 3 X 4.5.  I really really wanted rustic and vintagy (yes with a "y"), but I just couldn't summon the vintage created juices.  This is as close as I could get.  :)


This is a rub-on from Paper Studio...it's vintage as far as my collection goes...LOL!


I put the rub-on a piece of kraft paper and cut around the box to give my sentiment just a little extra presence.


Then I added the bling!  Fun!!  I cut the 3 bottom swirlies and added 1 to the left and 2 to the right.  Some of the gems were sharing glue with the main swirly so I had to cut the glue carefully to separate the strands.  I remember getting this at the Scrapbook Expo last year....ahhh good times!


Here's my card!  Until next time my friends...stay swirly :)

Tidbit Tuesday

Hello Everybody!

I hope everybody had a great Thanksgiving!  I sure did.  We had a little sickness which has slowed me down a little bit.  So today's tidbit is from Simon Says Stamp.  She shows you how to use alcohol inks using a felt applicator and shows you the newest color--Snowcap white.  Oh! I want that!! 

Don't worry though---there are a few challenges I want to participate in--so stop back by because there are sure to be projects and inspiration!

Until next time my friends....stay healthy!

Thursday, November 24, 2011

Little Birdie Mobile

Hello Everybody!

I hope everybody has a great Thanksgiving!  I have been busy working on this sweet little bird cage.  It is for the Lessology Challenge #6 Hanging Mobile.  This is my Friday project--just a day early :)

This is my bird cage mobile.  I watch Scrapbook Soup episode 110, and Jo Pearson from Michael's made a bird cage.  I thought it was the coolest thing and that I must make one too!!  So when the challenge from Lessology came along--I thought perfect!  I can make a mobile and the cage!  So scroll down to see how I made the mobile.  The main instructions are for the cage are here.  Scroll to episode 110, and you will see the link for the cage instructions.


Here is a closer view of the mobile part.


Here's my little birdie.


Side view...

Back view...

Here's the top of the cage...


Here's the mobile sitting still...


I started with a paper mache box.

I painted it ballerina pink.  Love that!

Then I punched holes in the rim of the top with my crop-a-dile.  I'm following the directions from the Scrapbook Soup instructions.

This is what it looks like after I put the wires in.  So cool!!  I put little heart gems on the end of each wire piece.  The heart gems came with jump rings so I used those.

Next I got out the beige colored Raffia.  Yay, a use for it!

I sprayed it with a clear glittery Smooch solution so the shimmer is subtle.

I saw these Martha Stewart keys in the Scrapbook Etc. magazine and knew that I had to had them.  I found them at Michael's--Cha Ching!  I knew that I could work a couple of them into my project.  Check out the background in the package...that comes back later!

I painted Prima paper flowers with shimmers that I got from Cardmaking and Papercraft Magazine.


I mostly used pink and blue, but there is a little yellow on some of the flowers.

I used these little rose buds on top of the cage.  I have had these forever!  The pink bunch I bought at Wal-mart way way back in the day for .25!  These have wire stems and that made it easy to attach to the top of the cage.

Here is the background paper from the Martha Stewart Keys package.  This is my upcycled item.  I made butterflies out of it.  How fun is that!

With the pattern paper I cut 4 butterflies--2 pattern sides up and 2 back sides up.  Then I glued the butterflies together (1 from each cutting) pattern up and pattern on the bottom.  I pierced a hole in them in order to tie them to the string for the mobile part.

I strung 2 strings of glass beads and 3 strings of Art C beads to make the mobile part.  I put 2 butterflies, 1 Tim Holtz coin (pictured below), 2 Martha Stewart keys (glued back to back because the are flat on the bottom) and 1 old luggage key on the bottoms of the beaded strands.


I took a piece of redline tape and put it on the inside of the box.  I put the top end of a strand of beads on the tape and took a piece of redline tape and put it over the exposed string.  I didn't take the other side of the redline tape off.  I did that with the other 4 strands as well.

I glued the shimmer flowers to the outside of the round box.  These Making Memories pearls and rhinestones are what I put in the centers of the flowers.

Here is the top part of the mobile.  I adhered the bird cage part to the upside down box.  The original directions called of a paper mache bird, but Michael's didn't have any.  Thank goodness it's Christmas time!  I went over to the Christmas ornament section and found this sweet bird.  Perfect!  I cut the ornament string and shorted it so the bird would be lifted higher into the cage.  I made a little hook to hang the birdie.

I put the sparkly Raffia in the bottom of the bird cage.  I took a couple of ribbons (1 with pink flowers) and strung them through the cage wires at the top.


Here's a picture of the mobile part. 

This was such a fun project to make!  Have a good Thanksgiving!  Until next time my friends....eat lots of turkey and cranberry sauce!  :)