Saturday, August 30, 2014

Tim's August Tag

Hello Everybody!

I am so happy that I was able to make the Tim Holtz Tag this month.  I haven't played in awhile and I missed it.  Though I have made plenty of "sand" from his July tag.  ;)

On his blog he said it was kind of a follow your muse type of deal.  But I enjoy going through the steps that he does because I always learn something.  This month I learned I could stamp on the tissue tape and it would resist distress stain. :)


I was totally inspired by the new Dr. Who episode from last Saturday.  If you still have it on your DVR you may want to scroll on ahead.  ;)  There was this main droid guy in the episode and there were steampunk elements.  I loved it!  So the fella was looking for "paradise."  There is a P that I made from krackle paste (wendi vecchi's) and the eye chart stencil.  I included lots of gears and the hot air balloon.  It was a great episode!

Here is a closeup.  Searching for Paradise :)


I am submitting this tag into the following:

Tim Holtz August Tag

Simon Says Stamp Wednesday Challenge-Anything Goes

Thank you for stopping by!  Until next time my friends...it's time to fire up the Tardis ;)

Friday, August 29, 2014

Favorite Things Friday-Inks!

Hello Everybody!

Since it's Friday it's time to find out what everybody's Favorite is at Scrap it Girl!  Today we want to know what your favorite ink is?  Do you like spray inks or stamp pads or some other way?  I like stamp pads the best. :)

Here are my two favorite brands.  I love distress because of how it reacts with water or spray inks :)  And I love the colors of Stampin' Up.


So friends--what is your favorite type of ink?  Until next time my friends...stay inky! :)

A Tweet Little House Warming Gift

Hello Everybody!

Today at the Unique Laser Designs Blog I am showing a fun way to decorate this very cool wood design by Unique Laser Designs.  When I was going through the ULD store-this piece totally caught my eye.  It is God Bless Our HouseW-3035L.  I am using the largest one which measures 8 inches tall.


First I used gesso to prime it.  Then I narrowed down my supplies to this:


The Kiwi Fruit embossing powder is on the bird.  Using Glossy Accents I adhered the Melissa Frances glitter glass and black Distress glitter.  

For the words I used Chipped Sapphire Distress paint.  I outlined the letters with the Faber-Castell marker.  Then using Versamark I applied Antiquities Frosted Crystal embossing powder.  It gave it this texture and some shine.


Here is the finished piece.  I had to give my bird a googly eye.  On the back I hot glued a soda tab so that I can hang this up.  Or if I should part with it-my lucky friend can hang it up. ;)


Thanks for stopping by!  For more ideas-check out Unique Laser Designs on Facebook and Pinterest.  And be sure to check out the store too! :)

A Teacher Gift

Hello Everybody!

This week at the Great Impressions Blog we are making teacher gifts.  I thought a little homemade box with goodies in it would be nice.

So using my Cricut machine and the Tags, Bags, Boxes, and More Cartridge I cut out a box top and bottom.

For the outside of the box I used E492 Twirly Background.  For the tag I used the sentiment B193 So Thankful for You.


Before I stamped the background I used Distress Inks and water to make it colorful.


Here is how it looked afterwards.  I made two sets (in case I didn't like one I had a backup.) ;)


For the drawer I used F427 Lace Border.  And I added a button. 


Here is what the paper looked like before I made flowers.  I used the following stamps: J106 The Rose (that's the handwriting), E645 Retro Spirals, K94 Distressed Background.  


Then I used the Tattered Floral die from Tim Holtz.  For the leaves I used mowed lawn on dictionary paper and used a Tim Holtz leaf die (not pictured).


Some more distressed ink and a cool brad later....


For the sides I used F387 Wild Flowers.  I used Distress Markers to color the stems green and the flowers pink.


So what did I put inside of this little box?  Post-It Notes, paper clips, and some Smarties.  :)


Thank you for stopping by!  If you are looking for more inspiration you can check out Great Impressions Stamps on Facebook and on Pinterest!  

Until next time my friends...Love your teachers-they do so much! :)

Friday, August 22, 2014

Favorite Things Friday

Hello Everybody!

Today at Scrap It Girl we are celebrating our Favorite Things Friday with our favorite stamp sets.  No easy task!

So as I look at all of my stamp sets-this one jumped out.  I have used this set many times-in tags and on scrapbook pages.


Do you have a favorite stamp set?  :)  

Until next time my friends...keep stampin'! :)

Friday Fun Layout

Hello Everybody!

It's my turn over at the Great Impressions Blog and I have a fun layout to share with you all today. :)  I was in a mixed media mood so I got out my stencils, inks, and most important-my Great Impressions Stamps!

Here's my layout.


Here is the Retro Happy Birthday stamp.  I used Real Red Stampin' Up Craft Ink with this stamp and clear embossing powder.  I used Real Red on the Tim Holtz Resist letters and for the Twirly Background stamp.


There are splatters from the stencils and from some mists that I used.  However, if you look here and see those brown dots (walnut stain distress ink)--that is the distressed background stamp.  I used it in other places on this layout but it shows up really well on the right hand corner.


Here are the retro circles.  I used weathered wood and black soot distress inks.  The weathered wood (like a gray) was applied first.  Then I just did a few black circles to give it some dimension.  You can also see the red twirls.  :)


Here is how this look where the picture goes.  You won't see all of those circles-but you need them to get the border to have some depth.  The chevrons are a stencil (heidi swapp) and Stampin' Up White Craft Ink.


Here is the area with the picture and embellies.  I also used Tim Holtz's sun burst stencil.  Some of those dots you see is bubble wrap with walnut stain distress ink.


For more inspiration check out the Great Impressions Blog, Facebook, Twitter, and Pinterest!  :)  And if you are ready to do some shopping: Great Impressions Online Store.

Until next time my friends...stay inspired! :)


Tuesday, August 19, 2014

Happy New Year 2014 Layout

Hello Everybody!

There is a new sketch at Stick It Down!  I was going through my pictures and found these 2 from where we stayed up to welcome the New Year.  And then like magic this page came together!  (Which doesn't usually happen like that!) ;)


The base paper is Bo Bunny.  This is a close up.  I bought the Jolee's steampunk owls and thought that would be a cool place for one.  I always buy these cute little things and then I hoard them.  I'm trying to get better and here is the first step!  LOL!  I used some Tim Holtz embellies and both die cuts are his.  I glittered the hexagons and that has actually been hanging around because it didn't fit another project.  Yay! Now it has a home :)


Here's the sketch.  We would love to see you scrapbook pages!  


Thank you for stopping by!  Until next time my friends...Hope your 2014 is going well! :)


Monday, August 18, 2014

Eek! A Cute Birthday Card

Hello Everybody!

Today at House of Cards we are showing you the Cute Cards using this month's sketch.

For my cute card I too my strips and adhered them to my white panel.  Then I embossed the whole thing.  I know this technique has a name-but I don't know what it is called.  I used 2 stamps from a Close To My Heart set (Merry Monsters) and the Happy Birthday is from Great Impressions.


We would love for you to play along!  Here's the sketch:


Here is the link to the original post (with the Linky).  

Until next time my friends...Have a great day! :)


Friday, August 15, 2014

Favorite Things Friday--Online Stores

Hello Everybody!

Today at Scrap It Girl we are sharing our Favorite Things.  Today it is Online Stores!

I couldn't choose one.  I don't do a lot of online shopping but when I do it is either from Great Impressions Stamps or Unique Laser Designs.  They are both just fabulous!  So if you have a chance-check them out! :)


What is your favorite online store?

Thanks for stopping by!  Until next time my friends...let's do some shopping! ;)

It's Still Summer!

Hello Everybody!

It's my turn over at the Unique Laser Designs Blog to share a project I made using awesome wood embellishments from the Unique Laser Designs Store.  I know school is staring soon (if not already), but I'm not quite ready to let go of summer so fast!

A friend of ours gave us this cool Beach Photo Holder a couple of years ago.  When I saw the new wood pieces at Unique Laser Designs-I was so excited!  I knew what I could use them for!


Here are the Unique Laser Design Pieces I chose to decorate with: Shells and the Dolphin.


I started off painting the photo holder with Salty Ocean Distress Paint.  I painted the base with Scattered Straw.


I painted the shells with gesso first.  Then for the first 3 (left to right) I painted them with spun sugar.  I outlined them with a worn lipstick distress marker (Thanks Tim Holtz for the idea!) and then I used Star Dust Stickles to outline the outlines (hehe).  Then I used black soot distress ink around the outside of each piece.


For this shell I added a little Shaded Lilac distress ink with my finger.  Just to add a little something.


For this shell-I actually painted it with an orange and white paint mix.  I wanted it to be coral.  I didn't use a marker for the outlines-just the Stickles.


For the sand-I made the sand using Tim Holtz's recipe and technique here.  I love this!  He is just brilliant!  I did have to substitute 2 things-I used Stampendous black embossing powder and a generic gold glitter.  But other than that everything else is the same.  The Antique Linen distress embossing powder is a must because it give it the sandy color.  (I personally don't have anything comparable.)

I don't have any pictures from making sand-it's a messing process.  :)

For the dolphin I used Sparkle N Sprinkle's micro glitter sonic silver.  They have a brushable glue-and that is what I used to adhere the glitter. 


So here is my finished Beach Photo Holder.  This is outside.  By the pool.  LOL!  I don't live close enough to the beach for a quick photo.  


And here is the photo holder in the photo box.  :)


Thank you so much for stopping by!  Until next time my friends...get your towels and sunscreen! ;)  Summer isn't over yet!


Fun Butterfly Cards

Hello Everybody!

It's my turn at the Great Impressions Blog!  I am going to show you 3 cards using the coolest butterfly stamp!  Are you ready?  I am! :)


I made 4x4 cards out of white cardstock.  I used the following stamps:  E843 Flowery Butterfly, B151 A Little Hello, B240 Sweet Happy Birthday, and B193 So Thankful For You.  All of these stamps and more can be found at the Great Impressions Online Store!

For this card I used Tempting Turquoise ink from Stampin' Up and matching cardstock that I embossed using the Swiss Dots folder.


I used Pink Passions from SU here with matching paper.  I found a pink floss that matched-yay!  The white panel is pop dotted.


For this card I used Orchid Opulence and a matching cardstock-both from SU.


I have to say it again-I love this butterfly!  These are fun and easy cards.  I don't know if I will give them out to friends or give them as a set to someone-Decisions! ;)

Keep up with Great Impressions with Facebook and Pinterest!  Our Happy Birthday Challenge is still going on-so link up with your Happy Birthday Project today! :)

I am linking up to the {PIN}spirational Challenge: Anything Goes #120.

Until next time my friends...Have a beautiful weekend! :)


Friday, August 8, 2014

Winged Birthday

Hello Everybody!

It's my turn to share a card at the Great Impressions Blog.

I love how this turned out.  I used H257 Someone Like You and E492 Twirly Background from the Great Impressions Online Store.  For the Someone Like You I used black embossing powder and then applied walnut stain and spun sugar distress ink over it.


Here is a picture of the background.  The paper is from Simple Stories.  I used spun sugar and the Twirly Background.  There were a few spaces where only 2 twirls would fit so then I just stamped the 2 to fill in.  Then I used light modeling paste with Tim Holtz's dot fade stencil.


The crown and wings are from the Tim Holtz die Heart Wings.  For the crown I put gold embossing powder on it and rhinestones.  For the wings I used dictionary paper and shaded lilac distress ink.  I used glossy accents to glue down the Someone Like You and wings because there is modeling paste underneath, and I wanted to be sure it stuck.

I added a little walnut stain distress ink to the edges.

I am submitting this card into the following challenges:


The Mixed Media Monthly Challenge--Use paste/gesso and a stencil

Thanks for stopping by!  Until next time my friends...make everyday special! :)

Sunday, August 3, 2014

Great Impressions New Challenge

Hello Everybody!

Today starts the new challenge at the Great Impressions Blog.  This month we are all about Birthdays!  There are so many awesome Birthday Stamps that you can see here.

For my card I used E846 Flag BannerG504 Birthday Bicycle and B240 Sweet Happy Birthday.


I totally love this little bicycle! I stamped it a second time and colored it.  then I cut out the balloons and the the present.  I used pop dots (I had to cut the pop dots in half for the two smaller balloons.  After I stamped the banner, I fussy cut it out and pop dotted it.  


I cut out the banners on the side with a die cut machine.  I glued the twine around the frame and for the strings on the balloons.  Where the twine met in the left hand corner, I added a charm.  

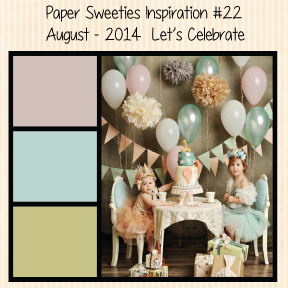
I am linking this card up to the "Let's Celebrate" challenge at Paper Sweeties!  (You can join in too!  Just click the link!)


Thank you so much for stopping by!  I can't wait to see your birthday cards!

Until next time my friends...who wants cake?

Supplies:
Paper: Me & MyBig Ideas, Recollections Cardstock, Stampin Up Cardstock
Ink: Stampin Up Lavender Lace, Distress Ink Tumbled Glass
Twine: My Mind's Eye
Copic Markers
Sizzix Banner Framelets