Monday, December 28, 2020

Festival of Trees Layout

 Hello Friends!

I was very inspired by the sketch at Stick It Down.  I love that wreath on the second page of the layout.  I also love Paige Evans-I am in her facebook group and she shares projects using her die cuts and paper lines.  So I saw the wreath on the sketch and my mine was like I can use a Paige Evans die cut.  So I did!

I am also submitting this layout to Challenge YOUrself-Anything Goes #84. I'm on the second page ;)

Here's my layout followed by the sketch:


I used an old Stampin Up kit called Christmas Jingle.  It was perfect because I was having problems matching all of the the other Christmas paper I had. LOL. The Merry Christmas Paper is from Hobby Lobby.  The border on the left is also from the kit. For the journal block I used decorative edge scissors. I have a lot of them, and I am trying to use them :) So yay! Then there are various brads and stickers and a tree button and a Making Memories square there to decorate. 

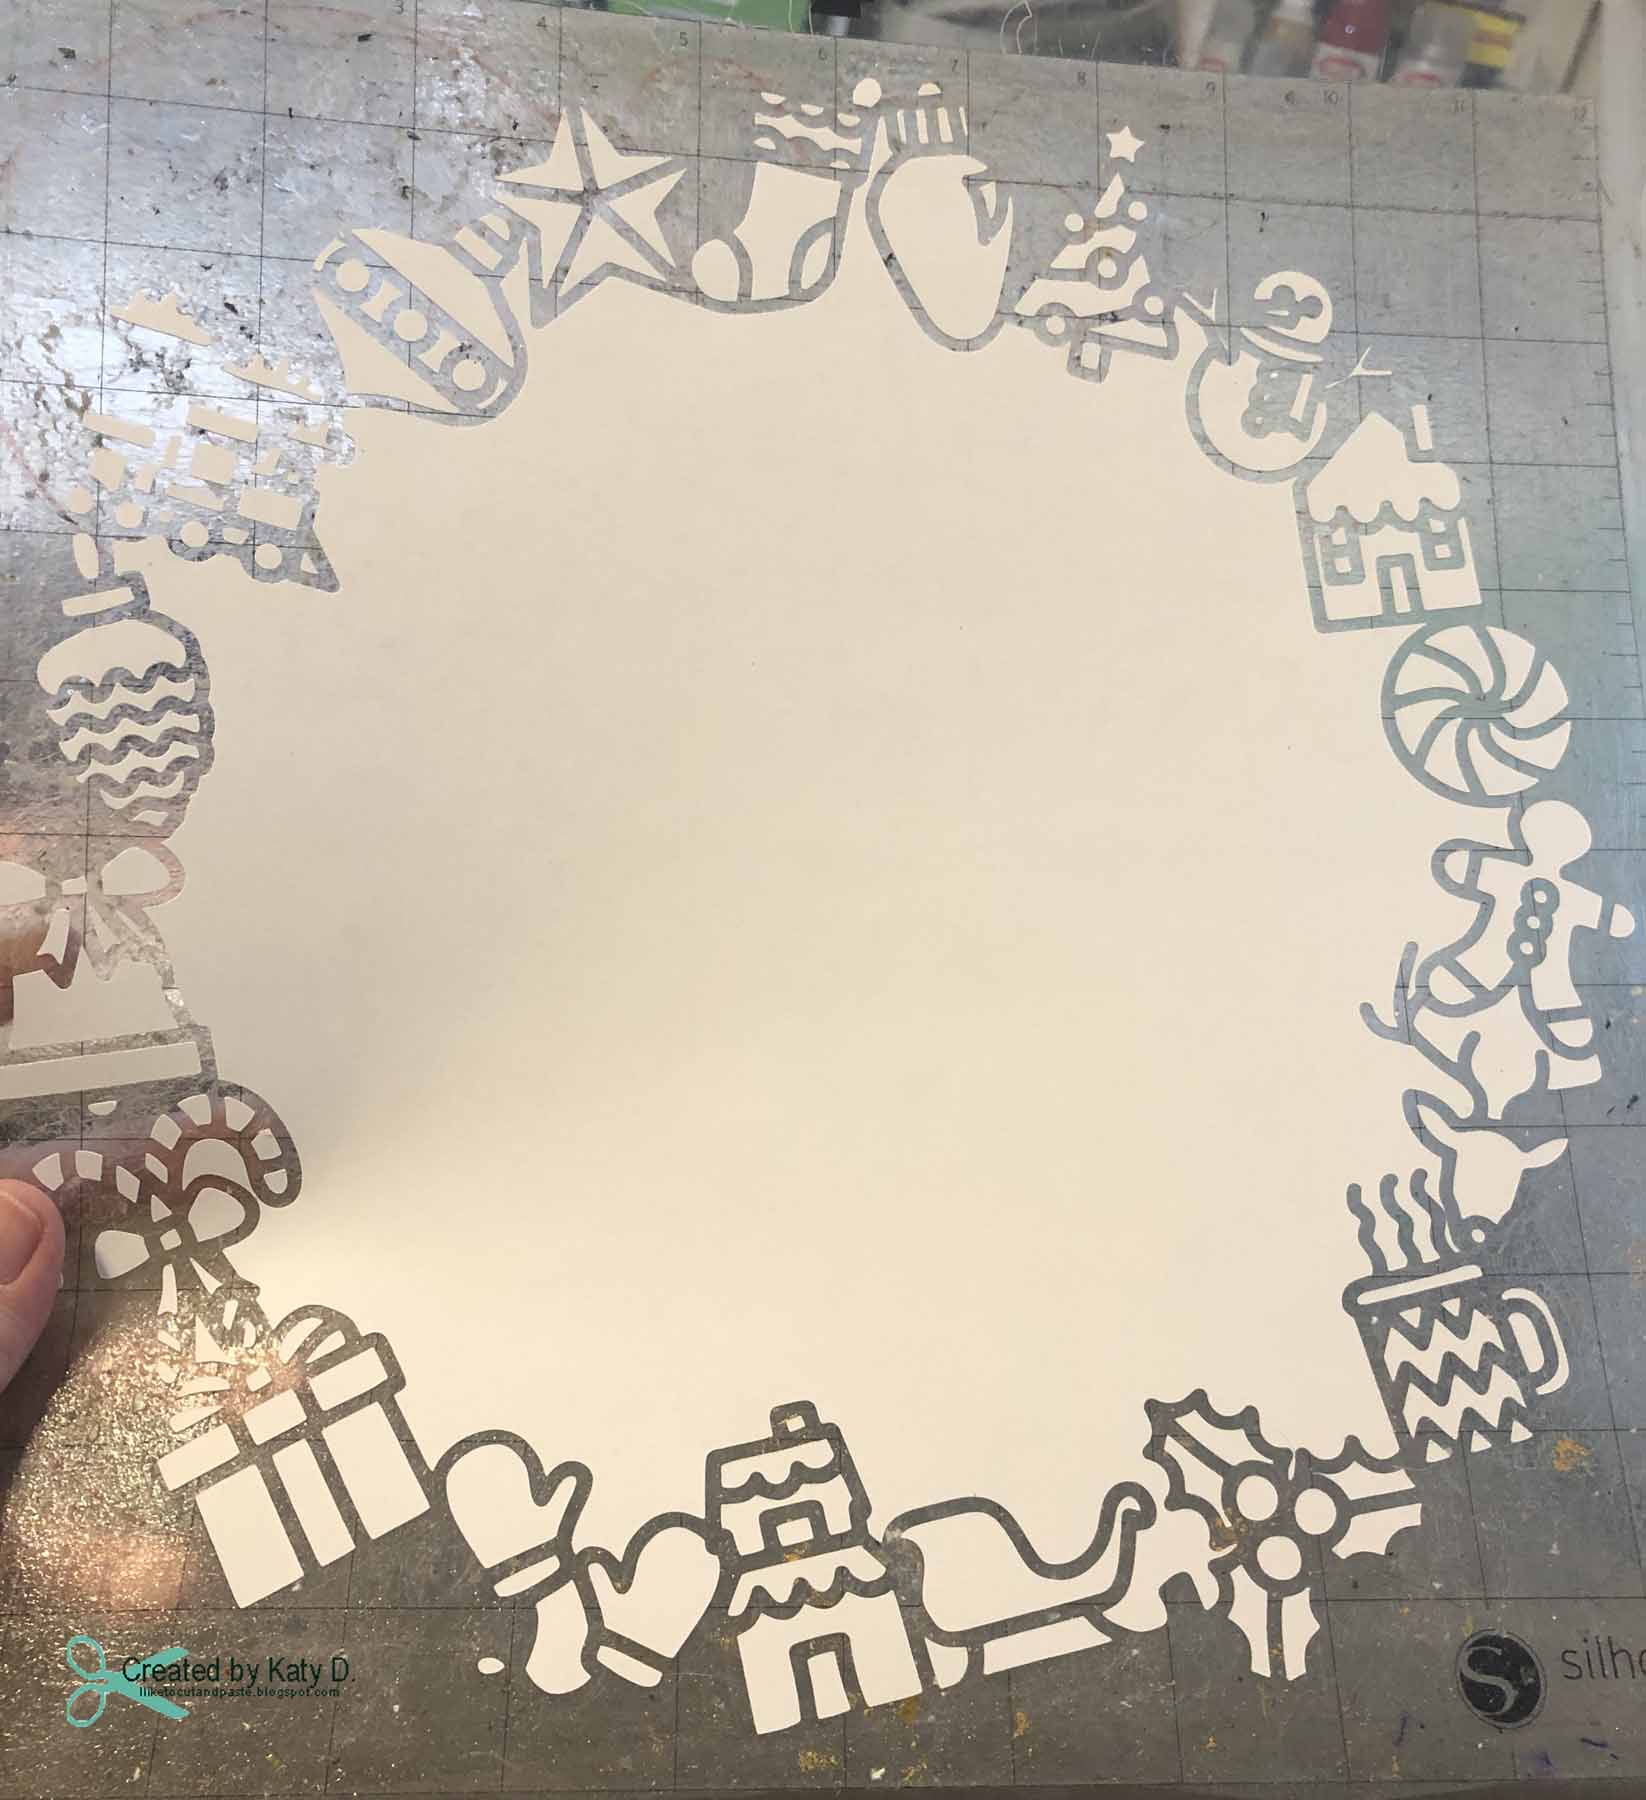
Here is the die cut wreath before I filled in with little papers. I am just happy my silhouette cut it out LOL. I know that sounds silly but I don't always have luck with intricate cuts.  I took the speed down by one and maybe that helped.  I was very proud of it LOL.


So here are the insides of the images.  They are so cute! I wanted to save them but I do no possess the patience for such an undertaking. I started and realized this. LOL.  I watched a video on Paige's youtube where she offers a few different ways to back the die cut. I chose flipping it over and tracing the paper I wanted it to go on (traced on the backside of it). Then cut it out with a border so I could glue it onto the die cut outline.  It took a few days a couple of hours here and there.


Ta Da! I used glitter paper, pattern paper, scraps, and even a paper where I had sprayed a pretty color on (the bell).  It was fun.  My husband wanted me to make it into a real wreath. He's so sweet! :) It's a little small but maybe that is an idea for later down the road. 


I have to show you one more die cut on this layout:


I got this as a little gift from Taylored Expressions for an order. I love it! And thought it fit perfect here.  They send the cutest little thank you gifts. I have others that I think are great. They didn't pay me for this advertisement but I think you should know!  :)

Thank you for stopping by! Until next time my friends!


Sunday, December 13, 2020

Thank You For A Doctor Card

 Hello Friends!

I made a simple card this evening.  I have had some medical stuff and my doctor has been fantastic.  So I created this card as a thank you and happy holidays.


The dark panel is a dark navy blue and I am not sure if that translated on camera.  But that's ok because the stethoscope sparkles (Paper Studio Glitter Paper)! I made that using my silhouette cameo.  I white embossed the sentiment from Stampin UP. And I used a silver marker to edge the navy blue panel.

Have you made your doctor a thank you card or given them any kind of gift? I am thankful that I haven't really had anything until now. And that I see the same doctor because sometimes with dr groups you see who is available. 

I am submitting this card into the challenge at Watercooler Wednesday: 301 Dawn's Challenge All About Occasions.

Thank you for stopping by today! :)


Tuesday, December 1, 2020

Rainbow Card Challenge

 Hello Everybody!

I hope that your Thanksgiving was great.  Hopefully you got to do some crafting!

This month we are creating rainbow Christmas cards at the Rainbow Card Challenge.  I thought this would be easy-lol however for me it was truly a challenge.  But that's the wonderful thing about challenges right? to push creativity and to look at our wonderful supplies in a new way. 

Here is my card:


I used: Paige Evans Star stencil
Distress Oxide Inks--picked raspberry, wilted violet, peacock feathers, abandoned coral, citron, spiced marmalade
Distress Ink-Squeezed Lemonade
Hero Arts stamp and sentiment from 2013 
Stickles for his scarf and band on hat
Random star jewels
Prisma Color Markers

Thank you for stopping by! I hope you join this colorful Christmas challenge!
Until next time my friends-always be crafting! :)


Friday, November 27, 2020

Wedding Card

 Hello Everybody!

One of the fun things about making cards is how we can make them custom for the recipient.  This is one of those cards.  It's not a traditional wedding card with a groom and bride-but that's ok it doesn't need to be.  


For this wedding card I used a heart stencil from Simon Says Stamp and shimmer paste from TCW.  The sentiments are words from a Tim Holtz word stickers pack and the flowers are from Hobby Lobby. 


Here's another view of the card.  I love this paste.


Thank you for stopping by! :)


Sunday, November 1, 2020

Sapphire for November!

 Hello Friends!

It's time for our November Challenge at The Rainbow Card Challenge.  This month we want to see sapphire! Blue is so pretty!

Here is my card:


I used a Tim Holtz die cut for the pattern cut out.  And the white leaves are Tim Holtz's also.  The flowers are 2 punches. And the metal frame and brads are from Stampin Up. The blue behind the open pattern and the flowers are from a dye pad by All Night Media Stamp A Memory #22 Royal Blue. I have had this ink pad for a while and it seemed to match the color in my mind perfectly.

I hope you will join us for this fun challenge!


Until next time my friends-stay colorful! :)


Sunday, October 11, 2020

Happy Birthday Cow Card

 Hello Friends!

Today I am sharing with you a card I made for a friend of mine for her birthday.  She has cows and I always hope she likes the cows because I like making cow cards for her. LOL. 


This cow is a digital file from the Silhouette Store.  It had other flowers with the original file but they didn't cut well for me. (Who knows-my blade could be sort of dull.  I will say it's user error.  LOL) So I used some little flowers from a Tim Holtz die cut set.  They remind me of little sunflowers here.  I used distress oxide to color them. The paper was in my stash.  And the sentiment is a Tim Holtz stamp.  


Here's a close up. 

I am submitting this card into the following challenges:

Crafter's Castle #34 Anything Goes


Thank you for stopping by! Until next time my friends! 

Edited: Happy Day! I won the Watercooler Rock Star this week! Thank you :)


Sunday, October 4, 2020

Cinderella Bridal Shower

Hello Everybody!

Six months or so ago a friend of mine asked if I could help with a mutual friend's daughter's bridal shower.  (LOL that sounds crazier then it is-I promise!) I said sure :) So the theme was Cinderella.  

The biggest challenge was to not make it look like a party for a 5 year old princess.  Planning the shower was me and two other friends.  After establishing what the games and things would be I went to Pinterest.  

I also went to Kellybell Designs and purchased the Midnight Princess Kit.   This kit was so awesome.  Everything in frames was used with this kit and various fonts in my Photoshop Elements program.  There were a few things I cut or print and cut from my Silhouette machine.  We also knew we had to have a photo booth (SO FUN!) so I bought a Cinderella set from the Etsy store JoJo Digital Store.

Here are the pictures with photo credits to my friend Victoria R. Her pictures are the professional looking photos.  It will be hard to tell (it won't be LOL-you'll know.) :)

Let's start with the invitations:


All Kellybell papers and elements except for the font is from Photoshop Elements. I even learned how to use a drop shadow. :)  I made this digitally so that I could print them and cut them down to size for the cards.  

We had 2 games on this table.  Guess how many Hershey Kisses and the other was a Ring Game where if certain words were said you could take the other person's ring. Whoever had the most rings at the end of the time won a prize.


I had post card papers-a whole box that my dad gave me years ago.  They were perfect for printing the guessing cards on.  This is the Kisses guessing card.  I created this using the Midnight Princess Kit from Kellybell and a font from Photoshop Elements.


This is the Date Night table.  This is where guests could give date night suggestions for the soon to be newlyweds.


My friend had an awesome patio area, and we were fortunate enough that the weather was nice (meaning hot but not raining! LOL)

This game is to guess how much all of the items cost all together.


Here's the answer card for this game.


Photo Booth! My friend put up this awesome grass wall.  


Here are all of the photo booth props.  I also had cut a few personalized ones for the Bride.


How we missed a picture of the Mimosa Bar...I'll never know LOL.  Here is the sign which had a frame.  I had printed up little labels for the juices and the fruits too.  This was an absolute hit!  We had orange juice, peach and mango nectar juice, and grapefruit juice.  One of our friends had brought these cool jar pitchers to pour the juice out of.  There was fruit too-but tricky to get out without making a mess. (at least for me LOL).


We gave out liquid soap from Bath and Body Works.  I glued little veils on them and created the tags.


The centerpiece for the food table was beautiful.  The mom of the bride spray painted this carriage and put the flowers in it.  Here are the dishes before the food was plated. And we sprinkled these glitter hearts around.


I found this idea on Pinterest. I bought the charms from Amazon.  And small doilies are a little harder to find than one might think.  I found these at a 2nd Hobby Lobby.  LOL.  The silverware I bought at Party City along with the disposable champagne flutes for the Mimosa Bar.  I love any excuse to go into Party City.  :)


This game was out on the patio too.  A different friend of our drank some wine for our cause.  And one of the friends helping with the shower drank some beer for our cause.  LOL. The crate came from Hobby Lobby.  I cut the vinyl on the silhouette. And I glittered bottles for days with mod podge and a spray sealant. 


Here is the sign.  Somehow we missed taking a picture of this outside so I am very happy to have these.  


The 3 of us giving the shower also put together a basket for the bride to be.  I made her these fun wine glasses.  Totally inspired by Pinterest. :)


Thank you for stopping today! :)

Thursday, October 1, 2020

Happy October!

 Hello Everybody!

Happy October! It just so happens that I love the month of October.  There's Fall and Halloween-it's all so fun! :)

So over at The Rainbow Card Challenge we have a new color challenge.  I hope you like it! It's slate:


I used various greys for my card.  I had dark and light grey paper.  I used some black soot distress ink around the edges of the dark grey panel.  

Everything here is Tim Holtz! Except the paper-it's craft smart from Michaels.  The bat embossing folder, the two monsters and bats die cuts, the sentiment, and I used weathered wood, pumice stone, and black soot distress inks. 

I did use pop dots on Dracula.  He levitates right?  LOL. :)


Making this card really has gotten me in the Halloween Spirit.  I am so excited! Although it will be the 2020 version of Halloween-that's ok :)

I'd like to enter this into the following challenges:


I hope you will join our Slate challenge.  Until next time my friends trick or treat! :)


Sunday, September 27, 2020

Fall Leaves Thank You Card

 Hello Friends!

Here is my 2nd card of the evening.


I used a recollections embossed paper for the back panel.  And I used a gold marker for the center panel. The leaves-let me tell you I bought those at Hobby Lobby last year for like 80 or 90% off.  And I didn't loose them! LOL So here they are on this card.  The sentiment is a sticker from hobby lobby also.  Sometimes I don't feel like stamping. Do you ever feel that way? And then I glued a square rinestone from Making Memories (talk about way back!) in front of the sentiment to give it a little pizzazz.

I am submitting this into the following challenges:


Thank you for stopping by.  Until next time my friends keep craftin! :)


Autumn Thanks

 Hello Friends!

I had a little time this evening and was able to make 2 thank you cards.  Here is the first:


I had this plaid scrap and decided it was time for it to be made into a card.  I outlined it with a gold marker.  I used an old queen and co. die cut for the sentiment and used glitter paper.  The pumpkins are a foil stamp from Hobby Lobby.  I try not to buy stickers because I have like a million of them--but when Hobby Lobby tells you you need it-you buy it.  ;) LOL

I am entering this card in to the following challenges:


Thank you for stopping by! Until next time my friends-it's time to enjoy fall! :)


California Slider Card

 Hello Everybody!


I made this card for some friends moving to California.  I realized that I filmed it since it was a slider card but I didn't take regular pictures of it.  LOL.  So I took a picture during the video.  


This is the first slider card I have made.  I used my silhouette machine to make the little RV and slider and the state of California.  I used gold glitter paper for Cali since it's the Golden State.  I used map paper for the background.  The Bon Voyage is a Stampers Anonymous Brett Weldele stamp.

Here is the video:


Bye Bye Friends! :)


Thank you for stopping by! Until next time my friends...safe travels! :)

**Edited This card won a Princess award. :)


Saturday, September 26, 2020

New Home Card

 Hello Friends!

Today I am happy to share with you a card a made for a friend's mom and dad who recently moved.  


This is an older stamp set called Around the Block by Close to My Heart.  I love this stamp set.  It gives you a couple of options for doors and windows and even bricks.  I tried to put bricks but liked the house plain so I had to redo the house. LOL. I used my prisma color markers.  I also used the grass die cut from Lawn Fawn-what I like to call Lawn Fawn grass as if you could to home depot and ask for it by name. (seriously though how cool would that be?)

I love the whimsy this house has. :) So Fun!

I am entering this into the following challenges:


A friend of mine gave me these stamps about 3 years ago. They have a 25 year sticker and right now CTMH is celebrating 35 years so I believe these stamps came out in 2010. 

Thank you for stopping by! I appreciate you! Until next time my friends good luck with the grass ;) lol

Wednesday, September 23, 2020

Did Someone Say Cake?

 Hello Everybody!

I am excited to show you this fun card.  My sister just had a birthday and of course I'm a few days behind.  Thankfully with digital things you can email a gift card in no time! But I had to send her a card too.  

I made this cake using a file from the Silhouette Design Store.  I used a stamp from the Rubber Stamp Tapestry for the spongy cake part.  For the sprinkles I used sprinkles polymer clay by Studio Katia.  


Look at the little clay sprinkles.  Aren't they so cute!  I have had these for a little while so this is my first time using them.  I hope my sister is just as impressed as I am ;) LOL

The background paper is from Studio G which has been in my stash for a little while. I also used Taylored Expressions sentiment and die cut.  They have a stamp with a lot of sayings and a die cut to match so you get this nice sentiment strip.  I absolutely love these sentiment strips!


Thank you for stopping by!  I am linking this up to the Watercooler Wednesday Challenge: Michelle's Challenge: All About Occasions.


Saturday, September 19, 2020

Happy Birthday Elena!

Hello Everybody!

It is a special day today! Our friend Elena from the Rainbow Card Challenge is having a birthday! Happy Birthday sweet lady! :)

To celebrate a few of us got together to make a little blog hop for her.  

Katy --->You are Here! :)
Elena --->Stop by and wish Elena a Happy Birthday! :)


Here is the card I made for Elena.  I embossed a navy blue Stampin Up cardstock and then lightly brushed gold brilliance ink tsukineko on the raised edges.  The red center is Tim Holtz alcohol inks.  The butterfly is gold glitter paper and a Tim Holtz butterfly die cut.  And the sentiment is from Taylored Expressions-the stamps and die cut.  I also used a gold Prismacolor Marker to outline the panels.

I am submitting this card to the Seize the Birthday Challenge #199 Toppings die cuts and stamped images.


Thank you for stopping by! Until next time my friends! :)

Saturday, September 12, 2020

Pencils

 Hello Friends!

I have had these little nubby pencils floating around my desk for sometime.  When I saw them I thought they would be cute on a little canvas.  So that's what I did today.  


I painted the square canvas magnet with Golden Paints- diarylide yellow, Naphthol Red Light and Burnt Umber Light (brown lol).  The red and yellow I tried to mix on the canvas but I felt the pencils got lost.  So I lightly painted brown over it and wiped some of it off with a towel.  Once the paint was dry I hot glued these little pencils on the canvas.


So why these little pencils? These are my son's pencils from school a few years ago.  I just thought they were super cute.  They were used by him to do school work. He totally could have thrown them away.  We have plenty of pencils so he didn't have to use the all the way to the end.  But he did :) My hand hurts just thinking about writing with them.  LOL.

Is there something you turned into art that wouldn't really be otherwise?  Let me know! :)

Thanks for stopping by!  Until next time my friends!


Tuesday, September 1, 2020

Autumnal Amber Challenge

 Hello Everybody!

Happy September 1st! It is always hard for me to let go of summer.  Long days and warm temps are some of my favorite things! But that's ok because now we can move on to fall! Which is also one of my favorite things!

At the Rainbow Card Challenge this month we are all about Autumnal Amber. (If you can't say that first word-it's ok neither can I LOL!) This is such a pretty yellow color.  


For my card I used Tim Holtz alcohol inks (butterscotch, sunshine, caramel and blending solution) and Yupo paper.  I die cut the hexagons from an old Tim Holtz die cut and then I glued just the hexagons on (one by one LOL).  The little stamp are from The Alley Way Stamps and a gnome stamp set I have. Lastly, I used gold marker on the white panel edges.


We hope that you will join us for our September challenge!

Until next time my friends! :)