Showing posts with label Distress Inks. Show all posts

Sunday, September 4, 2022

Happy Halloween Card

 Hello Friends!

I was inspired by two challenges to make this card. The first is The Funkie Junkie Challenge: Stamped with Love using Tim Holtz stamps. The second is make your own background by Simon Says Stamp Monday Challenge.

Here's my card:


Here's a close up of most of the detail.


The background is CMS414 Tapestry-I used villianous potion embossing glaze and distress ink. 

The skeleton is from CMS437 Halloween Doodles.

CMS237 Crazy Things-Balloons (which I masked to get them together), hat, bow tie (colored with villianous potion embossing glaze), and pumpkin trick or treat container. I used copics and prismacolor markers for these things. 

CMS236 Crazy Talk is the sentiment (and my favorite sentiment stamp of all time.)

Some twine and pop dots were used for the balloons.

I am probably going to make this background again. There is something about the shine of the glaze that is just so pretty. :)

Thank you for stopping by! :)


Friday, August 26, 2022

Bad Mood Mixed Media Page

 Hello Friends!

Do you have a long list of things you should be making-birthday cards, halloween things, maybe some tags? Me too! But I couldn't focus on that. I just wanted to play-so I created this page in my little art journal book. It's 4x6 so it's enough "real estate" :)  

When I chose this page the purple and and pink ink were already on there. I think I was using up something LOL.  The lady I printed off from my silhouette software and bought from the Silhouette design store-clickchic is the designer. She is just printed on regular copy paper. I used a paint brush and water to tear the paper around her. I adhered her with tim holtz collage medium and added more on top.


And then I played! I used mica hocus pocus and winterberry distress crayons for the feathers. For the edge of her hat I used hickory smoked crayon and antique linen crayon for her skin. I used a little left over hocus pocus for her dress.

Then I used distress ink villianous potion and my simon says stamp heart stencil and added hearts. I used a script tim holtz stamp and faded jeans distress ink and added some stamping. And the sentiment is where the bad mood comes from LOL.


Here's a close up. I think I can relate ;) LOL. 


This week at Simon Says Stamp Monday Challenge is Mixed Media--I am submitting this art journal page. 

Thank you for stopping by! :)


Sunday, July 31, 2022

Happy First Day of School Card

 Hello Friends!

The challenge at Simon Says Stamp Monday Challenge is Back to School. So when I was looking at my Tim Holtz dies the smaller house in ghost town 2 jumped out at me. Crazy right? But I was able to turn this little haunted house into a respectable place of education :)


I cut the house twice-red and black cardstock and then cut the roof to fit over the red house. I swiped chrome yellow archival ink from Ranger on white cardstock and fit it to the back of the house. The background paper and world is from a Prima paper collection called Engraver. I added two smaller paper dolls and she is sitting on a box of blank index tabs (from snippets tim holtz). I used vintage photo oxide ink and black soot distress ink in various places. 


Here's the haunted house versus the school house.


Here is how I made the sentiment and why the letters aren't perfect. I didn't have word stamps for happy first day. So I made my own words using this little stamp set from my husband awhile back :)

Thank you for stopping by! :)


Tuesday, July 26, 2022

Mini Journal

 Hello Everybody!

I made this little journal for the Moving Parts Challenge at TFJB Challenge Blog.  When I saw moving parts of thought the page has to move to see the next page. I made it mini because I have lots of little paper dolls and snippets from Tim Holtz and this is a great way to use them. :) 

The base of the pages are from Silhouette in the Design Studio (Silhouette brand 295181).  It originally had a match book style to it but because I embellish a little extra I just had to make it without a wrap around paper piece.

Here's the front:


This journal measures length almost 2.75 inches and 3 inches wide. I used brads to bind it together. The front is a Tim Holtz snippet, clay frame with mica powder and finnabair gold vintage wax and the back ground paper is a from Tim also.


When I put the clay in the mold-I dusted it with the mica powder first so it looks coppery. Then on the right side you can see the difference the wax makes.


The first 2 pages. Snippets, heart punch, gears from sizzix gearhead and Tim's metallic paper, Tim Rub-on and both have paper dolls.  


I made this background with a script stamp from Tim and distress oxides and inks and water.


Here is a close up of this page.

Here is the next two pages:


Both of these used Tim's abandoned papers for backgrounds. 


Tim's paper dolls, rub-ons and a piece of lace and flower found in my stash.


This is a cool Tim stamp but I felt it got lost in the background. The picture makes it look better than it really is LOL. So I added some things:


A Tim Holtz bird and a sizzix Tim green -So the stamp is part of the cool background now.

Here's the next to pages-Moving right along....(see what I did there?)


Both of these background pages are from Abandoned. 


This butterfly is a transparency that I added glitter glue and then white paint. There are some sparkles there I promise :) And an old dream ticket because I still have those :) And Snippets. Oh and a clipping sticker.


Snippet, washi tape, a sticker from 7 gypsies and the heart I think came from The Funky and Frilly Boutique in one of those cute envelopes. (and if not then it was in my stash LOL)

Here is the next set:


This was a tan paper that I used rustic wilderness distress oxide on. I cut out the sizzix mixed media piece and colored the smaller kid's outfit with prism markers. More clippings stickers.


I used kitsch flamingo embossing powder on this cool lady. A clippings sticker. The background is pattern paper I had floating around and I don't know the brand. If it's not Tim's I would say 7 gypsies.

This is the last set.


This background paper was also sort of beige and I used speckled egg oxide. More snippets and a paper doll and a gear to help tie in from the 2nd page.


And this is the inside of the back cover. I used gathered twigs distress ink and a little black soot over the raised edges. The embossing folder is an old Tim one from Halloween (I think).  I loved this clippings sticker as a sort of the end. :)


So above is the debossed side. And below is the embossed side. I used walnut stain, villianous potion and prized ribbon and water. I think the stain was ink the other two were oxides. Also, I bent the brads because they were long which was good to go through the book but then they hung over. Thankfully, the "arms" were easy enough to bend.  And I used vintage gold wax from finnabair over the raised edges.


Thank you so much for stopping by and then moving again ;) (lol I laugh at my jokes even if no one else does) lolol :)


Wednesday, March 16, 2022

Cobblestone Church

 Hello Friends!

This is sooo exciting--I am a guest designer today for The Funky Junky Boutique Blog challenge. This is the first time I have had a project win overall winner.  I am very honored. :)

The challenge "Rather Blustery Day" is all about using supplies or techniques that you having a hard time using. I chose the Village Collection dies from Tim Holtz.  I have made 2 houses and they are still floating around in my craft space. They are ok-I didn't like how they turned out.. And after I made those two houses-I haven't touched this die set again.  Until now! I thought this is the perfect motivation to use this die set.  So I set out to make a church. I was going to try to make a steeple. deep breath


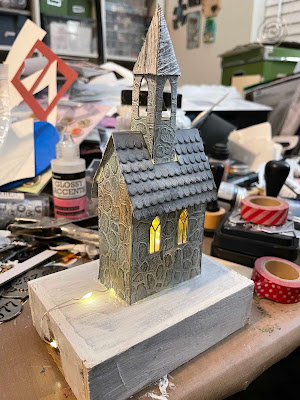
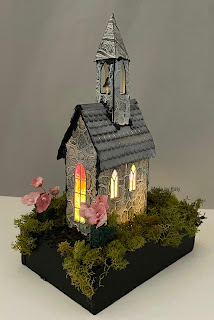
Here is my finished project. I used a lot of products and techniques, and it was super fun.  I know why I don't automatically reach for this set and that's because it is more of an exact type of craft. I'm not great at measuring (I like to eyeball) and I am not always tedious-a little more messy and just see how something turns out kind of person. However when you build a structure there needs to be some precision.  


This church makes my heart so happy! So I am going to post more pictures of it.  Here the lights are dim to show off the tiny lights and "stained glass" windows.

 Also, I am going to post process pictures-those will show what colors I used (for the most part). I take photos to remember what I used-it's a little easier that way. You will see my messy desk LOL just disregard that. Yeah, I'm a messy crafter for sure. LOL :)

So first more pics of the cobblestone church. One goal I had was for the bell to ring. And it does! 


Before I show you my process here are the links to help. They helped me. And I just want to show how I created mine-but these are better tutorials:
Cottage Tutorial by Bibi Cameron -It was cool to see her create the house from start to finish.

I used these embossing folders for the cobblestone and wood (bell tower roof).  As you see-I have the whole collection but didn't use the bricks or foundry on this project.


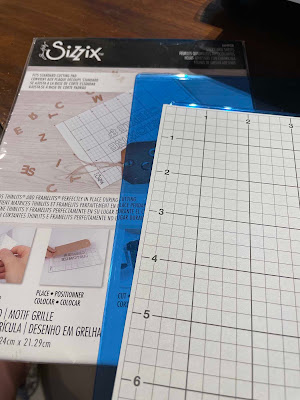
At Christmas I received two set of cutting pads. So one set I saved for the day I would use the sticky grid and cut out houses. Yeah that the day has come! :)


So I thought I measured right-but no I didn't. The windows on each are different. So I cut more and maybe have enough for another house. (that's in a pile marked later lol)


So the base of my house is regular cardstock. I have watched videos and Tim says to build it out of something a bit more stronger. Next time I will. LOL maybe that's why things get a little wonky.


We have windows and doors.


So I think next time everything should be cut out of black cardstock. Originally, I wanted to save time and just do the front and tower out of cobblestone but when I added black distress ink to the corners it wasn't clean. So cobblestones for all the walls! 


Here are the inks and crayon I used for the cobblestones.  The crayon is awesome!


I have mica tiles which I have never used before. I used alcohol inks and cut the pieces down to size. Then I glued them to the windows before sealing up the house.


Love! And that's when I knew that I needed to find my clear tiny lights.


It's shaping up. I used Allene's tacky glue to adhere it together and put on the cobblestone. 


So for the tower before I put on the cobblestone piece I colored the windows with this marker from faber-castell.  Below the marker you can see the cobblestone and the gold frame windows. The gold is from Tim's gold cardstock. 


I got out my heavy mixed media paper from Tim and sprayed it. This is what the roof shingles are made from. I chose this paper so it wouldn't warp. 


So here is the front of the church. I am mounting it on a vignette box-the 2nd largest one. I painted it with white gesso.  The tiny lights are on.


Here is the back side. I used a hole punch to make a small notch in the back of the church for the wire to go through.  I made a hole in the vignette box using a hand crank drill by Fiskars.  The battery pack is on the underside and the lights fit through the hole.


I painted the vignette box.  Here I'm trying to figure out how I am going to cover the vignette box around the church.


I used grit paste mixed with black paint to make a mortar type thing, and I put it where the tower is on the roof and underneath the roof and the spire.  I applied it using a toothpick since those spaces are so small.


I added a gravel walk way.  The little little rocks are from the dollar tree.


Then I decided that I didn't like the green paint. I repainted the base black. The arrow is pointing to where the wire comes in.

Here's a close up of the gravel walk way.


I sprayed mica spray on these ideology flowers. 


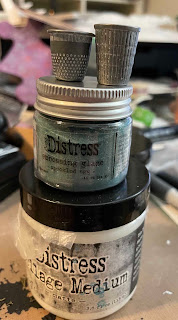
I had to watch another video to see how to glaze metal-LOL This was magical. 


This isn't the best picture but here are the thimbles glazed. I am going to use these for planters :)


Here is the battery pack. I hot glued it to the roof of the vignette box.


And that's it friends. Thank you for stopping by today. Extra thanks if you made it to the end! 


I'm so thankful for this challenge to make this church. It was a lot of fun. I look forward to the next structure in the village collection. :) 

Until next time my friends-keep on makin'!