Wednesday, March 16, 2022

Cobblestone Church

 Hello Friends!

This is sooo exciting--I am a guest designer today for The Funky Junky Boutique Blog challenge. This is the first time I have had a project win overall winner.  I am very honored. :)

The challenge "Rather Blustery Day" is all about using supplies or techniques that you having a hard time using. I chose the Village Collection dies from Tim Holtz.  I have made 2 houses and they are still floating around in my craft space. They are ok-I didn't like how they turned out.. And after I made those two houses-I haven't touched this die set again.  Until now! I thought this is the perfect motivation to use this die set.  So I set out to make a church. I was going to try to make a steeple. deep breath


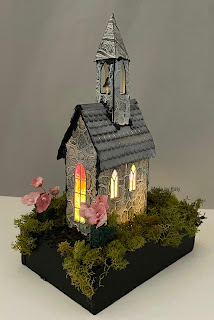
Here is my finished project. I used a lot of products and techniques, and it was super fun.  I know why I don't automatically reach for this set and that's because it is more of an exact type of craft. I'm not great at measuring (I like to eyeball) and I am not always tedious-a little more messy and just see how something turns out kind of person. However when you build a structure there needs to be some precision.  


This church makes my heart so happy! So I am going to post more pictures of it.  Here the lights are dim to show off the tiny lights and "stained glass" windows.

 Also, I am going to post process pictures-those will show what colors I used (for the most part). I take photos to remember what I used-it's a little easier that way. You will see my messy desk LOL just disregard that. Yeah, I'm a messy crafter for sure. LOL :)

So first more pics of the cobblestone church. One goal I had was for the bell to ring. And it does! 


Before I show you my process here are the links to help. They helped me. And I just want to show how I created mine-but these are better tutorials:
Cottage Tutorial by Bibi Cameron -It was cool to see her create the house from start to finish.

I used these embossing folders for the cobblestone and wood (bell tower roof).  As you see-I have the whole collection but didn't use the bricks or foundry on this project.


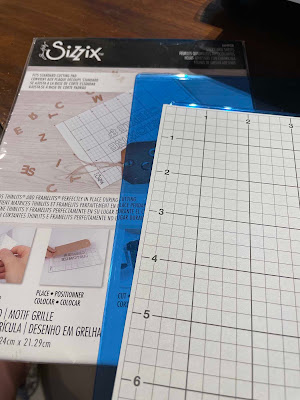
At Christmas I received two set of cutting pads. So one set I saved for the day I would use the sticky grid and cut out houses. Yeah that the day has come! :)


So I thought I measured right-but no I didn't. The windows on each are different. So I cut more and maybe have enough for another house. (that's in a pile marked later lol)


So the base of my house is regular cardstock. I have watched videos and Tim says to build it out of something a bit more stronger. Next time I will. LOL maybe that's why things get a little wonky.


We have windows and doors.


So I think next time everything should be cut out of black cardstock. Originally, I wanted to save time and just do the front and tower out of cobblestone but when I added black distress ink to the corners it wasn't clean. So cobblestones for all the walls! 


Here are the inks and crayon I used for the cobblestones.  The crayon is awesome!


I have mica tiles which I have never used before. I used alcohol inks and cut the pieces down to size. Then I glued them to the windows before sealing up the house.


Love! And that's when I knew that I needed to find my clear tiny lights.


It's shaping up. I used Allene's tacky glue to adhere it together and put on the cobblestone. 


So for the tower before I put on the cobblestone piece I colored the windows with this marker from faber-castell.  Below the marker you can see the cobblestone and the gold frame windows. The gold is from Tim's gold cardstock. 


I got out my heavy mixed media paper from Tim and sprayed it. This is what the roof shingles are made from. I chose this paper so it wouldn't warp. 


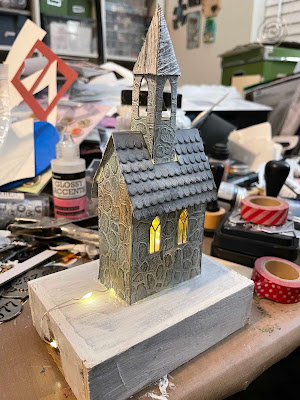
So here is the front of the church. I am mounting it on a vignette box-the 2nd largest one. I painted it with white gesso.  The tiny lights are on.


Here is the back side. I used a hole punch to make a small notch in the back of the church for the wire to go through.  I made a hole in the vignette box using a hand crank drill by Fiskars.  The battery pack is on the underside and the lights fit through the hole.


I painted the vignette box.  Here I'm trying to figure out how I am going to cover the vignette box around the church.


I used grit paste mixed with black paint to make a mortar type thing, and I put it where the tower is on the roof and underneath the roof and the spire.  I applied it using a toothpick since those spaces are so small.


I added a gravel walk way.  The little little rocks are from the dollar tree.


Then I decided that I didn't like the green paint. I repainted the base black. The arrow is pointing to where the wire comes in.

Here's a close up of the gravel walk way.


I sprayed mica spray on these ideology flowers. 


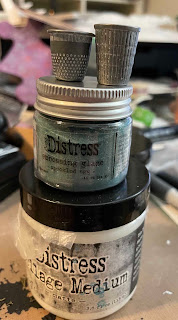
I had to watch another video to see how to glaze metal-LOL This was magical. 


This isn't the best picture but here are the thimbles glazed. I am going to use these for planters :)


Here is the battery pack. I hot glued it to the roof of the vignette box.


And that's it friends. Thank you for stopping by today. Extra thanks if you made it to the end! 


I'm so thankful for this challenge to make this church. It was a lot of fun. I look forward to the next structure in the village collection. :) 

Until next time my friends-keep on makin'! 


Sunday, March 6, 2022

Limited Edition Mixed Media

 Hello Friends!
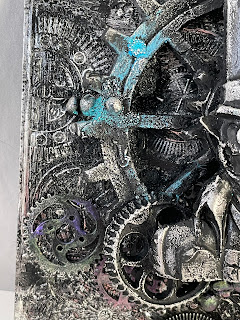
I am so excited to share with you this 6X6 Canvas Magnet that is all sorts of grungy fun!


I love love love mixed media and knew I had to participate in this challenge. Also, I watch Ana from Finnabair do a live stream on her new products and I was totally inspired to make something. She had these canvases that had some clay pieces and they were showcasing her new waxes-but they easy looking to make. So I knew I wanted to make something like that and this evolved from it.

This is what I started with: the 3-d gear folder from Tim Holtz/Sizzix, Ranger foil sheets, and the canvas magnet itself. The canvas magnet is a thin canvas that has a magnetic backing. Look at how shiny that embossed foil is!


Then I painted it black and once dry I scuffed it up with steel wool.


This is a foundry number from Tim Holtz and I edged the outside of it with black paint and wound up wire through the holes. When it gets glued down I actually glue it on top of 2 pieces of craft foam to give it dimension.  Underneath this is a Tim quote chip that I also edge with black paint. It it thick on it's own so I glue it straight to the canvas.


I used metal gears for depth. But I wasn't feeling the copper color so I painted them black.


The main centerpiece with the gears and the gentleman are clay pieces. I used finnabair and stamperia molds. On the  main gear I added some paper stones and microc beads.


Here is the canvas-now it's time for Finnabair waxes! 


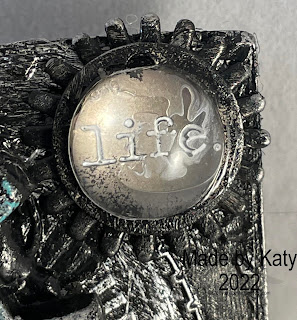
This is so cool to me-lol. It's a gear painted black with a word coin from Tim Holtz (I used distress picket fence to make life pop.) Then I put a Finnabair Melange on top and it made the word life bigger. The glossy accents seemed to have dried weird but that's ok. 


Here are all of the colors of waxes that I used on gears. Old silver is just a favorite-what can I say?  :)


Here's a side view of my project.


Here's a close up of the gears and area "painted" with the Finnabiar wax.


Looks like there's a little patina on the big gear :)


And here is a picture of the finished canvas. It was awesome to make a steam punk project again-it's been a little while ;)

                                               
Thank you for stoppin by! :)


Sunday, February 27, 2022

Art Journal Page

 Hello Friends!

Over at Simon Says Stamp Monday Challenge the challenge was to create an art journal page. I was so happy about this prompt. I have started an art journal and it makes me very happy when I have an opportunity to create in it. 

My book size is 6 by 4. Here's my page:


Here is an up close pic:

I used a lot of Tim Holtz product-crackle paste, a stencil, the lady with villainous potion glaze on her, Media Marks die cuts, clippings stickers, and distress crayons hocus pocus and seedless preserves.  I used the crayons for the background and on the stars.

The background paper is a pack from Amazon that my hubs got for me for Christmas. The star stencil is Dyan from Ranger, and the paint on the pattern on the bottom right is Finnabair Sparks Raven Black (it sparkles and is just fabulous).  Oh and some golden black paint behind the words. The words are how I think I felt yesterday lol.

Thank you for stopping by! Until next time my friends keep creating! :)


Friday, February 18, 2022

Metal Heart Wall Decoration

 Hello Friends!

I am super excited to show you a metal heart that I decorated. At my work there were two metal hearts that were donated and my friend at work said we should have each make one and have a contest. Now my friend has mad skillz and paints like for real paints lol. I just do what I do. So I said ok. And then there was a little stress because I wanted to make an awesome. So here's mine:


I have some pictures of the process. Before I get into that I want to take care of business. I am entering this heart into the Funkie Junkie Boutique Blog: Valentines.

So the heart started like this-plain and shiny.


So the question with a metal heart--do I let the metal shine through? Do I cover it with paper? It didn't seem right to cover it all up. Also, I wasn't sure how things would stick to the metal so I covered it in clear gesso.


The gesso dulled the metal, but the metal was still there.


I used a finnabair stencil and some matte paste.  I love this script.


Then I used a Simon Says Stamp heart stencil with crackle paste.  Oh the crackles!


I have 4 different color pink paints. I was going for an antique look with pink and beiges. But sometimes the piece talks to you and the idea changes. So I used this pink paint sparingly and added water.


Here it is finished. It's also tough not knowing how I was going to cover the center. But I loved how the stenciled parts and paint turned out.


The window is a Etcetra window which means it's laser cut out of a thick material. I painted crackle paint over it. I cut a piece of watercolor paper to size and sprayed it with a distress oxide and one of the Christmas mica sprays.  The shimmer is so pretty!


Here's the middle. I used foam and hot glue to adhere the window. I knew I was going to tuck things under the window so I needed some depth.  Some of the flowers are from Hobby Lobby and some are those little flowers used in weddings. I believe the silhouette of the lady and the frame are Kaisercraft and I painted them with a pink sparks paint form finnabair and a black sparks on the frame. Then I used some finnabair wax to tone it down.

I cut some flowers and greens from Tim Holtz Sizzix Garden Greens and Funky Floral #1. The silver glitter leaves are cut from a table runner I bought at the Dollar (25) Tree in the party section. I had the ideology arrow and word coin. For the coin I used the picket fence crayon to make the word love pop. I used a wire to add the coin to the arrow. I glued flowers and added some micro beads on the bottom. 

There is some lace under the window and then the flowers and greens. The flowers look like little circle but I think they are supposed to be Lantana or something. LOL. And then the rest of the leaves layer up from there.


Here's another picture of the heart. I also added a clay bird sprayed with the mica spray winterberry-but very light. 


So that's my heart-but I know if I was reading this post I would wonder what did the other heart look like?

Here is the my friend's heart:


So she put a song Jack sings-like the sheet music in the background and burned the edges to reveal the metal heart. She painted Jack and Sally (I told you she had mad skillz). And she made the jar of Deadly Night Shade out of clay. So beautiful! 

Thank you for stopping by! 

Saturday, January 22, 2022

Unicorn Birthday Card

 Hello Everybody!

I made a birthday card for my niece. I cut out a unicorn from my Silhouette Cameo and painted it with Anthropology Art purple glittery paint. 


I bought a paper pad of Holographic paper from DCWV from Joann's last month. It's one of those things that I could save forever because the paper is so cool. But I am trying to turn over a new leaf and use up my stuff. 

No more FORO-fear of running out LOL.  So that cool paper is the background and then I used a cuttlebug heart embossing folder for the white panel. I took a silver marker and outlined the white panel before I glued it on. I am really liking that look whether it is gold or silver. I feel like the marker outline helps make it look finished. The sentiment is an old one from Tim Holtz and I used a purple marker to make it pop. This is my favorite birthday sentiment. It's just an easy sentiment to use I guess. :)

I am submitting this into the challenge at Seize the Birthday-#230 Anything goes Topping-embossing. (Heart embossing folder by Cuttlebug.)


Thank you for stopping by! :)


Pick -A Mixed Media Page

Hello Everybody!

Tonight I wanted to play along at the challenge at the Funkie Junkie Boutique Blog-out with the old and in with the new.

I created a page in my mixed media journal. The background paper and the definition pick were part of packs gifted to me by my husband for Christmas. The paper doll is fairly new also, I think from this Christmas's paper dolls by Tim Holtz. I colored her coat with winterberry distress crayon. 


Everything else I have had. The flowers are glitter alcohol paper and alcohol ink and cut from a flower Tim Holtz die cut set. I used pearls that I have had forever in the centers. The bee is a button that I cut the button part off of. I used an old corner rub on. Rustic wilderness oxide ink and a diamond stencil fill in some of the background. 

Here is my journal book. This one is small-but it just feels manageable. I have really enjoyed making little designs-I get to play with my stuff and keep it LOL. ;)


I am also submitting this into the challenge at Arty Divas: January Challenge Anything Goes. 

Thanks for stopping by! Happy New Year! :)
 

Wednesday, December 1, 2021

Rainbow Christmas

 Hello Everybody!

Happy December! Christmas is on it's way and I know I am very excited about that!

This month for the Rainbow Card Challenge we are all about Festive Rainbow! And this is a grand finale if you will.  This is our last challenge at the Rainbow Card Challenge.  It makes my heart sad, too.  Hey friend-"Don't cry because it's over. Smile because it happened" -Dr. Seuss.  So true right!  

We have had some good times and beautiful colors to be inspired by.  Some were challenging colors like Sage and Mauve (for me). Thank you to everyone who has joined our challenges over the years.  Big Hugs friends!

Now here's my card:


Rainbow Christmas is a challenge for me too-LOL. I am so programmed with red and green. But I love how this card came out. The background is funky and there is a lot of Time Holtz. Tim inks and villianous potion distress with his smaller snowflake stencil are in the background.  I used glitter white cardstock for the snowy ground. The buildings are from the silhouette design store. Santa is from Die-Versions.  The sentiment is a sequin.  And the little trees, deer, wreath, and snowman are Sizzix Tim Holtz.

The deer is from tiny snowglobes. The snowman and wreath are from Christmas minis. Now let me tell you about the wreath.  It is actually the inside piece to the wreath you cut out. And the bow is trimmed along the "strings" that hang down and the bow part itself.  And then I used a whole punch to make it into a wreath. 


Make sure you stop by the Rainbow Card Challenge to see all of the beautiful inspiration there and to say good bye. :) 

I am on instagram if you would like to follow me there :) just look for iliketocutandpaste

Until next time my friends have a wonderful holiday!