Sunday, February 14, 2021

Happy Valentine's Day! 3 of 3

 Hello Friends!

This is my last card to share for Valentine's Day. These 14 days have gone by so fast!

For this card I used a Cricut Cuttlebug embossing folder. The stamped image is a Tim Holtz Stamper's Anonymous stamp. But the special thing about it is that the image is foiled. :)


I finally was able to get the liquid minc toner. And so I used a pink foil on it. I love the liquid stuff. I feel like there is so much you can do with it. I am just getting started! :)


Here's a closeup. I edged the pink with a wilted violet distress oxide. 


Thank you so much for stopping by! Happy Valentine's Day! :)


Happy Valentine's Day! 2 of 3

 Hello Friends!

Here is the last frame I made out of the six. It's for my nephew who likes Stem.


I gessoed the wooden frame first. And when I painted it with paint I could see areas that didn't get paint. So I left it like that-you can see the white peaking through. I feel like it adds personality to the frame. I used a Tim Holtz stencil for that computer board looking lines and Finnabair gold wax. Then I added clay stars and used vintage gold Finnabair wax on them. I glued little metal gears to the others side and a clay heart with wax on it. I stamped the atom and the carbons at the top using Close to My Heart stamps and Ranger Archival ink. Those stamps go with a chemistry stamp set-so cute! I got it a few years ago. 

Thank you for stopping by! I hope your day is awesome! :)


Happy Valentine's Day! 1 of 3

 Hello Friends! 

Happy Valentine's Day! Welcome to the last day of my series--My 14 Days of Valentine's Craftiness.  I'm so excited. I have a few projects but I am going to cover them over a few posts. So this is the first one. :)

I saw this file in the Silhouette Design Store and knew it was a must have. This is a Lori Whitlock cut file and she also has a you tube video describing how to put one together (but not this exact one). These are called impossible cards.

Here he is in front of the enveloped that also comes with the cut file. For me there is a little learning curve. As of right now he does not fit nicely into his envelope-and I don't know if I should have resized something-but no matter- I love how this guy turned out! And this card is for my husband so if it doesn't fit nicely-it's ok. :)


Here is Mr. Viking without the envelope backdrop. LOL


Here is a side view-because you cut out two pink tickets. The first ticket goes behind the print and cut ticket. And the second goes in the back to look nice. And may write a small enough message. .


This is used using a Silhouette Cameo Machine so I am entering this into the challenge at:

Cut It Up: #219 All You Need is Love: Use a die cut-everything is cut out except 3 little glittery stickers on the front.

Thank you for stopping by! Lots of love :)


Saturday, February 13, 2021

Valentine Frames

 Hello Everybody!

Welcome to Day 13 of my 14 Days of Valentine's Day Craftiness.  I am excited to show you the frames I decorated in a pack that I bought from Hobby Lobby.  I showed one yesterday and I am going to show you 4 today. So I am leaving 1 frame for tomorrow. :)

All of the frames started like this:


I either gessoed it or


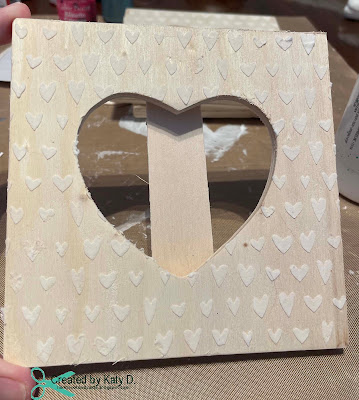
I put light modeling paste through this simon says stamp stencil.  


From there I painted and decorated. I First painted this frame pink.


Then I added a little white paint and sprayed water on the frame. Then I added some crimson Ken Oliver watercolor powder.  And then I added some purple.


Here you can see a close up. So fun! I also hot glued some paper studio flowers and this cool snazzy heart both from Hobby Lobby. And the butterfly I had in my stash :)


The second frame was just gessoed. And I didn't have any purple craft paint so I borrowed some fancy acrylic paint from my husband how does fine art painting from time to time. Swoon! This color is so pretty!  I was able to create an ombre effect. I had this love charm and hot glued the back of it so it wouldn't come off and get lost. I also had these paper flowers from Kaiser and they matched the ombre perfectly.


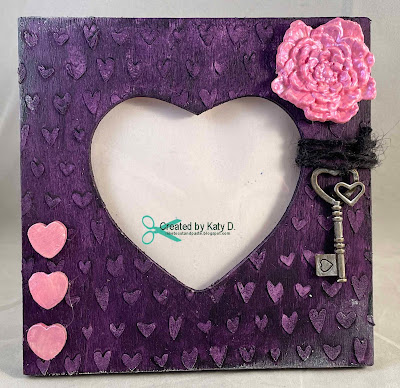
This frame recieved light modeling paste hearts. I painted with the same purple paint as above but just did one color. However if you notice the top left and bottom right corners are a bit white that is because I used a white matte Finnabair wax on it to give a little highlight for dimension. The flower is a clay flower I painted with Finnabair Opal magic Pink paint so sometimes it will have blue colors in the light.  Then I used twine for a metal key.  I also painted the 3 wooden hearts with the same opal paint.


I painted this frame red after the light modeling paste dried. I hot glued the Paper Studio paper flowers to the corner. And then I balanced it with another jazzy gem heart from Hobby Lobby.


These were so fun to share with you! I hope you enjoyed them also. Thank you for stopping by and I hope you come back tomorrow to see the last frame and the rest of the Valentine's Day projects. :)


Friday, February 12, 2021

Steampunk Valentine Frame

 Hello Friends!

Tonight I am sharing with you one of 6 frames I decorated. This is the 12th day of my 14 Days of Valentine's Craftiness. And there are still so many fun things left to share! But for now check out this cool frame!

I am submitting this frame into the following challenges: 

The Male Room: #147 Steampunk 

SanDee & Amelie's Steampunk Challenge: Steampunk Jan/Feb Challenge


Here's how I made it. These wood frames came from Hobby Lobby. And I will be honest-I looked all over Pinterest for inspiration and there was none. LOL. Maybe I looked it up wrong. So I started to gesso this frame and paint it pink.


Here it is gesso. Then I used some pink craft paint and what I saw was a bit of natural distress. If you look at the first picture again you can see white show through. That's the gesso. I could have painted over it-but I liked the distress of. And this was good because it was like the personality of the frame was starting.


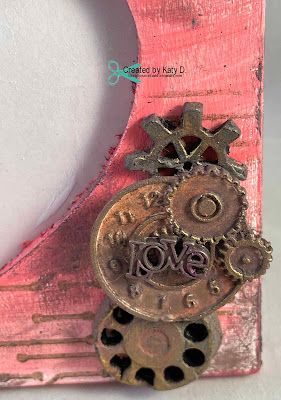
I have pre-made clay pieces that I make when I'm watching tv. And it's great for times like this. I brought them out and sorted through them so see what would fit. So this cluster here is all prima moulds. I also painted them with black gesso and then used various finnabair waxes. This is definitely one of my favorite parts. I love the waxes!  I also took some of the matte wax and went along the edge of the frame. You can see it here behind the gears. Also, I hot glued this gears on.


This bottom cluster is also clay gears except the bottom is Prima and the top 2 are from Mod Podge. And the LOVE is a metal charm. 


This was made using a Tim Holtz stencil and vintage gold finnabair wax. I love this stencil. And you can see the pink paint and the white showing through and the texture it creates. and then the wax applied on top of that. So cool! :)


I didn't keep this frame-I mailed it to a family member. I put a picture of all of us together the last time we were together which has been a while. I made the pic black and white and it turned out really nice. :)

Thank you for stopping by!  Hugs!


Thursday, February 11, 2021

Gnome Card

 Hello Friends! 

It's Day 11 of my 14 Day of Valentine's Craftiness.  I feel like I can't stop making Valentine's. It really has been so fun, and it's hard to believe Valentine's Day is almost here!

So for today-it is an easy card but super cute!


I embossed the background with a cricut cuttlebug embossing folder. The gnome and the sentiment are both print and cuts from the Silhouette Design Store but they are from different sets. The gnome is from a Valentine gnome set and the sentiment is from a Valentine elephant set.  I love print and cut. You can make them stickers or die cuts-which is what I like so I can move it around and make sure where I want it to go. 

Thank you for stopping by! 


Wednesday, February 10, 2021

Heart Swing Card Number 4

 Hello Friends!

Thank you for stopping by today. I had a set of 5 of these heart swing cards and this is the 4th one. 

Here is the card when it is collapsed. I used flowers and the envelope from K & Company. And the two ladies are a paper doll from Tim Holtz.


Here is the one side of the card standing up.


Then as it opens you see the sentiment.


Here is the card opened. The butterfly was in my stash and is cool because it changes colors in the light. And the hearts were cut outs from a few moons ago-so yay using up stash! The background paper is from Prima which I have also had in my stash for awhile. :)


Thank you for stopping by! 


Tuesday, February 9, 2021

Window of Hearts Card

 Hello Friends!

Today is the 9th day I have been posting Valentine cards and crafts. For me this is super exciting! I have been all about Valentine's, and I have been mailing stuff out hoping to bring a smile to a loved one. :)

Today is a card that I love how it turned out. My husband gave me this Tim Holtz window for Christmas. And as I started of thinking about Valentines I thought how cute if hearts were hanging in the window. 

Well my friends-that window is smaller than the one in my head LOL So I used the inside of the hearts to stick on the window.


The background is candied apple distress oxide through a crafters workshop stencil. Since oxide is sort of like versamark I applied stampin up iridescent ice embossing powder and heated it. Beautiful! so it added glitter and shine to the bricks. My background was totally inspired by a video I saw on Instagram by erica_cacacraft.  

The window and the little bitty flowers and leaves are Tim Holtz dies. I used some distress oxides for the flowers-wilted violet and worn lipstick. And then I used nuovo drops for the middles.

The hearts are from my silhouette machine.


Here is a close up of the bricks.  😍😍😍

I am entering this card into the following challenges:

the Library Challenge: 76 Jar of Hearts. I don't have a jar but a window which is made out of glass ;) 

Try It on Tuesday: Falling in Love (I'm seriously in love with this window :) )

Thank you for stopping by! :)


Monday, February 8, 2021

Owl Valentine

 Hello Friends!

Welcome to Day 8 of my 14 Days of Valentine Craftiness. :)

Here is a Valentine card made from cute owl stamps from Aall & Create. My husband gave me these stamp at Christmas and I thought how cute would they be for Valentine's! :)


I colored the owls with prismacolor markers. And then I fussy cut them out.  I also have this new circle masking stencil from Taylored Expressions. I taped down my paper, the circle masking stencil and then laid a paige evans heart stencil over that. I just wanted to see if it would look good. I used spun sugar distress ink. And ta da! Not too bad!

The heart with the arrow is a Silhouette stamp and cut. And the sentiment is a sticker from Simple Stories. 


Thank you so much for stopping by! :)


Sunday, February 7, 2021

Valentine Birdhouse

 Hello Friends!

Welcome back to day 7 of my 14 Days of Valentine's Craftiness.  Today I have a cute little birdhouse to show you :)


Time for the 360 tour :)


Here's the back.


And the other side.


Back to the cute front again. 


The details: I used light modeling paste for the roof.  I used Simon Says Stamps heart stencil on the roof. I paint with some crafts paints. The silver heart stickers and the actual bird house are from Hobby Lobby. The gem hearts were in my stash. The little bird was in my stash also. It's like a tiny miniature figure bird. LOL. I had hot glue showing so I folded a piece of scrapbook paper to make like a rest for the bird. And the pink is a puff paint type thing from Michaels a few years ago.


Above is a process step. After the light modeling paste I gessoed the whole thing so the paint would be nice and bright. 

And below is the original state of the birdhouse. :)  It's a very small birdhouse so it will make a nice decoration on my shelf :)


I am entering this into the Simon Says Monday Challenge: Love/Hearts.

Thank you so much for stopping by! :)


Saturday, February 6, 2021

Llama Fun Valentine Card

 Hello Friends!

It's Day 6 of my 14 Days of Valentine's Craftiness. So this is a Valentine Day card but different than the last 3.  It's just a regular shaped one ;)


This cute little llama and saying are by Lettering Delights in the Silhouette Store. The heart embossing folder is Crafters Companion Sara Davies. And the little shiny hearts are from Sticko-EK Success.  

I am entering this Valentine into the following challenges:


Thank you for stopping by today! 


Friday, February 5, 2021

One More Heart Swing Card

 Hi Friends! 

I have one more Heart Swing Card for right now. There were 5 altogether but I have other things I have made and want to change it up a little for tomorrow :)  But more about today :)

If you would like to see more Heart Swing Cards go here and here.

So for swing heart card number 3 I used Crate paper but different than the first two. And the heart paper here was in my stash, and I don't know the brand on it. The flowers and the vintage girl are K & Company. I put some mulberry paper behind the girl to soften the background. 


And here is the card are you open it-the other side of the heart. The little hearts in the spine of the card are some that I have had for awhile. And I made the other little hearts. The sentiment is a Tim Holtz sentiment.


Here's the card standing. It's pretty cool how there are two sides to the heart.


And here's the card standing in display mode LOL. You could face the card either way. :)


Thank you for stopping by! I need to work on getting these Valentine's in the mail! :)


Thursday, February 4, 2021

Heart Swing Card (2)

 Hello Friends!

Today I am showing you a second heart swing card that I made (there's 5 altogether). The story about the heart swing cards is here if you would like to know a little more. :)  Thank you stopping by today! This is Day 4 of my 14 Days of Valentine's Craftiness :)


For this card I used some old but very well loved Crate scrapbook paper for the background. I wrapped twine in the first part. The flower was in my stash-and is an acetate flower that I had made. I stamped it and then painted it with glue and glitter. Then I took a paper heart and put it for the center of the heart and added glitter glue.  The forever heart was a chipboard piece also in my stash. :)  Yay! Using up some pieces! LOL :)


Here is the card folded like it would be in the envelope. The elephant is from The Silhouette Design Store and is a print and cut. So cute!  And the butterfly was in a bag of sparkly kind of material butterflies that were given to me.


Here's a picture of starting to open this card. 


Here is the other side of the heart. This is a Tim Holtz sentiment and some hearts from a die cut. And the flowers are from K & Company.


Here is the card extended out. 


I am so excited to give these out. :)  Thank you for stopping by!