Thursday, November 29, 2012

Epcot Layout

Hello Everybody!

Today I am linking a scrapbook page up to Another Freaking Scrapbook Challenge.  Here is the sketch:


Here is my interpretation of the sketch.  I don't know about anybody else-but I love how it turned out.  I used rub-ons (Art Warehouse), stamps (Sparkle N Sprinkle), and some metal arrows from Tim Holtz and Spare Parts (Hobby Lobby).  The gears are embossed with a Cuttlebug embossing folder.  The post card and background paper are from DCWV.  I even got to use a key! :)  The title Epcot is a laser die cut from a company called Laserline.  I had bought it at my LSS.  Oh and I used Tim Holtz chit chat words in the middle.


I love this group picture of us.  We had a lot of fun.

Thanks for stopping by!  Until next time my friends...have a good night :)

Wednesday, November 28, 2012

Happy Birthday Card

Hello Everybody!

This is my second post of the day-that means I am getting some things made!  Yah!

So this card is a Happy Birthday Card.  I don't have many already made and I have a lot of birthdays coming up!  (And one that has past but we will talk about that later!) ;)

This card is using the Sparkle N Sprinkle stamp set #392 Dani's Umbrella.  I embossed each panel with a different design.  I used Copic markers to color this flower girl and used Star Dust Stickles to make the spots on her dress glittery.  The twine is from My Mind's Eye.

The sentiment is from this stamp set also.  I stamped, colored, and cut it out.  Then I inked it with a pink cat's eye and punched a hole.  I tied it into the bow of the twine.

Scroll on down to see the sketch and challenges that I'm participating in!


Here are the challenges that I am linking this card too:

Sparkle N Sprinkle November Sketch Challenge SNSSC13:


Simon Says Stamp Challenge: Anything Goes!


All Beautiful Cards (ABC) Challenge 6: Anything Goes!

Thank you for stopping by!  Until next time my friends...Have a glittery happy day! :)

For Fun Glittery Projects

Hello Everybody!

I am sooooo excited to tell you the news...wait for it....I am on the Design Team for For Fun Challenges.  This is one of my favorite places for challenges and now I get to be apart of the inspiration!

So the first challenge is for Christmas Glittery and Shiny.  Well when I made my card, my mind was still on Thanksgiving-LOL!  So here is my card.  But scroll down because I did get my act together and made some glittery Christmas tags!

The line is made from Mica chips.  I have been wanting to use them again and put them on red line tape.  The circle is from a Spellbinders die and I used distress inks to color it.  The stamp is from Fiskars.  The paper is from Recollections.


Now-Here are my tags.  I cut them on the Cricut using the George cartridge.  I outlined each tag with Stickles glitter glue.  The tree on this card is from a Christmas cartridge which I don't have.  And the star is a punch.  Also, I handwrote the To and From.


I stamped the reindeer on here with a stamp I bought at Michaels last year.  I colored him with Copics.


For these two tags I embossed them with a Tim Holtz snow flake folder.  I apologize for the shadows-my camera has a little scratch.  Hopefuly Santa will bring me a new one for Christmas ;)                                                   


Thank you for stopping by!  I think I'm all straighten out now-Haha!  I will have the right theme for next week.  :)

I can't wait to see what glittery creations you will make!  Until next time my friends-remember it's For Fun! :)

Tuesday, November 27, 2012

Tidbit Tuesday-A Recipe

Hello Everybody!

I hope that all of the US folks had a great Thanksgiving.  We did!  Spent time with our family and ate way too much! :)

Over at Let's Scrap they have a weekly sketch-but they also have groups that have various challenges.  One of the groups is called Let's Scrap Our Stash.  If you join Let's Scrap you can be in this group.  So a wonderful and creative lady named Cathy creates the recipes for the challenges.

Here are 2 layouts I did for challenges #22 and #23.  (I did #21 earlier.)  The first recipe and where you can find them in this layout are as follows:


2 pattern papers-the background and the brown strip with the black lines at the top
4 color cardstock-black, navy blue strip, red strip and apple, green-the leaf in the apple (made on the cricut)
10 brads-in the black cardstock
10 die cuts/stickers-the apple is 1 die cut and it's inked.  The title in the apple and your first day are stickers.  The School Days on pg2 is a sticker.  All of the letters and numbers at the bottom are stickers.


Here is the 2nd challenge #22.  I know I inverted them but that's how I have them organized in my head.  LOL!  This one was a bit more challenging.  I needed to use flowers are buttons.  I realized that I don't seem to use that much stuff on my pages.  I also seem to do more themed pages and since I have a little guy...well I don't use flowers as much.  But I have lots of flowers so go figure!

So reaching deep deep into the archives I found some pictures of my sister and I at the Botanical Garden in Atlanta.  This was fun to scrap, and I forgot how much fun flowers are!  :)


Here's the recipe for this layout:

2 pattern papers-I used 3 from Making Memories Chloe's Closet.  All 3 are on the first page and then the green pattern goes onto the 2nd page.
4 color cardstock: The background (or base paper), the blue polka dot is from Bazzill and came that way, yellow matting photos on page 1, and the journaling square on the 2nd page
1 pc chipboard-yellow swirl on pg 1-it's from Bo Bunny
4 flowers-2 on each page-3 are paper and 1 is a bubble flower sticker
3 brads-the centers of the paper flowers
9 buttons-I used 10 on the green strip on pg 2
2 ribbons-one is tied on the chipboard pg 1 and the second is in the middle of the green strip pg 2-create, enjoy, laugh is a canvas ribbon
bling-2 little blings on the journal square


So today's tidbit is to use a recipe.  You can make one up and come up with random numbers and items, or join a challenge.  I like these challenges because I realized what I wasn't adding to my pages.  On the 2nd layout I put a chipboard piece (the yellow swirl) which I wouldn't have done before.  Hopefully, I will look at my supplies a little differently.

Thanks for stopping by!  Until next time my friends-use up those brads-because it's always fun to go buy some more! ;)

Tuesday, November 20, 2012

Tidbit Tuesday-A little hand and some old papers go a long way!

Hello Everybody!

How's that for a title?  I've been  a little busy this past couple of weeks getting things ready for my little's one's birthday party that was Saturday.  It was a success but talk about wearing me out!  Then I added Thanksgiving cards to my list-and succeeded!  Let me take care of business and then I can show you what I made!

I am submitting this card into the following challenges:

I am also linking this up to Pin and Tack: Spark Your Creativity-Anything Goes! Thank you Corrinne for telling me about this challenge! :)

Clear It Out Challenge:  Ugly Sweater (use up never used papers) Plus what a great name for a challenge!

For Fun Challenges:  Thankful-I'm thankful for the little hand I borrowed to make these cards :)

Here's my card.  I painted my son's hand multiple times.  I made different variations, but I was in spaz mode trying to get them made and sent out that I realized it too late.  I took only one picture.


Do any of ya'll still have these paper pads from Provo Craft?  I have 2 for Fall, one for Christmas, and made 2 or 3 others.  They are like circa 2000.  LOL.  This is a country look that I am not really into anymore!  But they work great for Thanksgiving!  :)  I would use a full sheet to cut backgrounds and then used the scraps on other cards because I could only make 3 (I think) backgrounds from each sheet.  They are 8X11 (or so) and my cards are 5.5 inches by 4 inches.  It reduced scraps which is nice.


 Here is my stack of Thanksgiving hands.  My son would only make 12 so there were a few people on my list I wasn't able to send a card too.  :(  I hope they won't be mad.

I painted each finger and his hand and thumb with acrylic paint (over and over again).  Then I put googly eyes on the turkeys.  This costs a little extra at the post office.  But goggly eyes are so fun! :)


Thank you for stopping by!  Until next time my friends...it's time to do something with that ugly paper!

Sunday, November 18, 2012

Wishful

Hello Everybody!

Today I am sharing a Christmas card I made for the following challenges.  Each challenge inspired an element on this card.

Simon Says Stamp and Show: Stamping Without Ink-I used silver embossing powder on the snowflake stamp


Unscripted Sketches: Sketch 185


CAS-ual Fridays-Winter project featuring blue-CFC79


Here's my card.  I just bought some Martha Stewart snowflake stamps.  This is one of them (yay! I am already using them!)  I embossed it with silver embossing powder.  The white square behind it is where I took the Versamark pad and made the square and then used white embossing powder behind it.  Wishful is from the Tim Holtz word stickers.


Here's a closeup.

Thank you for stopping by!  Until next time my friends...It's beginning to look a lot like Christmas! :)

Tuesday, November 13, 2012

A Warm Christmas Card

Hello Everybody!

I made this card for the challenge at For Fun Challenges.  The challenge is to make a card for Christmas and it can be cold or warm-like where you live during the Holidays.  I live in Florida so it's generally warm for Christmas.  The first year it takes some getting used to but now it would be weird if it were cold.  We still decorate with snowflakes and give scarves for Christmas for the week in January or February when it will be cold enough to wear them for a week or so.  LOL! :)


The snowflake paper is from DCWV.  The silver glittery paper I bought from Joanne's.  The flamingo is a stamp from Close to My Heart.  The Christmas is a sticker from Making Memories.  The Greetings...is a stamp from Custer's Last Stamp.  I colored the flamingo using Copics.

I am sending this card to the Card Drive that Vera Yates is doing.  You can find out more details here.  She and Jennifer McGuire are collecting Christmas cards to send to seniors.  I think it's fantastic and hope to make a couple of more before time runs out! :)

Thanks for stopping by!  Until next time my friends...have a good night! :)

Monday, November 12, 2012

Technique Tuesday-Christmas Tags!

Hello Everybody!

Today's tidbit is using the current technique going on at Technique Tuesday.  To see the tutorial click here.  My project last week for the DT was a card with balloons.

But after seeing the other DT's projects, I couldn't help but to try this technique again-in the form of Christmas tags.  Also, there is a challenge going on at Moxie Fab for Alphabet Stickers.  There is still time to play and you can click here for the details.

So I made Christmas tags using the George cartridge on the Cricut.  My 3-D shapes also came from my Cricut.  The secret to this is to make sure your punched or cut out shape is symmetrical.  If it isn't, there can be problems.


Here is my first tag.  The snowflake came from the Travel cartridge.  The stickers are from Stickabilities.  Before I put the letters on, I sprayed the tag and snow flake with silver Perfect Pearls Mist.  (I love this stuff!)  The snowflake was the hardest element to make because it was exactly symmetrical the way I folded it.  The folded piece was skinny so it isn't perfect but I made it work.


The tag background is sprayed with brown mist from Dylusionals.  The Christmas tree is from the Cricut cartridge Celebrate with a Flourish.  (I just did one of the layers and cut off the star and made my own.)  I used stickles on the star which was punched out ironically.  ;) The alpha stickers are from Doodlebug.


I will just say I love this wreath.  The white dots are from Enamel Accents.  It's like a white puff paint.  Then I stamped a Stampendous present stamp as a watermark on the bottom of the tag.  The letters are from Making Memories.

Thank you for stopping by!  There's still time to play at Moxie Fab and Technique Tuesday.  The 3-D element is like magic!  Until next time my friends...it's time to get the Cricut warmed up! :)

July 4th


Hello Everybody!

I wanted to share a scrapbook page I did a week or so ago.  The challenge was to use black cardstock as the base, a color scheme, and black and white photos.  So here is my page.  The challenge is over but I used a sketch from Let's Scrap.

The papers are from Doodlebug.  Thickers letters and Mambi stars decorate my title.  And the flag I think is a Mambi sticker.  I also used some Recollections glitter star brads and $1 stickers from Michael's (toward the right middle).  The fun is some old Heidi Swapp credit card letters.


Thanks for stopping by!  Until next time my friends have a good day! :)

Saturday, November 10, 2012

Merci!

Hello Everybody!

I am so excited to show you my card!  I made the background for it and I used mica for the first time!  Ok so let's take care of business first and then I can show you my card! :)

I am submitting this card to the following challenges:

Simon Says Stamp and Show: Inspiration Francaise-Eiffel Tower stamp from Hero Arts

Our Creative Corner: Make Your Own Background-inks and stamps

Moxie Fab World: Alphabet Stickers Challenge-Greeting on the card

So here's my card.  I bought a new little easel to hold my cards.  Yay! :)  I guess I will figure out if I will crop it out but for now there it is.  I also bought in that same little shopping trip some mica bits.  They are from Stampendous and have 5 different colors.  I have seen mica forever-but now I have some.  So I applied glue to the edges of the black cardstock to get it to stick.  I did this after I gold embossed the Eiffel Tower.  Then I sprayed gold Pearls Mist onto it.


Here is my background.  I love this background-so it must be one of the prettiest ones I have made.  LOL!  I used spiced marmalade and bronze distress stain and mustard seed and rusty hinge distress ink.  I applied them to my mat and spritzed a little water.  The result is just awesome!  Then I stamped the script on top.  But that wasn't enough.  So after this picture I went back and added swirls and polka dots using stamps by Stephanie Barnard (I got them a loooong time ago at CKU).


Here's a close up of my card.  The title is made from Making Memories sticker letters.


Thank you for stopping by!  Until next time my friends...Bonsoir!

Friday, November 9, 2012

Me and You at Disney World

Hello Everybody!

*So exciting-this layout was in the Top 3 at Shopping Our Stash.  You can see it here! :)

Happy Friday!  I love Disney!  Everytime I go it really is like magic!  Leave your worries behind!

A few days ago I went to Joanne's and they had Disney paper on sale!  So I had to get it!  This is what caught my eye:


I have seen this in Paper Wishes.  There are brads and 2 Brad Buddies that come with these papers.  Also, there are some die cuts inside.  I am an instant gratification person though.  I like stuff now-which is why just look at it in the magazine.  But when I saw it-I had to get my hot little hands on it! ;)  This paper kit (that's what I will call it) is from Hot off the Press.

So here is my first layout with my new papers.  I used the sketch 11-7-12 at Let's Scrap.  I am also entering this into the Shopping Our Stash Challenge #76: Best Deal Ever or I Had to Buy It, It was on Sale!  I bought some chipboard pieces and Mickey Mouse stamps (eek! can't wait to use those) along with this Disney paper kit. :)


Thanks for stopping by!  Until next time my friends...have a Magical day whether you are at Disney or not :)

Tuesday, November 6, 2012

Tidbit Tuesday-It's Technique Tuesday!

Good Morning Everybody!

It's my favorite Tuesday of the month--the Tuesday that starts off the new technique at Technique Tuesday!  This month's challenge is 3-D Punched Elements.  Mynnette has made a fantastic tutorial that you can see here.

Here is my card:


My niece just had a birthday and I am going to be mailing her a little box soon (everything I do seems to be late lately!).  Balloons just came to mind!  I made these on the Cricut because my 2 circle punches were too big or too small.  :)

Check out what the ladies have created for this challenge.  Their cards are awesome!  Hope you will join us!  Until next time my friends....Go Vote! Every Vote Counts! :)

Friday, November 2, 2012

Mirror Mirror-Who is the Steampunkish of All?

Hello Everybody!

I know I am not the most Steampunkish of all but it doesn't make me love it any less!  Gears, clocks, keys, oh my!  This is one of my first all out projects using a Steampunk theme.  So let me show you, and I will tell you more about it as you scroll down! :)

I am entering this piece into the following challenges:

LESSology: Challenge: #19 Mirror, Mirror on the Wall--upcycled mirror

Simon Says Stamp and Show: Just Add Pearl--Perfect Pearl Mist and Pearls on the Butterfiles

So here is my mirror.  Eek!  I am so happy at how it turned out.  The mirror itself is 14 inches long plus the frame around it.  I upcycled the mirror.  I bought it at Goodwill for $4-Score!! :)  There is a mix of pictures taken from inside and outside.  Experiments with lighting-what can I say?  :)


Here's another picture of the mirror. :)


Here are the gears that go up both sides of the mirror.  They are from Tim Holtz die cut.  I painted them with gold dabber and then rubbed black stamp ink on them.  Some have a little bronze distress stain.


Here is the right side.  That pocket watch is Jolee's.  Rubons are from 7 Gypsies and well as the hooks you will see.  There's a lot of Tim Holtz Ideaology on here also. :)


I put a few butterflies to bring in a feminine element.  For the butterflies I used music paper cardstock, Martha Stewart punch, Want2Scrap pearls, distress inks, Perfect Pearls mixed with water.


The hooks are from 7 Gypsies, the gear is from Bead Landing (the ones my husband bought me in my last post), and Tim Holtz philosophy :)


Here are more of those cool gears mixed in with Ideaology and a butterfly.


Here is the top of the mirror.  The 3 men are one of Tim Holtz's stamp.  I used black embossing powder than spray them with blue Dylusions spray.  Then I sprayed Perfect Pearls Mist gold on them for some shimmer.  They were very blue-so I added some bronze distress stain and some Perfect Pearls powder and water (gold and silver).  Then I inked the edges so they would stand out.  I used 3 pop dot squares stacked on top of each other (2 times) to adhere them to the mirror.  

I air balloon is from Hampton Art.  I stamped it on dictionary paper then mounted it on black cardstock.  I sprayed silver Perfect Pearls Mist on it.  The gears in the corner are rub-ons from 7 Gypsies.


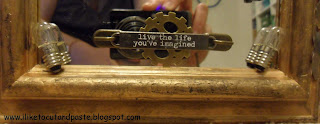
Here is the bottom of the frame.  The little light bulbs are actually burned out light bulbs from the microwave. The first time my husband changed the bulb, I said can I have that?  It's really cute!  It looks like he had to change it again, because when I found them there were 2! :)  So they are recycled!


Here is the original mirror-taped off-ready for a new look.


Here are my original supplies.


Here is the mirror painted white.  I did a second layer but you could still see the old color come through.  At first I wanted the mirror to be shabby chic and girly.  But I couldn't get an even white all the way around and I am a bit impatient.  I saw a Steampunk blog hop and I had my gears so I changed the theme of my mirror.  Then I painted it with the Gold Dabber by Ranger/Tim Holtz.  I took the top off and painted it with a paintbrush.  

So here is another picture of my mirror (and me!).  Thank you for stopping by!  Until next time my friends...like what you see! :)